
We have already introduced Cilium to you in a previous TechUp. It’s an eBPF-based networking, observability and security tool that can be used in all cloud-native environments such as, for example, Kubernetes. 🐝
Today, I want to take a closer look at a part of Cilium, namely Tetragon.
Tetragon is an agent which can run in any Linux environment. It doesn’t matter if it’s a Kubernetes environment or not. Tetragon uses eBPF to read data and make it available in various formats. We will later see in detail what kind of data we’re talking about. Tetragon is a Cilium project, but this doesn’t mean that it necessarily needs Cilium. We can install Tetragon as a standalone without any problems and will do so in this TechUp. But first, let me give you some facts about Tetragon. The first commit on Github was made as recently as May 11, 2022. But this doesn’t reflect the real age of the project. Tetragon has been included in Cilium Enterprise for years. But now, parts of the project have been open-sourced to the community. Tetragon is written in C and Golang and has 35 contributors as of today.
How Tetragon works in the background
Tetragon is, as mentioned above, an eBPF-based tool that takes care of security observability and runtime enforcement. Security observability means that malicious activities are detected in real-time and reporting takes place as soon as an event occurs. In fact, it goes so far as that these malicious events can be stopped before they can do any damage. But how exactly does this work? For that, let’s take a look at Tetragon’s official diagram.

Figure: Source: https://isovalent.com/blog/post/2022-05-16-tetragon (10/7/2022)
As we can see, various activities such as process executions, syscall activities, file access, namespace escapes, network activities and many other activities are monitored and logged by Tetragon using eBPF. At first glance, that sounds like a lot of overhead, right? Tetragon makes use of the so-called SmartCollector. It filters and aggregates the necessary information in the kernel and then sends it to the Tetragon agent running in user space. All this collected data is only useful if you’re able to use it. The Tetragon client provides integrations to Prometheus, Grafana, fluentd and other systems. Furthermore, you can export the data via JSON to process it. Tetragon can’t only monitor low-level kernel activities, but also function calls, code executions or the use of vulnerable libraries in the application. To start this monitoring, no changes in the code are necessary, since all data is collected directly in the kernel. Pretty cool, right?
When used in a Kubernetes environment, Tetragon is Kubernetes-aware, which means it understands all Kubernetes resources such as namespaces, pods and so on. Thus, event detection can be configured on a granular level with respect to individual workloads.
If you want to know more about kernel and userspace, I recommend Tom’s TechUp about Cilium. He explains the differences very precisely.
Now let’s take a look at a few examples!
Real-Time Runtime Enforcement
Let’s look at how we can not only detect and report events, but also directly prevent them using Tetragon. For this purpose, Tetragon offers us the already mentioned Runtime Enforcement. Again, we’ll take a look at the following diagram to help us understand this.
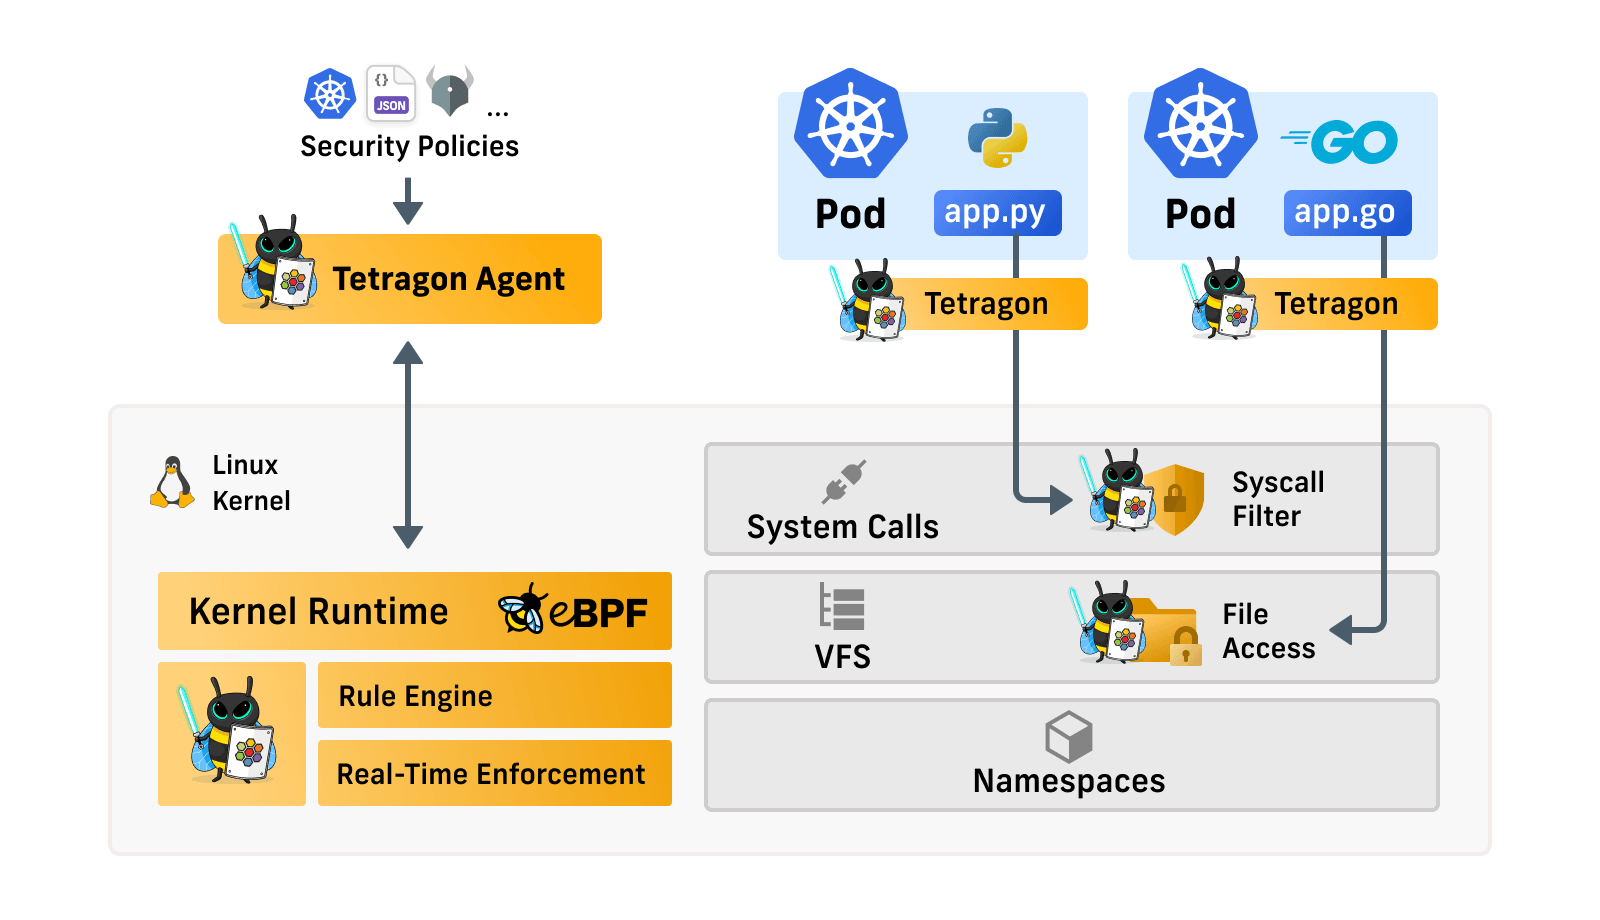
Figure: Source: https://isovalent.com/blog/post/2022-05-16-tetragon (10/7/2022)
As we can see, there’s a rule engine within the kernel, in which we can store policies, for example for which file the write permissions should be restricted. The eBPF kernel runtime then ensures that these guidelines are followed. If an application violates this policy, the action can immediately be stopped or the application can be terminated.
Here we see what such a rule that prevents a container from being used with root privileges could look like.
|
|
How to apply a policy
The Tetragon Agent provides us with several ways to inject these security policies. In the example above we see a Kubernetes CRD policy. Furthermore, JSON policies or policies created by Open Policy Agent (OPA) would also be possible as inputs. But what exactly happens when we create such a rule?
The best way to see this is by means of a small example. First we install Tetragon. Instructions can be found on the Github page. On my Macbook with the M1 Max ARM64 processor I unfortunately couldn’t get the container to work using kind. I therefore had to switch to the GCP variant.
Once Tetragon is up and running, let’s install the demo application from Cilium.
kubectl create -f https://raw.githubusercontent.com/cilium/cilium/v1.11/examples/minikube/http-sw-app.yaml
This installs the following 4 pods for us:
|
|
Checking logs with Tetragon
Let’s now take a look at what such an event might look like. For this, we open a terminal window and check the Tetragon logs.
kubectl logs -n kube-system -l app.kubernetes.io/name=tetragon -c export-stdout -f
In a second window we open a shell in a pod and simply check who’s the current user using whoami.
|
|
As we can see, we get a JSON object as an event, which contains various data. The Tetragon CLI provides a tool called (observe) with which we could extract only the essential details.
The nicely formatted JSON from the bash looks like this:
|
|
The most important information that observe would also return is:
|
|
So we see that a process /bin/bash has been started in the namespace default in the pod xwing. Via this bash, we now want to test if it’s possible to edit a file.
|
|
Let’s create a new user “test” and save the file. Now we want to test whether the changes were actually applied.
|
|
Of course, we want to prevent a change by a foreign user on our system at all costs. So let’s now look at how we can do that with Tetragon.
Creating a tracing policy
With this policy we want to prevent that someone can create a file in the folder /tmp/forbidden. For this, we create a policy with the following content.
|
|
Basically what happens here is the following. As soon as an __x64_sys_write syscall is executed, it checks if it’s a write to a file in the /tmp/forbidden folder. If this is the case, the sigkill event must be executed, which in our case means that the write process is terminated immediately.
Testing the tracing policy
To prove that our policy works, we first create a file, which we’ll edit later.
|
|
Now, we try to edit the file, but first without the specified policy. We simply write “File changed” in the file and save and close the file.
|
|
We can edit the file and see our changes when we open it again. Now let’s try the same thing with the policy shown above. We run the following command on our host system to do this.
|
|
Then we open a bash shell in the container again and try to edit our file in the /tmp folder. We just write something below “File changed” and try to save and close the file again.
|
|
As we can see, the writing process is terminated immediately. Our policy therefore fulfills its purpose as desired. This is what the whole thing looks like nicely summarized and neatly arranged in the Tetragon CLI:
|
|
Conclusion
With Tetragon we have a very powerful tool to secure our systems directly in the kernel. Of course, for usage in combination with Cilium it is not necessary to define policies on this level, but it is definitely good to know how it works.
We at b-nova will definitely be looking at more projects related to eBPF in the near future, so stay tuned and follow our social media channels! 🔥
Stefan Welsch – Pionier, Stuntman, Mentor. Als Gründer von b-nova ist Stefan immer auf der Suche nach neuen und vielversprechenden Entwicklungsfeldern. Er ist durch und durch Pragmatiker und schreibt daher auch am liebsten Beiträge die sich möglichst nahe an 'real-world' Szenarien anlehnen.