The command line is an indispensable tool, especially for developers in technical professions. Millions of developers use it daily to write, compile, execute, and debug code. However, anyone who uses the terminal knows how many different commands exist. Moreover, it is often confusing and usually not self-explanatory. To address these issues, Fig.io aims to prevent typos and provide the correct syntax, primarily through autocompletion.
This is why I came across fig.io when I was looking for a way to simplify my daily work routine. It’s a way to improve the basic command-line experience – not only for beginners but also for experienced developers.
In November 2023, Amazon acquired another company. Fig.io was integrated into CodeWhisperer as an extension of their AI-powered productivity tool. This provides IDE-like completions for over 500 CLI applications, including Git, npm, Docker, and AWS CLI, as well as inline documentation and natural language to code translations.
However, in this Techup, I will mainly focus on the autocomplete functionality of fig, as this was my actual use case.
Installation
For the installation, I initially followed the documentation of fig itself. However, errors occur after downloading via Homebrew. The reason for this is that fig is no longer available for new users on its own. Therefore, the installation had to be done directly through Amazon. An Amazon BuilderID is required for registration. Once the registration is successful, let’s first look at the functions that are provided out-of-the-box.
Basic Functions
To open the dashboard, you can use the command cw. The first basic functions, Autocomplete and AI Translation, are displayed there directly.

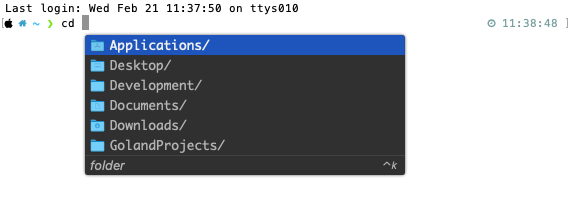
A frequently used use case is changing folders. A preview of the possible folders is displayed directly.
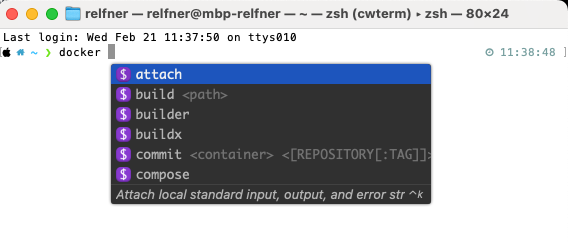
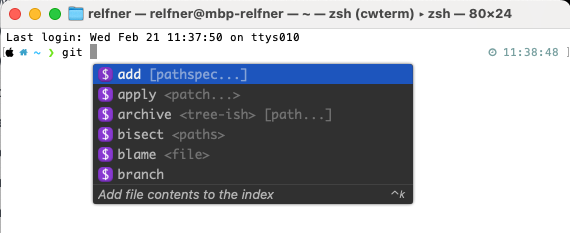
But not only in this case, but also with different syntax examples like Git or Docker.
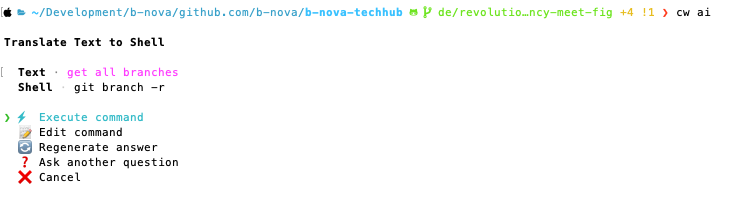
Another basic function is AI Translation. This allows you to get the corresponding command based on a description. To do this, first execute the command cw ai. Then you can describe your intention as text.
In this example, I want to have all the branches that exist in this Git repository. After the shell command is generated, you have the option to execute it directly, revise it, regenerate the answer, ask another question, or cancel everything.
The CodeWhisperer Dashboard, accessible through the command cw, allows you to make various settings. These include, among other things, adjustments to the autocompletion behavior, privacy settings, integrations with other tools, and customizations of the theme and appearance. The dashboard thus offers a wide range of personalization and configuration options to individually adapt the user experience of fig and increase your own efficiency.
Features
A particularly helpful feature is the creation of your own autocompletion options. This is especially useful if you want to use your own scripts. In our case, we have various b-nova scripts that are designed to make life easier for our developers. Therefore, it makes sense to provide autocompletion for all employees. This is exactly the functionality that fig.io offers.
Let’s start simple and see how exactly this works. First, you need to check out or fork Fig’s GitHub repository autocomplete. A direct tip: Ideally, this should be done under the path ~/.fig so that the self-created autocompletion tasks also work.
Individual Tasks
Once this is done, open the project as we still need to install all the necessary dependencies:
|
|
Then you can create your first own task; in the context of Fig, this is called a “Completion Spec”. The basic framework can be created automatically. In our example, we will call it “techup”:
|
|
This will create the following techup file:
|
|
It is important that the file name matches the name property, as Fig uses this to load the completion specification when the user enters the name. Fig.Spec in the first line is a TypeScript type that tells Fig that we are defining a completion specification. The export default syntax at the end ensures that it is exported correctly and can therefore be compiled.
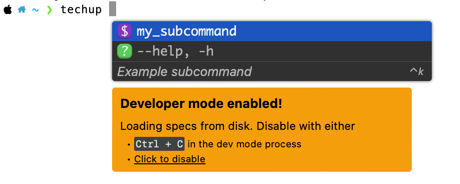
If you want to test your own task, you can do this using the dev mode.
|
|
You will then see your change directly in the terminal:
How it works: A standard example explained in detail
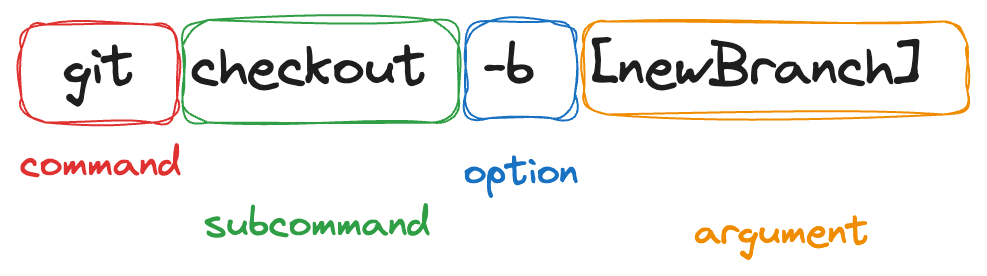
To better understand this construct, let’s take a look at the terminology using a git command as an example:
Since this is a very good example to better understand the structure, we will now build this task. To do this step by step, we create the file git.ts ourselves and first define the name and a description:
|
|
Now we want to have the checkout of a specific branch as the first subcommand:
|
|
Now we also want to define that this command accepts the corresponding branch name. This is defined using the args attribute:
|
|
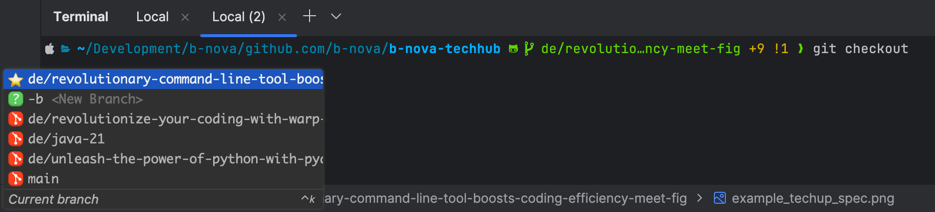
If we look at our image for the terminology, there is also the possibility to create a new branch with the option -b. For this we now add the options attribute:
|
|
If you now execute this script, you will get the corresponding suggestion.

Usecases
As already mentioned, we use a lot of scripts internally. These are all created as aliases. For this reason, we have created our own autocompletion for these cases. For example, if you enter bnova, all scripts that are available in our repository are displayed. Therefore, the attribute insertValue is used so that it is inserted directly into the terminal. With \b, one character is deleted from the input at a time, and with \n, a new line is inserted so that the command is executed directly.
|
|
Another possibility is to write your own generators. A custom generator in fig.io allows you to create a function that takes the tokenized array of user input, executes multiple shell commands on the user’s machine, and then generates suggestions for display. This means that with a custom generator, you can handle the logic for processing user input, executing relevant commands, and creating suggestions based on the results of those commands all in one step.
A very simple example of this would be:
|
|
This could then be used in a subcommand:
|
|
However, there are also template generators like filepaths and folders that automatically display the content by using the attribute template instead of generators.
To get a detailed overview of which attributes or other functions are available, the documentation of fig.io is highly recommended.
Integration of Fig Autocomplete
Of course, it is also possible to use the autocomplete function of fig not only in the normal terminal, but also in your IDEA. Most of the time I use IntelliJ from Jetbrains myself, since this unfortunately did not work out-of-the-box I had to install the corresponding integrations first. This command is also displayed in the dashboard under Integrations.
|
|
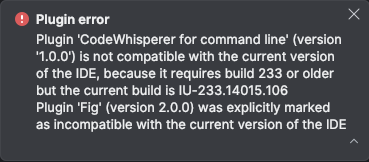
After the installation was completed, IntelliJ should have only needed to be restarted. However, there was an error that this plugin is not compatible:
To fix this problem, simply install the Amazon plugin “AWS Toolkit” instead. After another restart, the functionality is then also available in the IDEA:
AWS CodeWhisperer
With the previously completed installation, CodeWhisperer is now also generally available in your IDEA. Since I actually chose fig.io as my Techup theme, I will only briefly touch on CodeWhisperer.
To use CodeWhisperer, you only need to log in with your AWS Builder. Amazon CodeWhisperer is an advanced code generator that helps developers code faster and more efficiently. A key feature of Amazon CodeWhisperer is its ability to generate accurate code suggestions in real time based on the developer’s entered comments and existing code. These suggestions can range from single lines to entire code blocks, which not only reduces development time but also significantly improves code quality. The following languages are supported:
- Java
- Python
- JavaScript
- TypeScript
- C#
- Go
- PHP
- Rust
- Kotlin
- SQL
- Ruby
- C++
- C
- Shell
- Scala
- Infrastructure as Code (IaC) languages with the most support:
- JSON (AWS CloudFormation)
- YAML (AWS CloudFormation)
- HCL (Terraform)
- CDK (Typescript, Python)
Thus, you can see that developers can use their preferred programming languages and IDEs to customize CodeWhisperer for more specific recommendations.
In addition, Amazon also sees an important area in security and compliance issues in the development process. CodeWhisperer detects potential security vulnerabilities through its security scan and actively contributes to development security by highlighting code suggestions that resemble public code. These features enable developers to be more aware and responsible in their use and integration of code components, especially with regard to open-source licensing.
Additionally, the integration of the generative AI assistant Amazon Q provides deeper support through expert advice via an integrated chat to explain code, transform it, and receive personalized suggestions for testing, debugging, and optimizations.
Amazon offers CodeWhisperer in two pricing models: a free version for individual developers and a paid Professional version for businesses.
In conclusion, Amazon CodeWhisperer not only increases developer productivity through accelerated code creation but also contributes to higher code quality.
Conclusion
In my Techup, I made it clear that I was primarily interested in fig.io because I saw real added value for our team in the features offered. However, after taking a closer look at the topic, I had to realize that features such as the script builder, sharing SSH credentials, or DotEnv files are now only available to existing fig.io customers. As a new customer, I was only able to use the autocomplete function via CodeWhisperer.
Nevertheless, I have to say that the ability to write your own autocompletion scripts is very appealing. However, it must also be said that this can be very time-consuming at first, depending on the number of your own scripts. It must also be taken into account that a considerable amount of learning effort is required at the beginning in order to understand all available Spec attributes and to understand how exactly your own generators can be implemented.
This techup has been translated automatically by Gemini