
In modern application development, secrets such as access data, API keys and certificates are indispensable. Since we try out a lot of things at b-nova, a lot of secrets have been distributed in different places over the last few years. For example, we have secrets in the AWS Secrets Manager, which we read out via API in various internal applications. We have Secrets stored in Github, which we need to run our pipelines or deploy to the different environments. Furthermore, we have several Kubernetes clusters in which various secrets are also stored. But now we have reached the point where we slowly but surely need to bring some order back into the management of our secrets. The reasons for this are obvious.
- Secrets are currently stored in several places and there is no SSOT (Single Source of Truth).
- Secrets are stored redundantly. This means that if you adjust a secret, you have to adjust it in several places.
- The overview of which secret is where is no longer guaranteed.
- It is very difficult to manage who has access to which secret.
- Life-cycle management: Automation and management of the secrets rotation can become complex.
- Some of the secrets are unencrypted (K8S Secrets)
So the question arose as to how we could get the secret handling back under control. We quickly decided on Hashicorp Vault, as this tool fulfils all our requirements for a secret manager with flying colours.
- Encryption: Vault stores secrets in encrypted form and offers additional security.
- Access control: Vault enables fine-grained access control through ACLs and roles.
- Lifecycle management: Vault supports automation of secret rotation and management.
The Vault server was set up very quickly and the secrets were transferred quickly. But how do we access the secrets from the individual applications, from GitHub and from the K8S cluster? There are several possibilities that we have considered. Most of our applications are currently running on K8s. The secrets are injected into the applications via secret reference to the K8s secrets as environment variables during deployment.
A variant would be, for example, to read out the secrets from Vault via API. The advantage of this would be that the secret is only read where it is really needed. No one would be able to read any passwords via the secrets. The disadvantage, however, is that we have to program the API access into every application first. Another way to manage secrets securely and efficiently in Kubernetes is to use Kubernetes External-Secrets in combination with HashiCorp Vault as external secret storage. So today we’re going to look at how these two technologies work together and how they can optimise the handling of Secrets in Kubernetes clusters.
First, let’s take a look at what the Kubernetes External-Secrets Operator even is.
Kubernetes External-Secrets Operator
The Kubernetes External-Secrets Operator is a Kubernetes controller that enables the synchronisation of secrets from external sources, such as HashiCorp Vault, AWS Secrets Manager or Google Cloud Secret Manager, into Kubernetes clusters. It monitors the cluster for the presence of custom resource definitions (CRDs) called ExternalSecrets. These CRDs contain metadata describing how the Secrets should be retrieved from the external source and stored in Kubernetes Secrets. The operator reads the configuration, retrieves the appropriate Secrets from the external source and creates Kubernetes Secrets containing these Secrets. By using the External-Secrets Operator, developers and administrators can centrally manage secrets in external secrets stores, while applications in Kubernetes continue to use the native Kubernetes secrets. This increases security and enables central management of Secrets, access controls and lifecycle management.
The External-Secrets Operator can be installed via Helm or kubectl. Here is an example of how to install it using Helm:
|
|
Create Secret Store
Once the operator is installed, the first thing we need to do is create a SecretStore. To do this, we create a file called secret-store.yml with the following content:
|
|
We could also create a global ClusterSecretStore here. This would not have to be defined per namespace, but would be available across all namespaces.
We now define the address of our vault server and the version of the KV (Key Value) Secret Engine. Version 2 of the KV Secret Engine now also supports the versioning of secrets. Now we create a namespace and try to create the SecretStore in it:
|
|
As we can see, the store was successfully created. Let’s see if it works properly:
|
|
As we can see, the status is InvalidProviderConfig, so something seems to be wrong. Let’s find out what exactly is going wrong:
|
|
We see that the token we specified in our configuration does not exist. So now let’s generate a token.
Generate a token
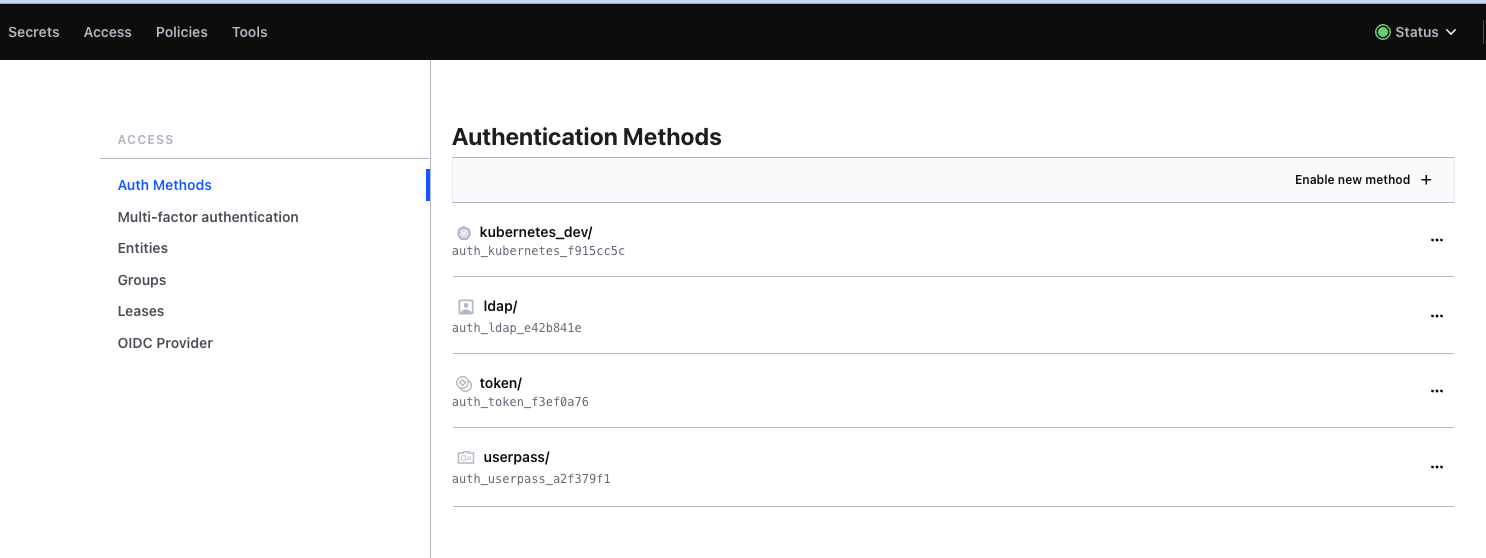
In this techup I assume that the Vault Server is already fully set up. If this is not yet the case, you would have to set it up first. Detailed instructions can be found directly on the Hashicorp Vault page. For our application we now need a corresponding Vault user. For example, we could add a new userpass method under Access -> AuthMethods. As the name suggests, you can use it to create a user who can then authenticate himself with a password.
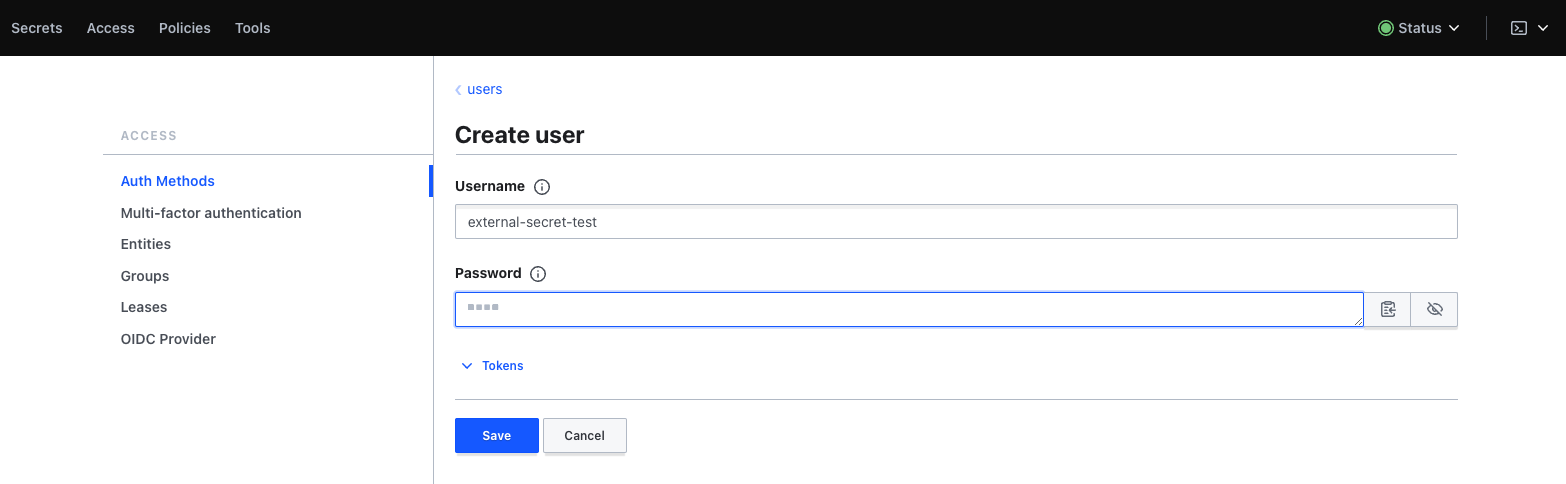
In the userpass auth method we can then create a new user.
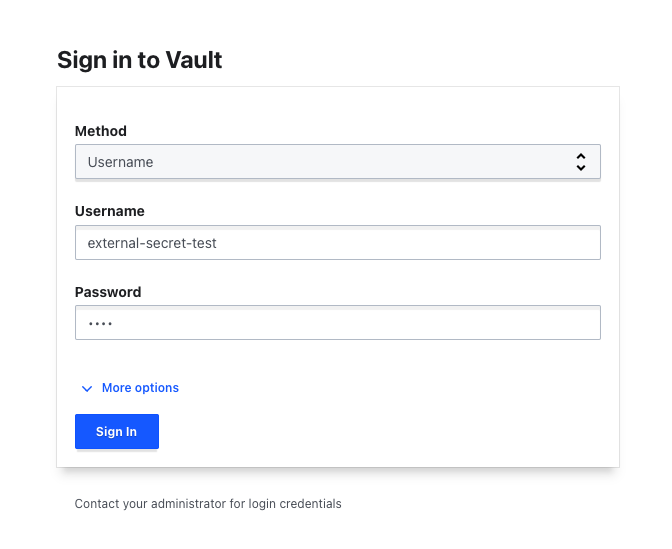
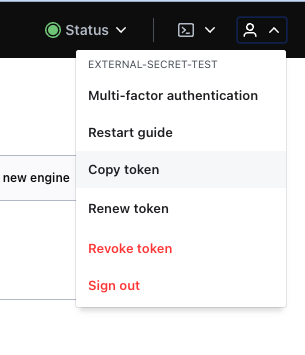
Once the new user is created, we need to log in to Vault with it to get the required token. We select Username as the method in the login mask and enter the previously given access data. Afterwards we can copy the token of the user via the user menu.
Now we have to store the secret in our namespace. The quickest way to do this is to use kubectl:
|
|
Now let’s see if the secret store works correctly after creating the secret:
|
|
We now see that the status is “Valid” and the Secret Store is working.
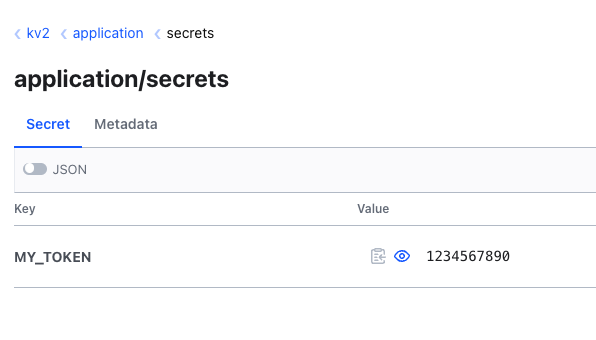
Once the Secret Store has been successfully set up, we can manage the external secrets. The External-Secrets Operator also offers us a CRD for this. Before we set up the external secret, however, we first want to create it in the vault. Under kv2 we create a secret with the path ‘application/secrets’. Here we can now create a key/value pair with the content MY_TOKEN=1234567890.
Once we have created the secret, we can create another file called external-secret.yml with the following content. Then we create the secret with kubectl apply -f external-secret.yml.
|
|
Let’s check again if everything is working properly:
|
|
To get more information, for example in case of an error, we can use this command:
|
|
The secret should now have been synchronised and we can now look at it:
|
|
As we can see, the secret named my-secret has been successfully created. If we look at the content, we can also see that the content is the same as the one stored in the vault.
|
|
Now the expected value is in the Secret. Now let’s test whether the update of a secret works. To do this, we create a new version of the secret in the vault and change the value:
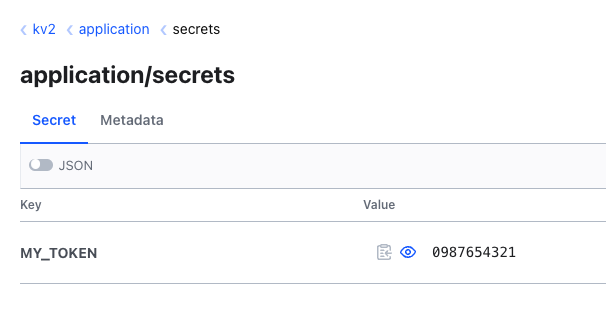
We now have to wait a maximum of 15 seconds and should then also see the new secret in Kubernetes.
|
|
Perfect, we now have the new secret available in our new namespace and can use it directly in our application as an environment variable or volume via a secret reference. Detailed instructions can be found directly on the Kubernetes page.
Summary
Today we looked at how to centrally manage your secrets and easily synchronise them into a namespace using the Kubernetes Secrets Operator. No adjustments to the code in the application are necessary for this. This is a very elegant way, as the secrets are only delivered when they are really needed by the application. Stay tuned! 🚀
This TechUp was translated by our automatic Markdown Translator. 🙌
Stefan Welsch – Pionier, Stuntman, Mentor. Als Gründer von b-nova ist Stefan immer auf der Suche nach neuen und vielversprechenden Entwicklungsfeldern. Er ist durch und durch Pragmatiker und schreibt daher auch am liebsten Beiträge die sich möglichst nahe an 'real-world' Szenarien anlehnen.