Today we’ll take a look at a tool that leaves common problems with CI/CD pipelines in the past. So if you are expecting a Dependency Injection Framework at this point, I’ll have to disappoint you. Unfortunately the name Dagger is used twice in the field of development. First for the DI framework I just mentioned (https://dagger.dev/), and second for the tool we are going to take a closer look at in this techup (https://dagger.io/).
But what exactly does Dagger do? If you visit the home page of dagger.io, you are greeted with the phrase: “Develop your CI/CD pipelines as code and run them everywhere.” This is a bold statement and today I want to find out if this statement is actually true.
Before we get deeper into the technical details, I want to give you a few facts about dagger. The first commit on GitHub was made on May 01, 2021. This means the project is almost two years old and actively maintained. The core of the project was developed in Go. However, since there are now also SDK’s for Python, CUE and Node.js, these languages are now also represented. The project was started by the creators of docker.io.
Now let’s take a look at what Dagger can do and what we can use it for. Dagger is not meant to replace a CI/CD system. It just wants to introduce a layer to ensure that there is no gap between different CI/CD systems. Developers can define their CI/CD pipeline as code, which allows versioning and reuse of pipeline configurations. It also allows the pipeline to run in isolated environments using containers, enabling more efficient and consistent builds. This, of course, also makes the effort to migrate a pipeline from system A to system B quite low. In addition, dagger.io provides a number of APIs for integration with external services and tools, making it easier to integrate with existing workflows and systems. In short, you can use dagger in a GitHub Action, but also deploy it in Jenkins.
Of course, another huge advantage is that you can also test the pipelines locally, and there is no difference to running them on the CI/CD system.
How Dagger works
How exactly Dagger works is shown in the following graphic:
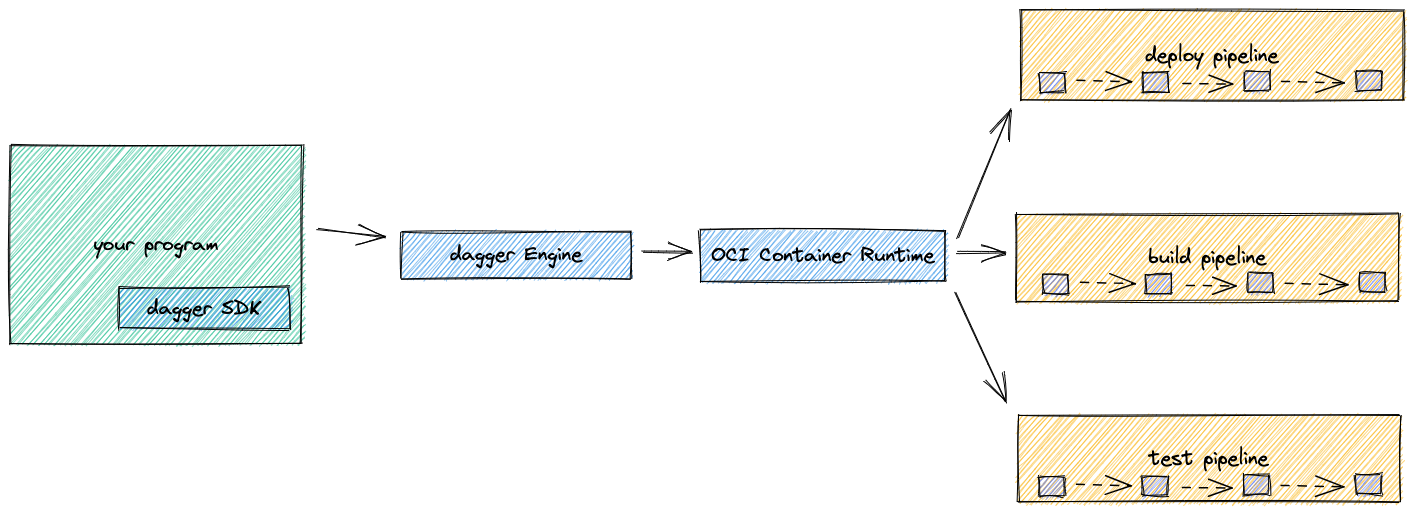
Figure: How Dagger Works
The first thing to do is to import the corresponding SDK. Currently there are SDK’s for the following languages: Golang, Python, CUE and Node.js.
With this SDK, Dagger opens a connection to the Dagger Engine. This is done by either using an existing one, or creating a new one on-the-fly. Using the SDK, the program then prepares API requests that describe the pipelines to be executed, and then sends them to the engine. A custom protocol called wire is used to communicate with the engine. This protocol is currently private and therefore not yet documented. The developers of Dagger promise that this will change in the future. This means that currently the SDK is the only documented API available to us.
When the engine receives an API request, it computes a Directed Acyclic Graph (DAG for short) of low-level operations needed to compute the result and starts processing operations concurrently. When all operations in the pipeline are complete, the engine sends the result of the pipeline back to the program, where the result can be used as input for new pipelines.
Dagger in practice, with Golang
So much for the theory. Now let’s take a look at the whole thing in practice. Today I want to use the Golang SDK and Cue to build a pipeline that builds my Golang code into an Executable. To do this, I’m writing myself the following program. I ignored the error handling for readability reasons. The following is the Go variant:
|
|
In line 8 we see the import of the dagger.io SDK. Furthermore, we define two functions: main(), which provides an interface for the user to pass an argument to the tool, and build(), which defines the pipeline operations.
The build() function creates a Dagger client with dagger.Connect(). This client provides an interface for executing commands against the Dagger engine. We then mount the project directory into the container and build our executable. We then export the executable back from the container to the project directory. The big advantage of this method is that a Go developer can write his CI/CD pipeline directly in the language in which he has developed his actual program.
Now let’s run our CI/CD pipeline and see what comes out of it. By the way, the whole project is available on Github. Before running the pipeline, let’s have a look at our project structure:
|
|
We see that our dagger pipeline is located in the dagger subfolder. We can therefore run the pipeline with go run dagger/dagger.go and get the following output:
|
|
After that, we should find a new build folder in our project folder that contains the built executable.
Dagger in practice, with CUE
Now let’s next look at how we could build the same pipeline in Cue. This should also be fairly intuitive for a developer to understand.
|
|
First we have to import the dagger.io SDK and another dependency to build our Golang executable.
After that we define actions, which will be executed one after the other. First we define where to find the source code. Here we simply say that the path is our current directory, because the dagger.cue file is located in the root directory of the project. After the path to the source code is clear, we define a build action where we test the code and then build it.
Now we also want to run this pipeline locally. In order to do this, however, we first need to install the dagger-cue CLI. Here there is a tutorial on how to install it on different operating systems. Since I program locally on a Mac, I can just use Homebrew.
|
|
As soon as the CLI is installed, I first enter the following command to load my dependencies:
|
|
After that we can start the actual build:
|
|
We can see that an executable has also been built here and then exported to the build folder.
We have now seen two different ways to build a CI/CD pipeline using dagger.io. These can now be built into your own CI/CD system. I’ll show this briefly using a GitHub action. For other systems, there are various instructions on the Dagger website.
GitHub offers a custom GitHub Action for the execution of the Dagger Action. We can call this as follows:
|
|
Conclusion
As we can see, it is quite easy to integrate Dagger into an existing pipeline. In my opinion, portability is a clear plus point for Dagger. Dagger becomes especially powerful when you can write your pipeline in your familiar programming language, such as Golang. Here you have almost no restrictions when implementing an action.
A disadvantage of dagger.io is the documentation. There is still a lot of potential for improvement. Especially when it comes to the SDK’s, you have to search for a long time until you find the information you need.
However, I will continue to keep an eye on dagger.io, also due to the fact that we at b-nova have already converted the first projects to dagger 🚀😄
Stefan Welsch – Pionier, Stuntman, Mentor. Als Gründer von b-nova ist Stefan immer auf der Suche nach neuen und vielversprechenden Entwicklungsfeldern. Er ist durch und durch Pragmatiker und schreibt daher auch am liebsten Beiträge die sich möglichst nahe an 'real-world' Szenarien anlehnen.