Today I want to give you a small but very useful tool. Teller is a “secrets manager” for developers when it comes to building cloud-native apps. The project was launched in March 2021 and is written entirely in Go.
The principle behind it is simple. Never use the terminal to input or output passwords in plain text. Let’s take a quick look at a small example and find out why this is not a good practice.
Let’s assume you use a secrets manager in your company, such as AWS Secrets Manager, to protect your secrets. Passwords or tokens are kept “safe” and you can be sure that only those who have access to the corresponding entity in the Secrets Manager can see the secret. So far so good.
Now there is a bug on a system when querying a secured rest endpoint and you would like to look locally at the data coming back from this endpoint. In our case, the endpoint is secured with a simple “Basic Auth” (of course, you should choose a more secure method here, but this is enough for us for an illustrative example). So we open our console and do a curl against the endpoint. Before we do that, we copy the corresponding password from our Secrets Manager to the clipboard.
|
|
In response we get the desired result in JSON format.
|
|
We realise that there is a typo in “title” and we can fix it very quickly. Now we can treat ourselves to a coffee. Unfortunately, you forgot to lock the PC, but luckily the console window was closed so that nobody can see the password. Now, however, a Linux expert comes along and knows the magic command with which he can still read out the password. So he sits down at your PC, opens the terminal and types the command history. He can then display all the commands that were executed in your console. The last entry he sees is the curl command and thus also the user and password in plain text.
Long story short. Typing passwords in plain text on the terminal or storing them in ENV variables is not really a good idea. This is exactly where Teller helps us. Teller also offers us a lot of possibilities to manage or exchange secrets in the different secret managers.
Let’s take a look at an example. First, we have to install Teller locally. There is a binary for macOS, Linux and Windows. I use macOS and therefore enter the following command.
|
|
Then we create a new project. To do this, we type teller new and then we have to configure the name and the providers. The name here is my-project and as provider we take only AWS Secrets Manager for now.
|
|
As we can see, a file called .teller.yml has now been created in our user folder. Let’s have a look at this file.
|
|
As we can see, we get a configuration file, which we will now discuss in detail.
Line 14 - 16: Here we can define options which can be read later with opt. (e.g. region)
Line 22 - 30: Here we configure the provider.
In order for us to be able to test this, three things must already be in place: You must have a Secret in the AWS Secrets Manger, the AWS CLI must be installed and configured and you must have access to the corresponding Secret you want to read.
For my example, I created a secret with the ID dev/test/admin and two keys (user/pass). Accordingly, I can read it with the AWS CLI as follows:
|
|
Those who have not yet installed the AWS CLI should interrupt here and do so. After the installation, you still have to run the command aws configure to get access via token.
Now we can get down to business. In the file .teller.yaml we now change the value of path: prod/foo/bar to path: dev/test/admin in the aws_secretsmanager provider at env_sync: and simply delete the section env. The file now looks like this:
|
|
So let’s test our changes. We enter the following command in the terminal: show.
|
|
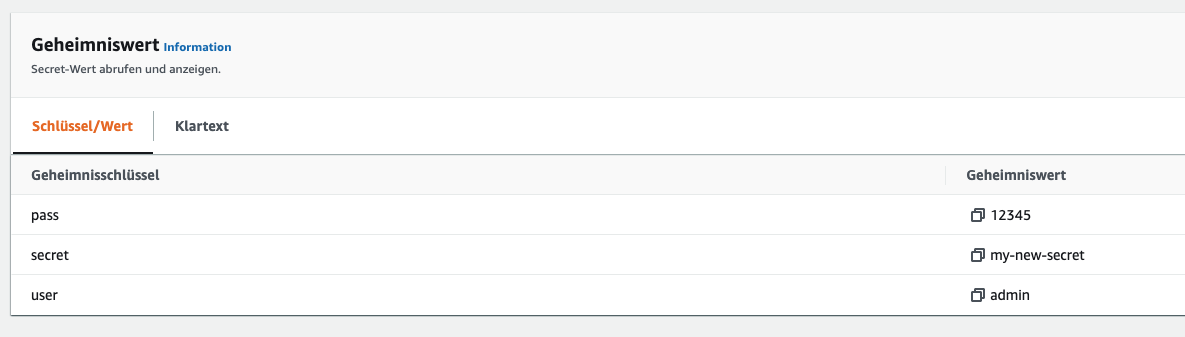
As we can see, the secrets are read correctly and we can now use them with Teller. The secrets are masked on output so that they cannot be read in plain text.
ℹ️ You can control the masking of the output in the .teller.yml configuration file with the option redact_with.
Of course, we can also read only one key from the secret. To do this, we change the following in the .teller.yml and then read out the secret again with teller show.
|
|
|
|
Now we can see that only the corresponding secret is output.
Next, let’s look at how we can use these secrets in an application. To do this, we write a simple Hello World Go app in which we want to display the user. I create a new directory teller-golang and create a file main.go here.
|
|
When I run the program now, I get the following output:
|
|
As we can see, the variable ADMIN_USER is not set. Let’s run the program again with Teller:
|
|
We get an error because there is no Teller configuration file in our project directory. Because of the error we now see how handy Teller works at this point. For each project directory a separate configuration file can be created. This ensures that only the secrets that are really needed are used. This file can of course be checked into the VCS (Version Control System) so that all developers have access to the same Secrets.
So let’s copy the configuration file into our project directory and try the whole thing again.
|
|
As we can now see, the Teller variables are loaded and made available to the Go application in the form of environment variables. 🚀
Secrets Management with Teller
Teller offers us other useful tools, which not only simplify the development, but also the handling of secrets in general. For example, we can create new secrets directly in the provider. To do this, we extend the .teller.yml with the following entry
|
|
Now we run the following command in the terminal.
|
|
This command creates a new key in the specified path directly in AWS Secrets Manager.
Teller also offers us the possibility to copy secrets between two or more providers and even to synchronise them.
To do this, of course, we first have to add another provider. So we open the Teller configuration file and add Google Secrets Manager as provider. If you don’t have a Google account yet, or if you haven’t installed the CLI, you can do so here. You will also need a service account. You can find the instructions for this here.
I create a new project teller-golang in the Google Cloud Console and create a secret MY_USER=bnova-stefan within this project.
|
|
After we have inserted the provider, we can see if the secret can be read. If all configurations are correct, we should see the following output.
|
|
Now we want to copy the secret from Google Secrets Manager to AWS Secret Manager. Unfortunately, synchronisation is not possible in Google Secret Manager.
To do this, we issue the following command in the terminal.
|
|
We see an error message that the key MY_USER does not yet exist in the AWS Secret Manager. So before we can copy a Secret Value, the corresponding field must first exist in the target. So we extend our .teller.yaml with the following entry and then execute the command again.
|
|
|
|
As we can see, the command was executed successfully. Let’s have a look at the result directly in the AWS Secret Manager.
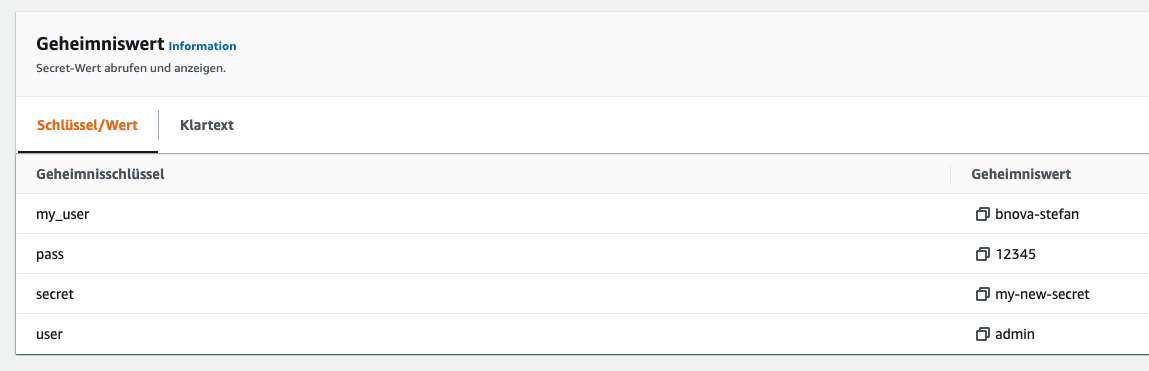
Et voilà! The new secret has been successfully copied. Also teller show shows us the new Secret in AWS of course.
|
|
Now we have seen how to create and copy a secret. Let’s take a look at how to delete a secret again. For this purpose Teller offers us the teller delete command. We don’t want to use the Admin User in our application anymore, but MY_USER. So we can delete ADMIN_USER. To do this, we execute the following command.
|
|
Deleted! We’ll look again directly in the AWS Secret Manager just to be sure.
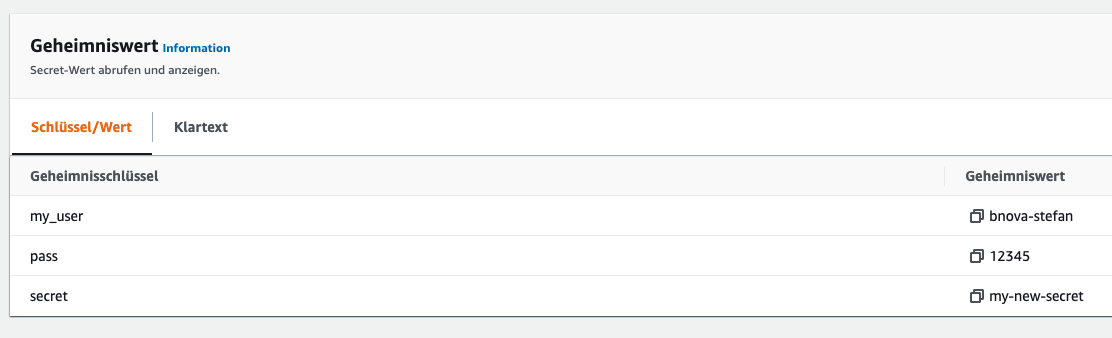
And here, too, the secret has been deleted. Let’s take a look at what teller show tells us.
|
|
We see in the last line that the status for the secret ADMIN_USER in the AWS Secret Manager is “missing”. This is correct and we can remove the entry from the teller.yaml.
|
|
We have removed the secret completely.
ℹ️ Not all providers support all commands. For example, Google Secretmanager does not support teller delete.
Summary
Teller is a very practical tool if you want to share secrets in the developer team without having to display them in plain text. The practical configuration file teller.yaml makes it possible to store the same secrets in the project directly for all developers. The developers only need to have access rights to the secrets.
Secret management with Teller is very effective, but the big disadvantage is that not all providers support the same functionalities. For example, AWS Secret Manager offers synchronisation of the secrets, while Google does not support this. However, I only see a limited use case in daily business (e.g. migration project from AWS to Google).
Teller offers us another tool, teller redact, with which we can filter out passwords from a log file, for example. This is also very handy to make sure that you have not logged any passwords in the past without having to delete the log file.
We at b-nova will definitely consider Teller for future internal development projects. Stay tuned! 😄
Stefan Welsch – Pionier, Stuntman, Mentor. Als Gründer von b-nova ist Stefan immer auf der Suche nach neuen und vielversprechenden Entwicklungsfeldern. Er ist durch und durch Pragmatiker und schreibt daher auch am liebsten Beiträge die sich möglichst nahe an 'real-world' Szenarien anlehnen.