Last time I introduced you to Devfile.io. Here is a short summary of the Techup: Devfile.io is an open-source initiative that defines an open standard for containerized development environments using YAML files. Since 2019, this standard has made it easier to set up and manage development environments, especially in cloud-native development. As a CNCF sandbox project, Devfile enables the standardization of configurations, ensuring portability and reproducibility. Devfiles define tools, dependencies, and settings, ensuring automation and consistency. These Devfiles are integrated with tools such as Eclipse Che and odo.dev and distinguish between inner loop and outer loop actions that cover the entire development and deployment process. In addition, the Devfile Registry offers pre-built stacks for various runtimes and frameworks, making it easier to get started with cloud-native development.
Now that we’ve recapped the benefits of Devfile.io, let’s turn our attention to another important tool in the cloud-native development landscape that implements the Devfile standard: odo. Odo is an open-source tool specifically designed for developing applications on Kubernetes and OpenShift. It uses Devfiles to define and manage development environments, greatly simplifying the entire development process. In the following, we will look at the functions and advantages of odo.dev and show how it helps developers to work efficiently and consistently in Kubernetes environments.
Prepare the target platform
To use odo, we need a platform on which our containers can run. We have several options here. For example, we could set up a local Kubernetes. Here, for example, minikube would help us. Of course, if you have an existing Kubernetes cluster, you can simply use that as well.
However, a simpler variant would be if we simply use Podman locally. You can install the Podman CLI and simply start an instance. You can find instructions for the different systems directly on the Podman page. For Mac users, here is a shortcut:
|
|
But since we don’t want to make it too easy for ourselves, we’ll use the Kubernetes variant anyway, because it allows us to take a closer look at an additional odo command ;-) So to get started, we first need to “connect” odo to our Kubernetes cluster. To do this, we create our own namespace with the odo CLI.
|
|
Now you might be wondering what odo create namespace does more than the standard creation of a namespace via kubectl. Now the answer is relatively simple, namely actually nothing :-)
The command is simply provider agnostic, i.e. if I execute odo create namespace in an Openshift environment, a project is created instead of a namespace.
Odo also has an alias for this odo create project. So the command is smart enough to handle the supported resources of the current cluster.
So you can run odo create project in a Kubernetes cluster and it will create a namespace or you can use odo create namespace in an OpenShift cluster and a project would be created.
Initialization
There are two ways to start a project with odo: Either an existing project is “odo-ized”, or a new project is created with odo. Let’s take a look at both options.
Existing project
I will first create a simple Golang project.
|
|
Then we create a main.go with the following code:
|
|
Finally, initialize the module and briefly test whether everything is working and we are ready to manage the project with odo.
|
|
Next, we need a devfile, which contains various configurations that we need to run our application on our cluster. If you need more information about devfile, I recommend my Techup about devfile.io.
The odo CLI now offers us an easy way to create the Devfile based on our existing code.
|
|
As we can see, based on our project, certain things like Language, Project Type and also Application Ports are already filled in. Once we confirm the parameters, the specified image will be downloaded:
|
|
Now we are asked if the container configuration with the ports and environment variables is correct. At this point we could adjust them. What we can already see now is that we have the possibility to create several container configurations. But more about that later. We have nothing to complain about here and select NONE.
|
|
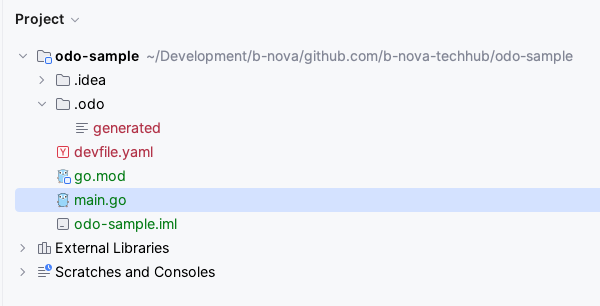
Next, we enter a component name. Here we can simply leave the default for our example and press Enter again. Once we have done that, the initial setup is done for now. In the folder itself we can now see that a devfile.yaml has been created and a folder called odo.
New project
To initialize a new project with odo, we create a new empty folder
|
|
Then we execute the odo init command in this folder. This command will create the devfile again.
|
|
Now an interactive mode follows to determine which architecture, which programming language and which framework should be used.
|
|
For Enterprise customers it is also interesting here that you can immediately use the RedHat version of Quarkus as a starter project. But for our test the community version is enough for us. After that we have to enter the component name as seen above and our project will be created.
|
|
Again, a complete project including odo integration and Devfile is created for us. If you want to take a closer look at the devfile.yaml and understand it, I recommend my Techup about devfile.io. There I explain it line by line.
We can then open the project in our IDE and get started right away. Speaking of IDE. There is the OpenShift Toolkit plugin from Red Hat, which is available for both Jetbrains products and Visual Studio Code. These allow you to interact directly with OpenShift or Kubernetes clusters. The odo and oc binaries are used for this purpose.
Now that we’ve seen how to create or initialize a project with odo, let’s take a look at how to use odo for rapid development.
Development
So let’s start with local development. We can do this with one of the two most important commands in odo odo dev.
odo dev is very useful in the initial phase of development, when you are making frequent changes to the code and want to see them directly.
The dev mode also allows debugging and you can run tests.
|
|
As we can see, the application is started on the cluster. Let’s take a look at this with kubectl
|
|
If you’re wondering why we don’t need to specify a namespace to see the pod, you’ve been paying close attention. ;-)
The explanation for this is quite simple. We executed odo create namespace odo-sample above.
This not only creates the namespace, but also sets it as the default.
If we want to switch the namespace to an existing one, we can do this with odo set namespace.
The first start can take a little longer because the images still have to be downloaded. But once that’s all done, we should see the following output in the terminal:
|
|
So we should now be able to access our application with http://localhost:20001. Does it work?
|
|
Now we want to make an adjustment to the code and see what happens. We add something else to the output
|
|
As soon as we save the file, we can observe the following in the terminal
|
|
So the changes we make to the code are applied ad-hoc to our cluster. If we execute a curl accordingly, we also see the expected new greeting.
|
|
Log output
What we are still missing is log output. In the terminal we only see the output generated by odo. Of course, the odo CLI also offers us a command for this: odo logs.
Here we see an excerpt from the logs. Of course, I can also specify a --follow directly in the command to follow the log output.
|
|
Execution in the container
If you want to execute a command in the container, odo offers us a run command odo run.
With this command you can execute “commands” which we define in the Devfile. For all those who are confused now, here is an example ;-)
So I define the following “command” in the Devfile:
|
|
Now I can use odo to execute this command via the run command and a shell should be started in my container, so:
|
|
This can be very handy for providing predefined commands, for example deleting certain data or configuring certain applications.
Web Console
In the console output we can see that there is also a Web Console which we can access at the specified URL.
|
|
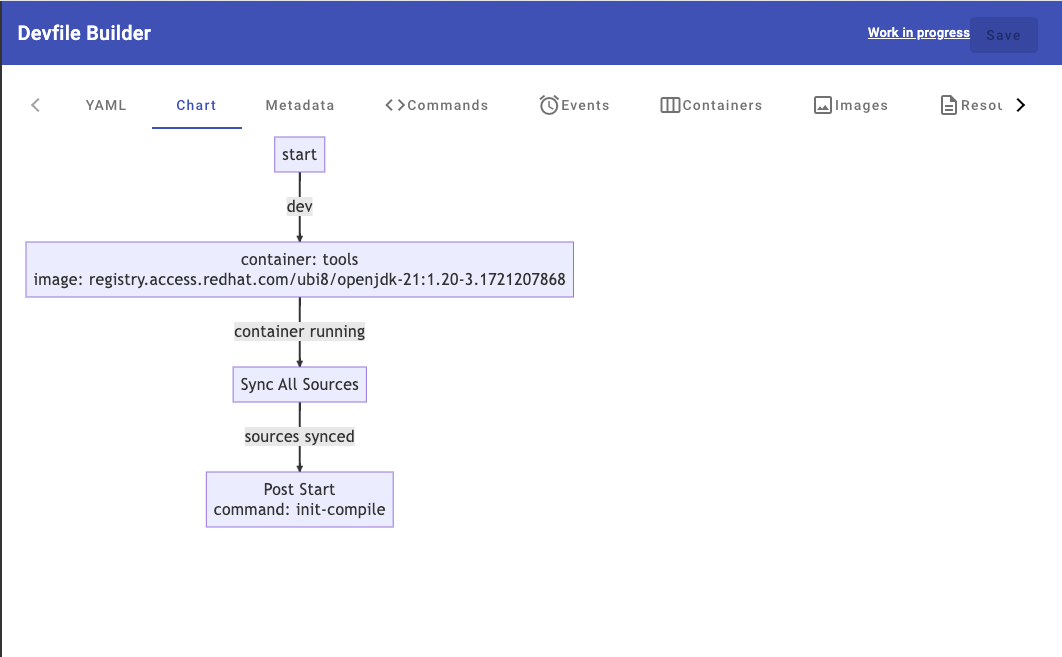
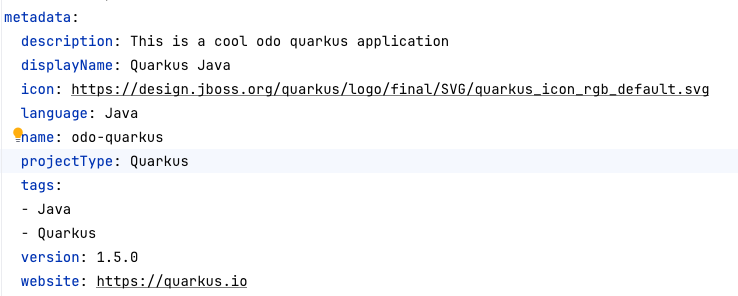
This is of course very nice, because we can do all the configuration comfortably in the web interface. For testing, we adjust a field in the metadata and see if this value is actually reflected in the devfile. In the yaml file we see the following metadata.
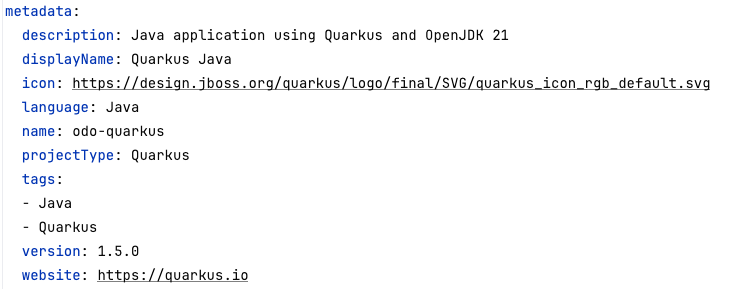
We now want to change the description via the web interface. Here you have to note that after updating the value “Apply” you have to click “Save” in the upper right corner.
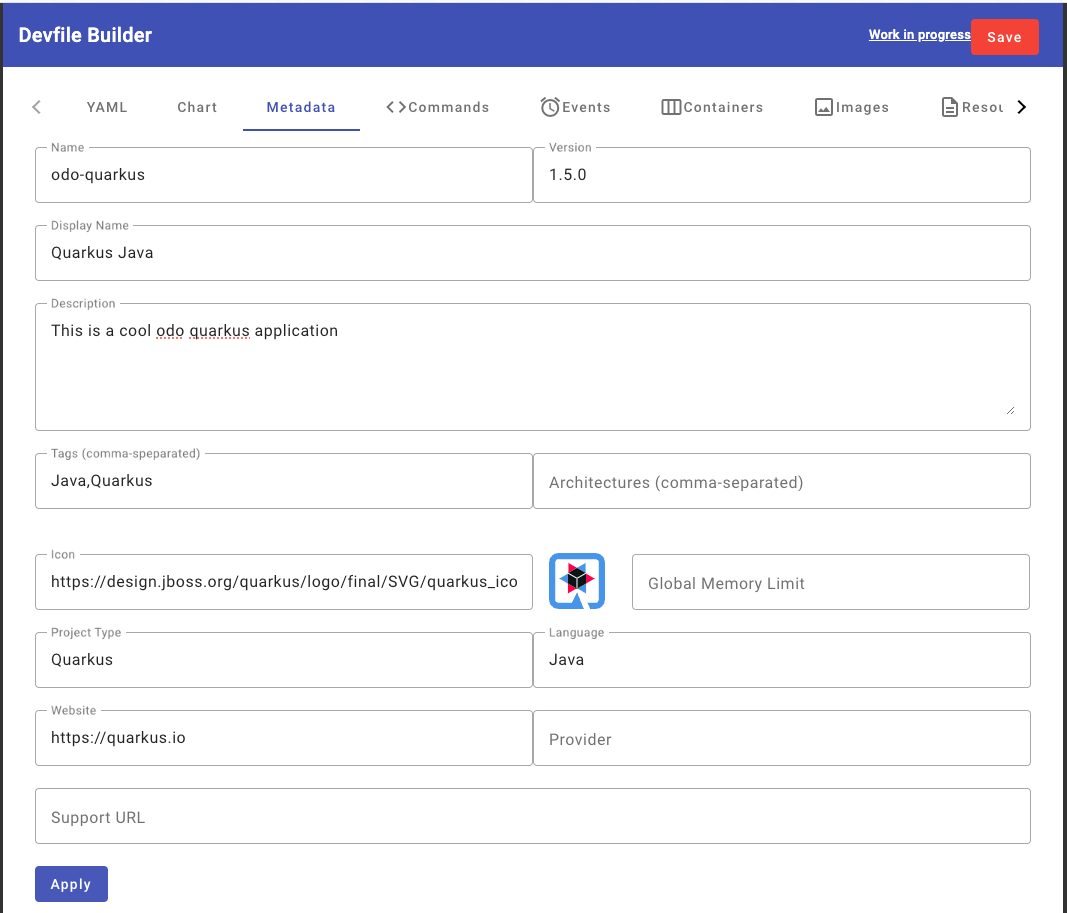
Once this is done, we take another look at the devfile.yaml and can see that the file has also been updated.
Deployment
odo theoretically also offers us a way to deploy our application directly to a cluster.
However, I’m not sure if this really represents a real use case, at least not in
professional software development. Here I would always go the way via a CICD pipeline.
Therefore, I will not consider odo deploy further in this Techup.
Conclusion
Odo is a versatile tool that greatly simplifies the development of applications on Kubernetes and OpenShift. It enables seamless integration with Devfiles and provides developers with a user-friendly environment to focus on what matters most: writing code. The integration of plugins for common IDEs and the availability of a web console make Odo a powerful tool in cloud-native development. While Odo’s direct deployment capability may be less relevant in professional environments, it still represents a valuable resource for optimizing the development process and increasing efficiency.
This techup has been translated automatically by Gemini
Stefan Welsch – Pionier, Stuntman, Mentor. Als Gründer von b-nova ist Stefan immer auf der Suche nach neuen und vielversprechenden Entwicklungsfeldern. Er ist durch und durch Pragmatiker und schreibt daher auch am liebsten Beiträge die sich möglichst nahe an 'real-world' Szenarien anlehnen.