
It’s that time again: A new release version of Next.js is here - Next.js 15. With this update, Vercel aims to set new standards in performance, security, and developer experience. The improved performance should please not only developers but also end users. In this tech-up, we’ll take a look at the new features that come with the upgrade to version 15. Of course, we’ll try this out with some examples that you can also find in our Techup repository.
Announcements
Automatic Updates with Codemods
Every developer knows the problem: As soon as a new version is released, you are often faced with the challenge that the API has changed. This is exactly where codemods come in. These are an automatic upgrade option. This is especially helpful when there are major changes, as Next.js performs these updates automatically.
Other versions that are updated are Next.js, React, React Hooks, and ESLint.
This can be done directly from the CLI as follows:
|
|
The advantages are obvious if the script actually works: It is efficient because changes are made automatically in seconds. It is also error-free because human errors are avoided. The simplicity of the process lies in the fact that no manual adjustments are required. This saves a considerable amount of time, as there is less effort for the developers. In addition, consistency is ensured, as all projects can use the same version.
Asynchronous Request APIs (Breaking Change)
The first breaking change involves various request APIs. These are converted to asynchronous APIs such as cookies, headers, and params in the new version. This leads to a paradigm shift in server-side processing. However, the goal is clear: better performance.
In typical server-side rendering processing, the server is blocked until the request is fully received. This, of course, means that you have to expect waiting times. In this case, you have to wait with rendering content until request data such as headers or cookies are fully loaded.
The new asynchronous API allows you to load cookies or headers only when you really need them.
Next.js 14 (synchronous)
In this example, the params parameter is used synchronously, which means that the entire request is awaited before the content can be processed further.
|
|
Next.js 15 (asynchronous)
In this example, params is processed as an asynchronous promise, so the values are only retrieved when they are actually needed, which increases efficiency and reduces blocking times.
|
|
Improved Caching Mechanisms
Optimizing the Caching Strategy for GET Route Handlers
In Next.js, it was standard practice to cache GET handlers unless they consciously used dynamic functions or configurations. This could, of course, lead to problems with pages with dynamic content, especially when the content had to be retrieved. With Next.js 15, this has now been adjusted so that nothing is cached by default. However, there are a few special cases, including sitemap.ts, opengraph-image.tsx, and icon.tsx. These remain statically cached.
The client router cache was introduced in Next.js 14 with aggressive caching behavior. For example, even pages with dynamic routes (e.g., /product/[id]) were cached for 30 seconds, even though the underlying data could change during that time. With the upgrade to Next.js 15, the stale-time value for pages defaults to 0.
However, it is worth noting that the behavior has remained the same in the following points:
- Sharded Layouts: Layout components are still not reloaded from the server to support partial rendering.
- Back/Forward Navigation: When navigating back or forward, data is restored from the cache to preserve scroll position.
- loading.js Component: This is still cached for 5 minutes (or as configured).
In general, it can be said that the caching behavior has changed from an opt-out to an opt-in procedure. Here is an example of how to granularly control caching per request:
|
|
Integration of React 19
The Next upgrade also directly uses the release candidate of React 19. React 19 brings significant improvements such as the new React Compiler, which translates React code into plain JavaScript and doubles the startup speed of applications, as well as the Actions API for easier form handling. Server Components and Web Components provide optimized loading speed and improved integration of native HTML elements. Additional features such as Asset Loading, Document Metadata, enhanced hooks, and a new use API improve performance and usability, while error handling and hydration have also been optimized.
Improved Error Handling for Hydration Issues
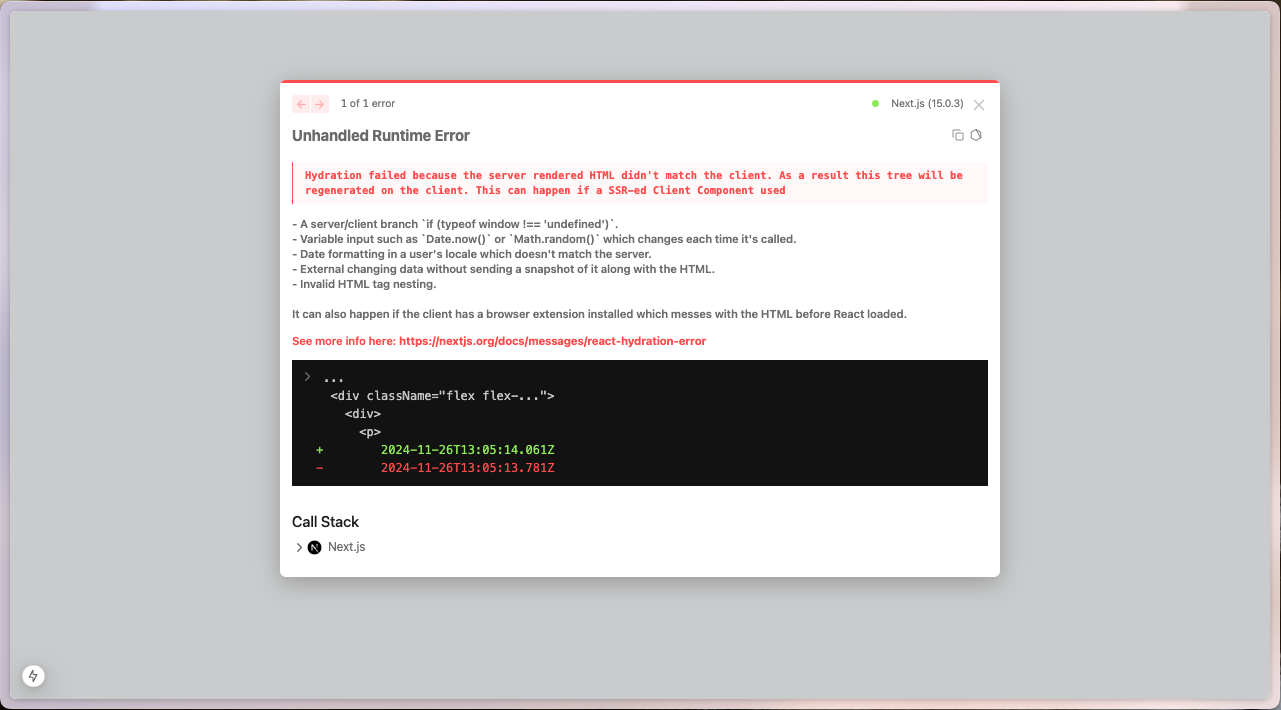
A common reason for hydration errors is that the content differs between server-side rendering (SSR) and client-side hydration. This often happens due to dynamic values, such as with Date.now() or Math.random().
Next.js 15
Next.js 14
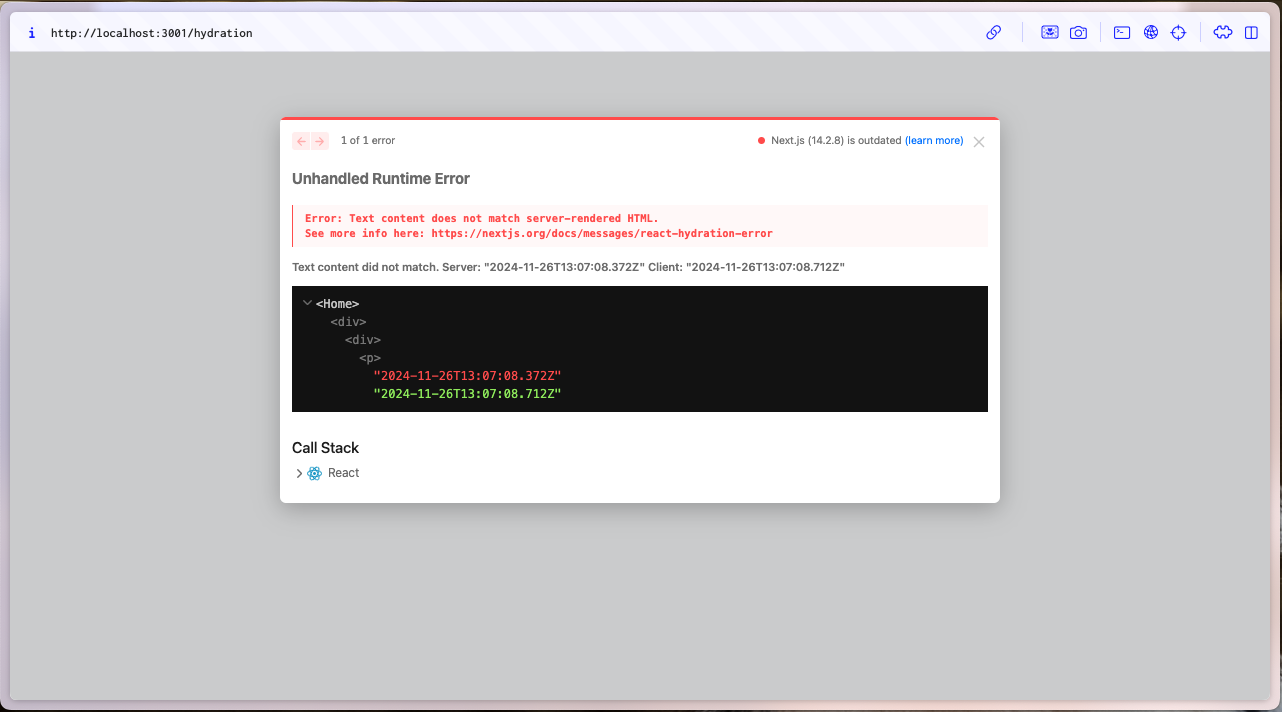
The example shows how Next.js 15 improves error messages for hydration errors and provides developers with clear guidance on how to fix them. While Next.js 14.1 issued rather vague warnings, Next.js 15 takes debugging to a new level by providing specific source code references and suggested solutions.
Stability and Performance with Turbopack
With the new version of Next.js, Turbopack is now stable and ready for everyday use. It can be enabled via the package.json by appending --turbo to the dev script.
|
|
The advantages are mainly due to the increased performance. Vercel reports that they were able to achieve up to 76.7% faster server startup in the development environment with their own Next.js app. During development, they also achieved up to 96.3% faster code updates thanks to the optimized Fast Refresh, as e.g. unnecessary modules do not have to be recompiled.
The stability and consistency of compilation times have also improved. Turbopack is also considered future-proof, as several other features are planned. These include a persistent cache to reuse already compiled code across restarts.
Example Next.js 15 with Turbopack:
|
|
And the same application without Turbopack:
|
|
Static vs. Dynamic Routes: The Static Route Indicator
This new feature supports the development process by indicating whether it is a static or dynamic route. The marker at the bottom left allows you to immediately see how the page is rendered.

[!NOTE]
Static Routes: These are generated once at build time and delivered directly from the cache (SSG).
Dynamic Routes: These are pages that are re-rendered on the server with each request (SSR) or contain dynamic adjustments.
If you run a next build, all routes available in the application are listed. Static routes are represented by ○ and dynamic routes by ƒ.
|
|
If you now call the start page, you will see the Static Route Indicator at the bottom left:

If, on the other hand, you call /techup/1, this indicator is no longer visible. This tells you that this page is rendered dynamically.

Note: If a promise is not used correctly, the indicator may still be displayed, even if, for example, an API interface is called.
Executing Code After the Response with unstable_after (Experimental)
This feature also aims to increase performance. There are often tasks that do not directly affect the user and where it is therefore unnecessary for them to wait. Such tasks include, for example, logging events or collecting analytics data. Previously, this was not possible because serverless functions terminate their execution time as soon as the response is complete. This made it impossible to perform subsequent tasks. With this feature, it is now possible to perform the main task of the component, such as rendering the page. In a second step, the secondary task can then be processed.
This is one of the experimental features that must first be enabled via the settings. This can be done in the next.config.ts file as follows:
|
|
Now let’s create a simple page that uses the new unstable_after feature:
|
|
If you now call the created page, you will get the timestamp of the call:
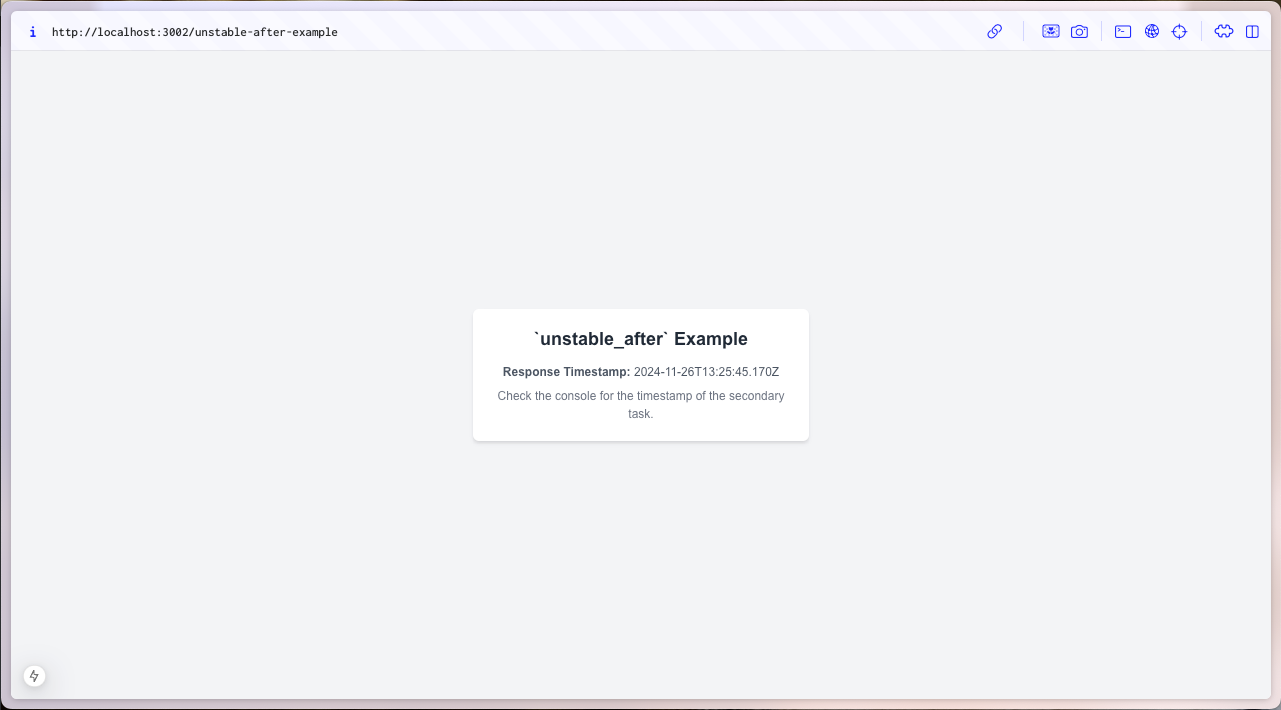
In this example, you can see the difference between the main task and the downstream task only by the timestamps in the console, which are accurate to the millisecond:
|
|
Introducing instrumentation.js for Error Monitoring
Now we will take a look at the instrumentation.js file, which is intended to help with better traceability and error monitoring in a Next.js app. For example, you can create functions that allow you to capture errors and forward them to an observability service.
The instrumentation.js file is created in the root directory of the project, as shown in the following directory structure:
|
|
First, the register function must be exported. This is called automatically when the Next.js server starts. To verify this, we add a log statement.
The new onRequestError function is now called automatically whenever an error occurs. In our example, an error log (console.error) is mainly written. In a productive environment, a fetch call to an observability service would be made at this point to forward the error information.
|
|
When starting the server, you will see the log message “Observability SDK initialized” from the register function, which confirms that the initialization was successful:
|
|
When the /api/instrumentation endpoint is called, you will see the log that is thrown inside the onRequestError method. This log contains detailed information about the error, the HTTP request, and the context.
|
|
Enhanced <Form> Component for Improved Forms
This new component extends the standard HTML element <form> with additional functions. This makes it easier to create forms, as functions such as prefetching, client-side navigation, and other improvements are integrated. A big advantage is that the form also works if JavaScript is disabled in the browser. Since prefetching and navigation are supported out of the box, you save a lot of code as a developer.
Here is a simple example of what the base of the <Form> component might look like:
|
|
The styling of the form can of course be adjusted, as you can see in the example below. For example, if you enter the search term “ipsum” on this page and submit the form:

you will be redirected directly to the page defined in the action parameter. In this case, the redirect address is: http://localhost:3002/search?query=ipsum.

Support for next.config.ts with TypeScript
Next.js 15 now supports TypeScript for the configuration file. Functionally, this doesn’t change much, but it follows the modern standard and makes life easier for developers already using TypeScript. Using TypeScript in the configuration file brings several advantages, such as improved type support and autocompletion by the development environment.
Next.js 15
Here, the configuration file can now be written in TypeScript, which allows for type-safe and more readable configuration:
|
|
Next.js 14
Here, on the other hand, it was necessary to make the configuration with JavaScript in an .mjs file:
|
|
Improved Security for Server Actions
Next.js 15 includes significant security improvements for Server Actions. These improvements are designed to ensure that server-side functions are protected and only executed when actually needed. Two of the new features in this area are the use of secure action IDs and the elimination of unused code (dead code elimination).
Secure Action IDs for Protected Server Calls
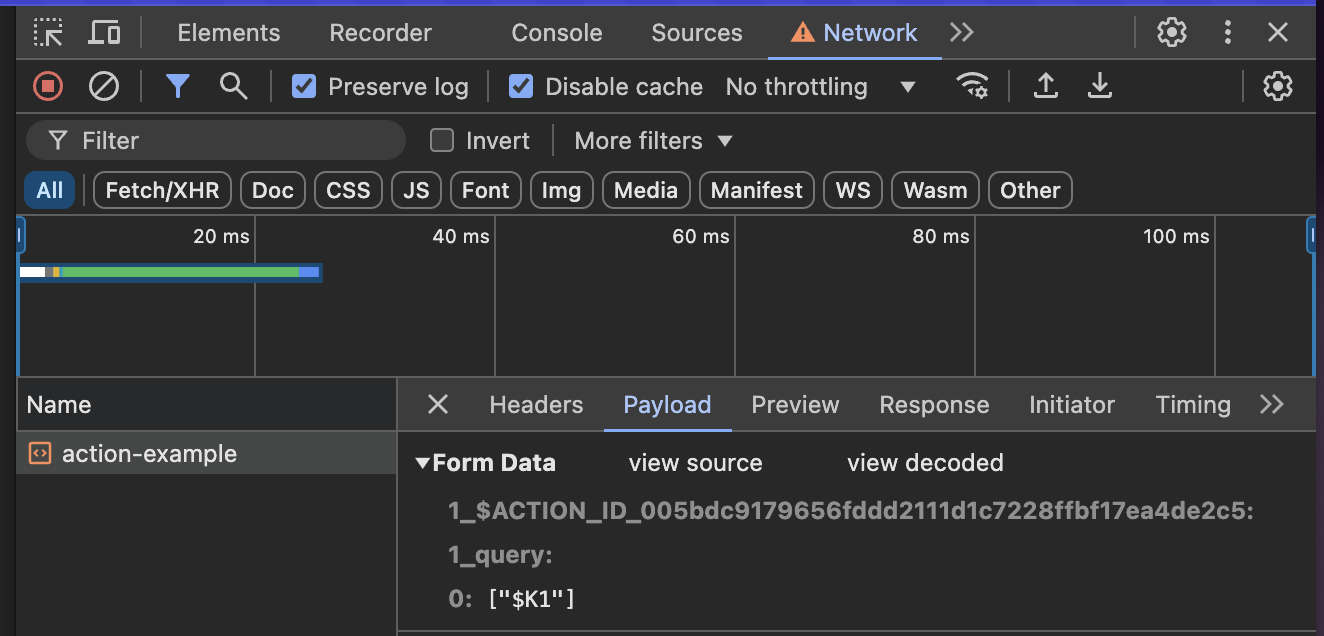
In Next.js 15, Server Actions are referenced by secure action IDs to improve the security of communication between the client and the server. Here is an example.
In this example, the form is submitted via the action ID testActionId, which references a Server Action. This ensures that only trusted server actions can be called, which improves security.
|
|
Here is the corresponding Server Action:
|
|
The log shows that the Server Action is called correctly:
|
|
Action Id in Payload:
Automatic Removal of Unused Server Actions (Dead Code Elimination)
Unused Server Actions or helper functions can pose a security risk because they remain accessible as public HTTP endpoints, even if they are not actively used. Dead code elimination ensures that only actually used code is included in the production version after the build.
Problem
- Server Actions or helper functions that are not used remain publicly accessible HTTP endpoints.
- There is a risk of accidental disclosure of functions that are not intended for external calls.
Solution
- Dead Code Elimination: Unused Server Actions are automatically removed during
next build. - Unused functions are not included in the JavaScript bundle.
- Advantages:
- Increased security: No unnecessary public endpoints.
- Smaller bundles: Reduced JavaScript bundle size.
- Better performance: Less data to load and process.
An example of this:
|
|
Optimizing the Bundling of External Packages
Next.js 15 introduces new configuration options to optimize the bundling of external packages. In the App Router, external packages are bundled by default, while in the Pages Router, specific packages can be specified for bundling using the transpilePackages option. This optimization can improve the startup performance of the application by reducing the number of network requests required to load dependencies. The new bundlePagesRouterDependencies option unifies automatic bundling in the Pages Router, and serverExternalPackages allows you to specifically exclude certain packages from the bundling process. These and other innovations in Next.js 15 ensure that development processes become more efficient and application performance is further enhanced.
Support for ESLint 9
Next.js 15 now supports ESLint 9, but remains backward compatible with ESLint 8, allowing for a gradual migration while legacy configuration options are gradually removed.
Improvements to the Development and Build Process
Next.js 15 brings improvements to the development and build process, including Hot Module Replacement (HMR) for server components, which avoids repeated API calls during development, and faster static generation, which significantly reduces build times by reusing render results.
Conclusion
The focus of this Next.Js update is primarily on performance. However, also security and developer experience. Features like after() to perform various tasks afterwards, or the use of Turbopack improve performance in different areas. Time can also be saved by the improved display of error messages for Hydration Errors or by the Static Indicator.
While in the first step one should not underestimate the complexity for the changes of the asynchronous API, such as headers or params, in the end this brings some performance gains.
Security is increased by removing unused endpoints or specifying the SecurceID, which makes Next.js a lot more robust. It will be exciting to see how larger projects start to upgrade to the new version, but Next.js is definitely going in the right direction to offer a modern setup with performance and modern tools.
This techup has been translated automatically by Gemini