Next.js was released in 2016 by Vercel. However, it started as a framework that focused on server-side rendering. Version 12, which was released on 26 October 2021, is the biggest step since Next.js has existed. It should also be mentioned that although it is such a big update, it is completely backwards compatible. At the same time, it is supposed to be very developer-friendly and also intuitive to use. Vercel themselves write that it is the React framework that is best used for production.
Welcome Next.js 12
Now, of course, we want to take you through the individual features and show you why this update brings such a big change.
Rust Compiler
First we start with the new compiler. This is now a compiler written in Rust, more precisely, the compiler is built on the code base of SWC (Speedy Web Compiler). This replaces the widely used Babel compiler. In Vercel’s blog post they state that reloading is up to 3x faster and also the build process is even up to 5x faster. Of course, this depends on how large the code base is. However, it should also be mentioned here that libraries such as styled-components, emotion or relay are not yet supported by the new compiler. However, these should of course be available soon. Via opt-in, minifications can also be activated within your configurations, which are supposed to be up to 7 times as fast as Terser.
Support of Middleware & Edge Functions
The typical use-case of middleware is that code may only be executed under certain conditions. This is possible because the response of each request can be processed. For this, there are the techniques of rewriting, redirecting, adding headers or streaming HTML.
Since Next.js in version 12 now supports the use of middleware, you can also use the so-called edge functions. This means that your code is executed as close as possible to the user. Before this version, you had to decide between CDN or SSR directly during development if you wanted to develop faster apps. This is possible because Edge functions are provided globally by default. A V8 runtime is used for this, which contains a powerful JavaScript and WebAssembly engine. Web API standards such as fetch are also supported. This should enable up to 100x faster start-up times compared to Node.js within containers or on virtual machines.
Examples of middleware are as follows:
- Authentication
- Bot Protection
- Redirects Browser Support
- Feature Flags
- A/B Testing
- Server-Side Analytics
- Logging
To this end, Vercel itself provides a page with various use cases for edge features using middleware.
ES Modules & URL Imports
The feature of ES Modules was actually already worked on in the previous version. But now the feature of URL Imports is added. This combination offers you the possibility to directly integrate different tools / packages from a CDN without having to install or build them yourself. Of course, the package must be provided in a “ready-for-production” version. This can then be integrated and used directly via the URL. In any case, it should be mentioned that this feature is currently still in an experimental version. With this new feature, you can reduce the size of the bundles by quite a bit.
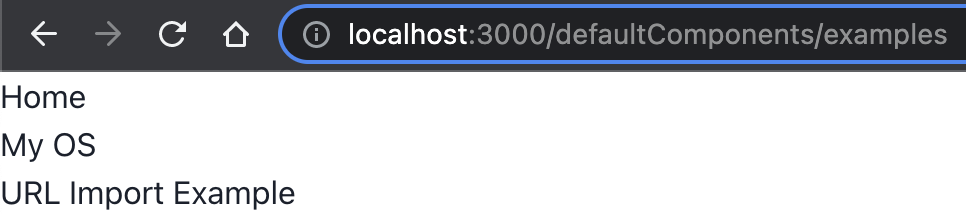
Default components
During the presentation of Next.js, some default components were discussed in more detail, and we do not want to withhold these from you. In this case, default components means that components are used instead of the usual tags. This makes it possible to provide some additional functions that are intended to make life easier for developers. For example, these components include:
- Link
- image
- script
We will take a closer look at these in the practical examples below. However, every developer knows the problem of not using such standard components very often. This can happen for various reasons, for example, you often don’t know what alternatives there are or you quickly forget them if they are not used often. This is why Next.js already introduced its conformance system in its previous version. This should show the developer solutions and rules to use different features in a more targeted way and also more often in order to write a better application.
For example, if one uses an a\ tag instead of the link\ component, an error is displayed as soon as one runs npm run lint. This would be the output for that case:
|
|
Vercel’s platform
If you deploy your application to Vercel itself, there are some notable features that you can use without much effort.
Next.js Live
With Next.js Live, Vercel offers you the possibility to simultaneously adapt your code, chat or, for example, draw with your team from anywhere in the world. And all this in real time. All you need is a deployment on the Vercel platform and a browser.
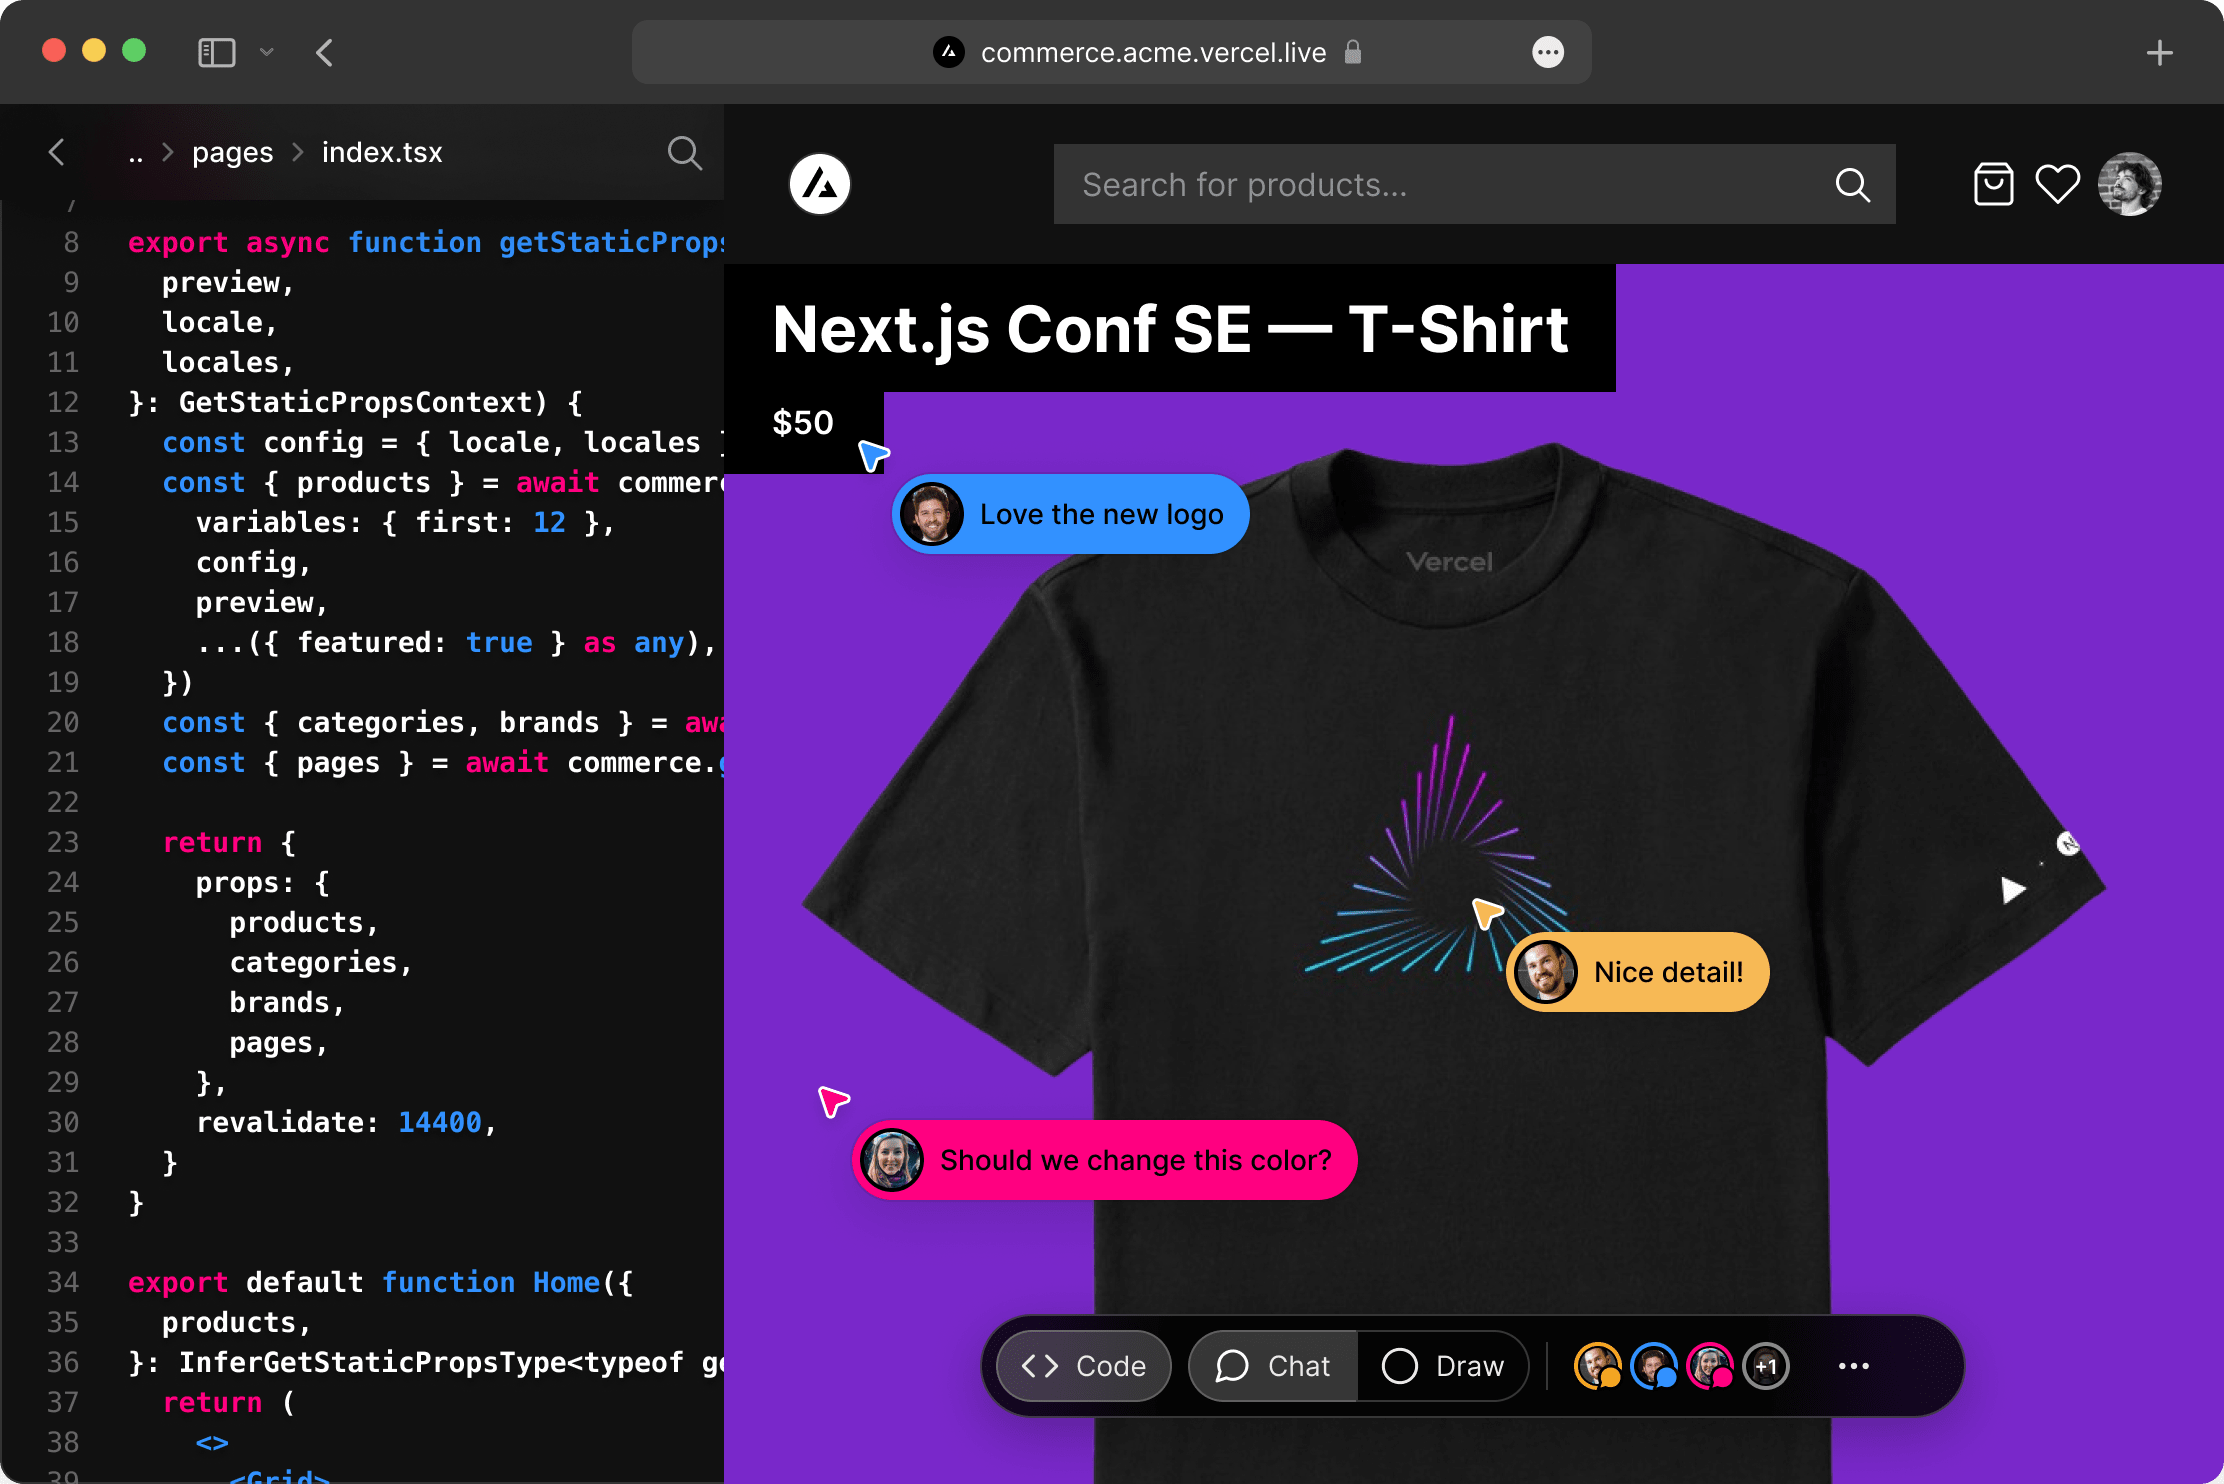
Figure: Source: 26.01.2022: https://vercel.com/live
Next.js Analytics
If you have an application yourself and make it available to several users, you naturally want to know how fast or stable it is running. Here there is the Analytics feature to monitor various parameters. Based on the collected values, a score is calculated that reflects how well your application is performing. You can use all these features without changing anything at all in your code. With this feature, it is not even necessary for your application to be deployed to Vercel, but you will need a paid Pro or Enterprise plan. In addition to Next.js applications, this can also be used with Nuxt.js or Gatsby applications.
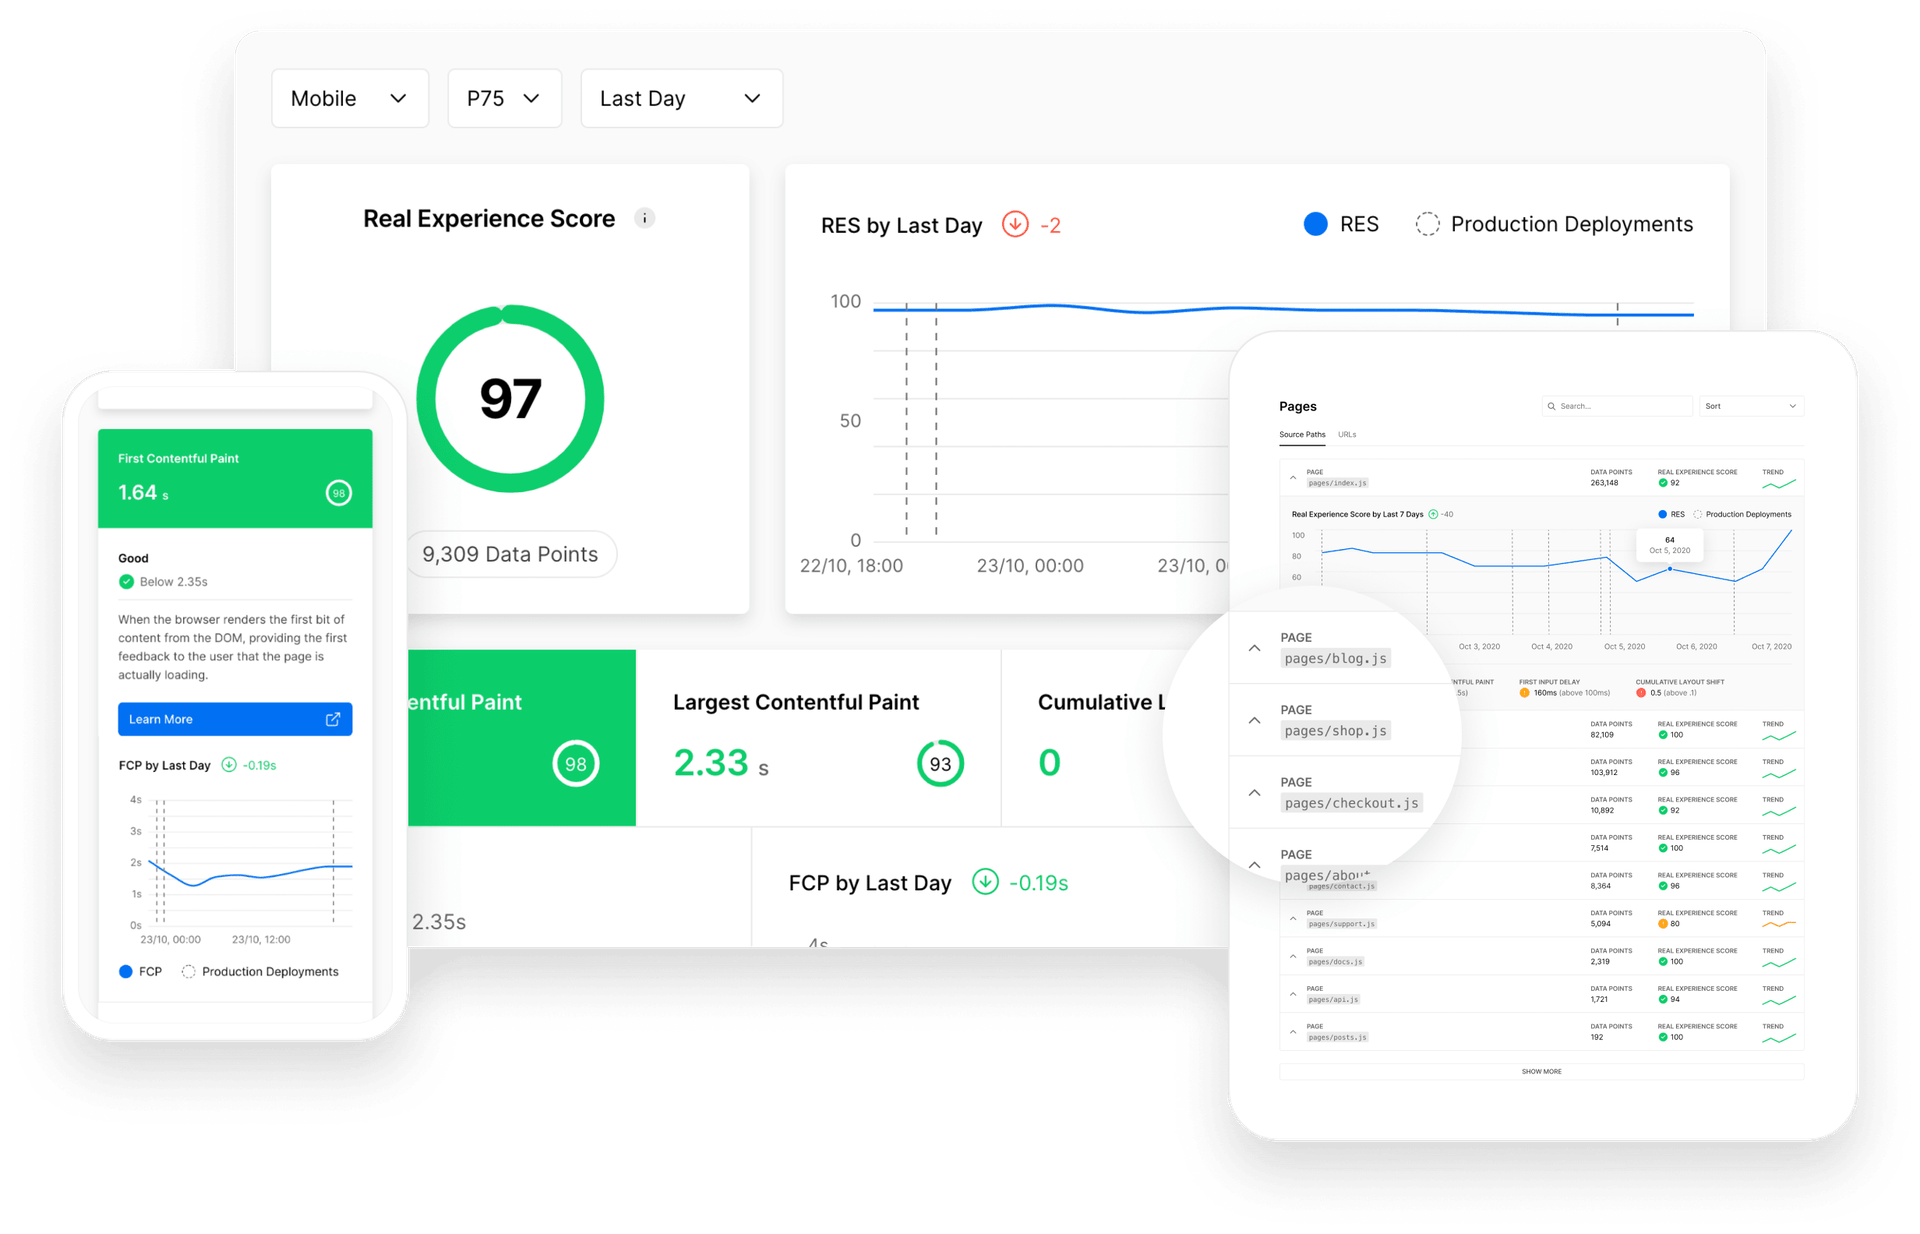
Figure: Source: 26.01.2022: https://vercel.com/_next/image?url=https%3A%2F%2Fassets.vercel.com%2Fimage%2Fupload%2Fq_auto%2Ffront%2Finsights%2Fdashboard.png&w=1920&q=75
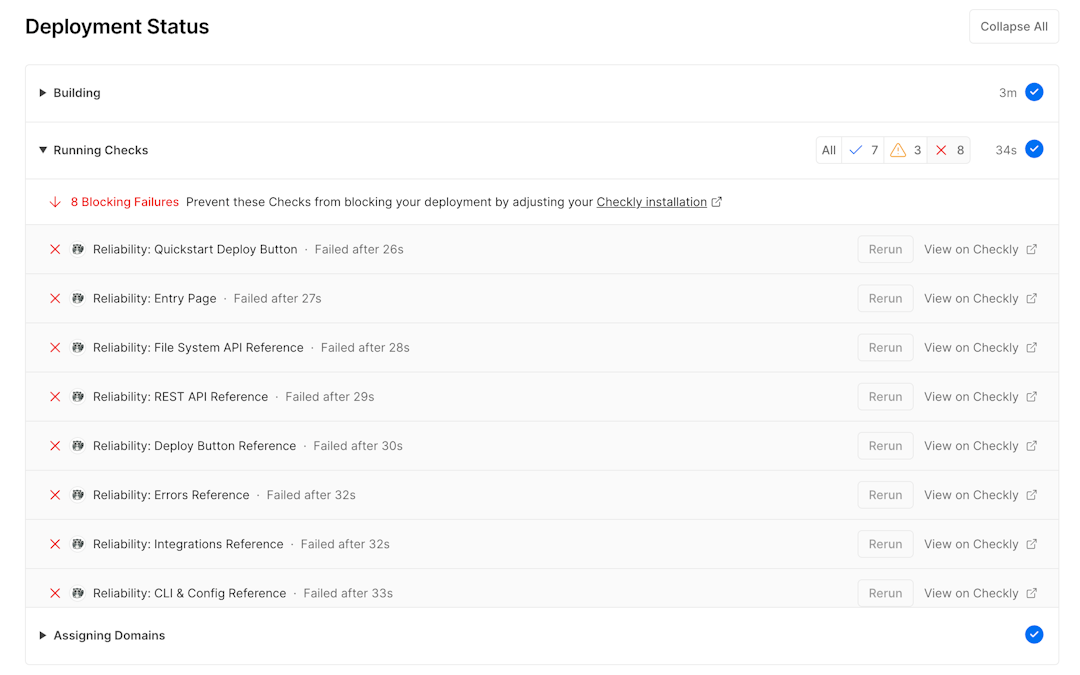
Vercel Checks
This tool is intended to prevent errors from occurring in the first place or to prevent poor performance results due to code errors. With Checks, all pages that have been changed are automatically checked during deployment. This means that all pages are not always checked again so as not to lose unnecessary time. The state of your application is evaluated by Virtual Experience Score (VES). This is calculated by different values.
- FCP - First Contentful Paint
- describes how fast the page is loaded or when the first content of the page is displayed.
- LCP - Largest Contentful Paint
- describes how one perceives the loading speed or until the entire content of the page is loaded
- CLS - Cumulative Layout Shift
- describes how many elements move again after the user can see them
- TTI
- describes how long the main thread was blocked in order to prevent input
- TBT - Total Blocking Time
- This is used instead of FID (First Input Delay) as this cannot be measured in a simulated environment. TBT instead measures the time between the FCP and the TTI.
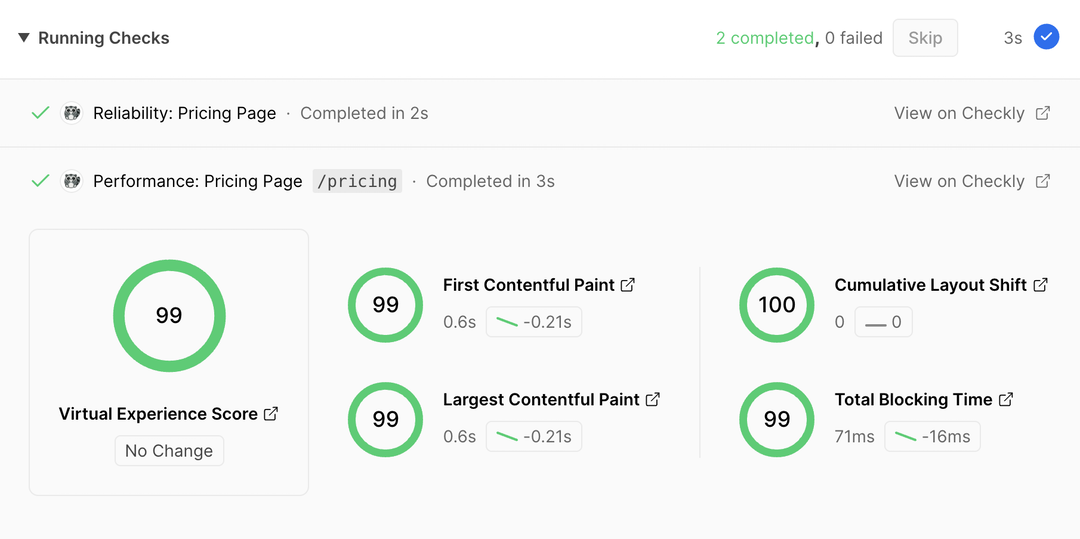
Figure: Source: 26.01.2022: https://vercel.com/_next/image?url=%2Fdocs-proxy%2Fstatic%2Fdocs%2Fconcepts%2Fdeployments%2Fchecks%2Frunning-checks-step.png&w=1080&q=75
Hands-on
Now, of course, we would like to show you some additional examples of how to use the new functions from the release of Next.js 12. To do this, it is best to first create a new Next app.
|
|
In order to quickly have a more beautiful design, we use the framework Chakra, which already provides some standard components.
|
|
After the installation is finished, the file app.tsx has to be modified, because it needs a ChakraProvider around the Component tag to use Chakra.
This is necessary for all designs and functions to work.
|
|
Within the index.tsx, some todo items are needed first for the example, these are called todo in the example. The variable item, is used to create new todo items, because the entered value is stored in it. Then the two methods removeItem and AddItem are needed.
|
|
You can then start the local server and call up http://localhost:3000/ in the browser and try out the functions of a ToDo list.

Creating a middleware
The best way to demonstrate this is with two simple examples. Let’s start with a simple variant that simply changes the response. For the first example, first create a file called _middleware.ts under the folder pages.
|
|
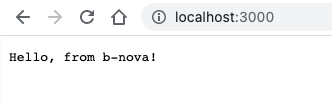
This created _middleware\ file is called for every route under the route /pages. Thus you should be sure that this is also necessary on every other page. Within the following example, the message Hello, from b-nvoa would now be output as a response after each request instead of loading the normal page.
|
|
Instead of returning a fixed response, it would make much more sense to check a JWT token. If you now call up the start page of the application again, you no longer see the ToDo list, but the message from the middleware.
For this example, the previous example should be commented out, because otherwise, as already mentioned, this middleware counts for all routes. For now we want to show you another example with redirect. To do this, first create a new route by creating a folder with the name of the desired route.
In this example it will be the route myos. Within it, for our example, you need a standard page with the name myosx.tsx and a file with the name _middleware.ts, which will subsequently serve as middleware specifically for the route. Since we want to use a redirect in this example, it requires another file with the name [os].tsx. This file should be used for routing on the server side without the user noticing.
Now we should have such a folder structure:
|
|
For the standard output of the page, we simply define a text like this:
|
|
The import of useRouter is a React hook, so it is also necessary in the next step, to create a new instance. Using the URL, which is rewritten within the middleware, we can read out and return the operating system.
|
|
Now it is necessary to adapt the URL so that our [os].tsx can also read the variable for the operating system. In order to be able to perform a rewrite, it needs the import of NextResponse. Within the function, the operating system is read from the request and then the rewrite to the previously determined page takes place.
|
|
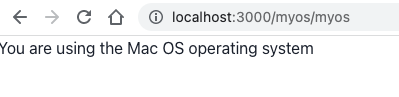
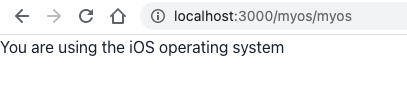
Using the developer tools, we can now display this as an iPad and see that the content of the page has now been adapted without any adjustments to the URL in the browser.
ES Modules and URL Imports
If you want to use URL Imports, the function must be enabled via next.config.ts, as it is still an experimental function.
|
|
Now we create the skypackExample.tsx, which contains the import from the Skypack CDN. The function confetti is also called up here via a button.
|
|
Default components
Links:
Instead of the usual a-tag, Next.js offers the link component. This offers the possibilities of automatic pre-fetching and pre-rendering. It is also said that this improves SEO. Furthermore, transitions between the different routes can be enabled on the client side.
Further examples of configurations can be found in the next.js documentation.
Images
There is now also an image component instead of the src tag. Here out-of-the-box automatic layout options like enlargement depending on the viewport are possible. There are also settings like loader functions that return a URL with settings for src, width and quality. Or you can use a blur transition until the image has loaded the optimal quality. Many more settings can be found again in the doc.
Script
Finally, the script component should be mentioned, which replaces the src tag. Here you can use the attribute strategy to determine when a 3rd-party script is loaded. Or using onLoad you can execute a script as soon as it is loaded.
|
|
Conclusion
If you have already dealt with various JavaScript frameworks, you will already know the new features of Next.js. Therefore, you will notice that such functions will also do this framework a lot of good. It should also be noted that some of the new features are even still classified as experimental. In any case, it must be said that this update is very helpful for the developer and also for the end user, as a difference in speed is noticeable. Another point to be aware of is that features like Live and Analytics are mainly usable if you also host your application at Vercel.