Multityping in Kafka: A Practical Guide to Using One Topic for Different Event Types

08.05.2024Ricky Elfner
Tech apache kafka streaming Microservices architecture Event-Driven

Banner

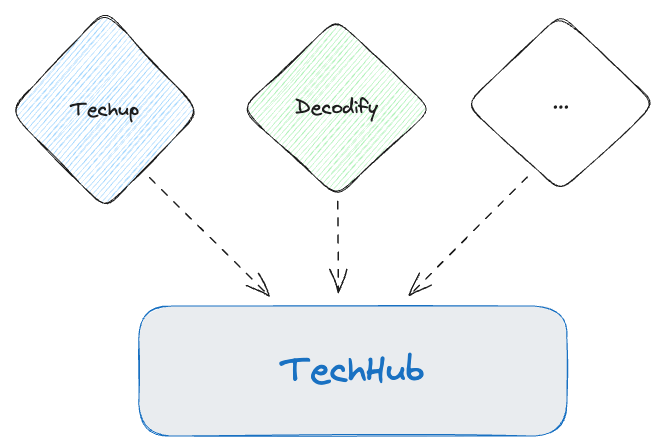
In this Techup, we’ll explore the best way to write multiple events to a single Kafka topic. To illustrate this, I’ve devised a practical use case. We regularly publish blog articles on various topics, which we call Techups. Additionally, we’ve had our own podcast called Decodify for some time now. All of this is part of our internal research and development process and is collected in our Techhub. Therefore, in this example, there’s a topic called Techhub that receives events of the type Techup and Decodify.

Below, you can see that different events are intended to be written to the TechHub topic:
Practical Implementation: One Kafka Topic for Multiple Event Types

The example is implemented using a Quarkus application in version 3.9. The best way to start is by creating the basic framework in Quarkus itself.

Schema Development: Basics and Implementation

The first step is to create our desired schemas, from which the corresponding Java classes will be generated. First, the Techup schema — techup.avsc:

 1
 2
 3
 4
 5
 6
 7
 8
 9
10
11
12
13
14
15
16
17
18
19
20
21
22
23
24
25
26
27
28
29
30
31
32
{
  "namespace": "com.bnova",
  "type": "record",
  "name": "Techup",
  "fields": [
    {
      "name": "title",
      "type": "string",
      "default": ""
    },
    {
      "name": "slug",
      "type": "string",
      "default": ""
    },
    {
      "name": "author",
      "type": "string",
      "default": ""
    },
    {
      "name": "content",
      "type": "string",
      "default": ""
    },
    {
      "name": "description",
      "type": "string",
      "default": ""
    }
  ]
}

We also need our Decodify schema — decodify.avsc:

 1
 2
 3
 4
 5
 6
 7
 8
 9
10
11
12
13
14
15
16
17
18
19
20
21
22
23
24
25
26
27
28
29
30
31
32
33
34
35
36
37
38
39
40
{
  "namespace": "com.bnova",
  "type": "record",
  "name": "Decodify",
  "fields": [
    {
      "name": "episode",
      "type": "int",
      "doc": "The episode number.",
      "default": 0
    },
    {
      "name": "season",
      "type": "int",
      "doc": "The season number.",
      "default": 0
    },
    {
      "name": "topic",
      "type": "string",
      "doc": "The main topic of the episode.",
      "default": ""
    },
    {
      "name": "attendees",
      "type": {
        "type": "array",
        "items": "string"
      },
      "doc": "A list of attendees or participants in the episode.",
      "default": []
    },
    {
      "name": "description",
      "type": "string",
      "doc": "A brief description of the episode.",
      "default": ""
    }
  ]
}

However, to enable writing multiple entries to the same topic, we need another file that serves as a reference to the other two schemas.

bnova_techup_techhub_topic_all_types.avsc:

1
2
3
4
[
  "com.bnova.Techup",
  "com.bnova.Decodify"
]

Kafka Topics — Set-Up

Now it’s time to create the corresponding topic. Our Techhub topic needs to be defined as both an input and output topic within our example project. This is because we’ll later provide an endpoint for testing purposes that will write to this topic, allowing us to test that both schemas can be read. The prefixes mp.messaging.outgoing and mp.messaging.incoming define whether the topic is used for receiving or sending.

In our example, the SmallRye Kafka Connector is used to send and receive messages to Kafka. This allows the application to efficiently send messages to a Kafka topic.

The setting with the postfix topic defines the name of the corresponding topic. Additionally, the desired serializer and deserializer must be defined so that the data can be processed correctly.

To enable the deserializer to use the exact schema that was used when writing the data, specific.avro.reader is activated.

1
2
3
4
5
6
7
8
9
mp.messaging.outgoing.techhub-topic.connector=smallrye-kafka
mp.messaging.outgoing.techhub-topic.topic=${bnova.techup.topic.prefix}.techhub-topic.v1
mp.messaging.outgoing.techhub-topic.value.serializer=io.confluent.kafka.serializers.KafkaAvroSerializer

mp.messaging.incoming.techhub.connector=smallrye-kafka
mp.messaging.incoming.techhub.topic=${bnova.techup.topic.prefix}.techhub-topic.v1
mp.messaging.incoming.techhub.group.id=${bnova.techup.topic.prefix}-producer
mp.messaging.incoming.techhub.value.deserializer=io.confluent.kafka.serializers.KafkaAvroDeserializer
mp.messaging.incoming.techhub.specific.avro.reader=true

Essential Kafka Services

To utilize different schemas, we need a Schema Registry. I’ve chosen the solution from Confluent for this purpose. Together, these services form a complete Kafka architecture deployed via Docker, providing a robust platform for message transmission and schema management. Each service plays a specific role:

The Kafka Broker is the heart of the system and is responsible for managing and storing messages. The configuration defines the necessary ports, environment variables, and listeners to enable communication.

 1
 2
 3
 4
 5
 6
 7
 8
 9
10
11
12
13
14
15
16
17
18
19
20
21
22
23
24
25
26
  broker:
    image: confluentinc/cp-kafka:7.6.0
    hostname: broker
    container_name: broker
    ports:
      - "9092:9092"
      - "9101:9101"
    environment:
      KAFKA_NODE_ID: 1
      KAFKA_LISTENER_SECURITY_PROTOCOL_MAP: 'CONTROLLER:PLAINTEXT,PLAINTEXT:PLAINTEXT,PLAINTEXT_HOST:PLAINTEXT'
      KAFKA_ADVERTISED_LISTENERS: 'PLAINTEXT://broker:29092,PLAINTEXT_HOST://localhost:9092'
      KAFKA_OFFSETS_TOPIC_REPLICATION_FACTOR: 1
      KAFKA_GROUP_INITIAL_REBALANCE_DELAY_MS: 0
      KAFKA_TRANSACTION_STATE_LOG_MIN_ISR: 1
      KAFKA_TRANSACTION_STATE_LOG_REPLICATION_FACTOR: 1
      KAFKA_JMX_PORT: 9101
      KAFKA_JMX_HOSTNAME: localhost
      KAFKA_PROCESS_ROLES: 'broker,controller'
      KAFKA_CONTROLLER_QUORUM_VOTERS: '1@broker:29093'
      KAFKA_LISTENERS: 'PLAINTEXT://broker:29092,CONTROLLER://broker:29093,PLAINTEXT_HOST://0.0.0.0:9092'
      KAFKA_INTER_BROKER_LISTENER_NAME: 'PLAINTEXT'
      KAFKA_CONTROLLER_LISTENER_NAMES: 'CONTROLLER'
      KAFKA_LOG_DIRS: '/tmp/kraft-combined-logs'
      # Replace CLUSTER_ID with a unique base64 UUID using "bin/kafka-storage.sh random-uuid"
      # See https://docs.confluent.io/kafka/operations-tools/kafka-tools.html#kafka-storage-sh
      CLUSTER_ID: 'MkU3OEVBNTcwNTJENDM2Qk'

The Schema Registry from Confluent, specified in the second service block, is crucial for schema management, which is needed in Kafka environments to ensure the compatibility and versioning of the schemas used for message serialization. The configuration ensures that the Registry has the necessary information to communicate with the Kafka Broker and effectively store and manage schemas.

 1
 2
 3
 4
 5
 6
 7
 8
 9
10
11
12
  schema-registry:
    image: confluentinc/cp-schema-registry:7.6.0
    hostname: schema-registry
    container_name: schema-registry
    depends_on:
      - broker
    ports:
      - "8081:8081"
    environment:
      SCHEMA_REGISTRY_HOST_NAME: schema-registry
      SCHEMA_REGISTRY_KAFKASTORE_BOOTSTRAP_SERVERS: 'broker:29092'
      SCHEMA_REGISTRY_LISTENERS: http://0.0.0.0:8081

To enhance user-friendliness and provide a graphical interface for interacting with the Kafka cluster, the kafka-ui service is employed. This tool allows users to visually inspect and manage the topics, partitions, messages, and schemas within the cluster. It is particularly useful for debugging and monitoring as it provides a quick overview and easy control of Kafka resources without complicated command-line operations.

1
2
3
4
5
6
7
8
9
  kafka-ui:
    container_name: kafka-ui
    image: provectuslabs/kafka-ui:latest
    ports:
      - 8082:8080
    environment:
      DYNAMIC_CONFIG_ENABLED: 'true'
      KAFKA_CLUSTERS_0_BOOTSTRAPSERVERS: broker:29092
      KAFKA_CLUSTERS_0_NAME: 'local'

Registration and Usage of Avro Schemas

After setting up the Schema Registry, the prepared schemas need to be registered. This is done through configuration in the application.properties, where the URL of the Registry is specified as follows:

1
kafka.schema.registry.url=http://localhost:8081

To effectively register and manage the schemas, an additional plugin is required. The Avro schemas should be placed in a specific structure within the project directory so that dependencies/references can be resolved.

1
2
3
4
5
6
7
8
├── src
│   ├── main
│   │   ├── avro
│   │   │   ├── bnova_techup_techhub_topic_all_types.avsc
│   │   │   └── include
│   │   │       ├── decodify.avsc
│   │   │       └── techup.avsc
│   │   │

The kafka-schema-registry-maven-plugin from Confluent is configured in the project’s pom.xml file. This plugin allows registering the schemas directly from the project structure and ensuring they comply with the compatibility policies defined in the Schema Registry. The plugin configuration looks like this:

 1
 2
 3
 4
 5
 6
 7
 8
 9
10
11
12
13
14
15
16
17
18
19
20
21
22
23
24
25
26
27
28
29
30
31
32
33
34
35
36
37
38
39
40
41
42
<plugin>
    <groupId>io.confluent</groupId>
    <artifactId>kafka-schema-registry-maven-plugin</artifactId>
    <version>7.6.0</version>
    <configuration>
        <schemaRegistryUrls>
            <param>${kafka-schema-registry.url}</param>
        </schemaRegistryUrls>
        <subjects>
            <decodify>src/main/avro/include/decodify.avsc</decodify>
            <techup>src/main/avro/include/techup.avsc</techup>
            <bnova-techup.techhub-topic.v1-value>src/main/avro/bnova_techup_techhub_topic_all_types.avsc</bnova-techup.techhub-topic.v1-value>
        </subjects>
        <outputDirectory>src/main/avro/include</outputDirectory>
        <schemaTypes>
            <decodify>AVRO</decodify>
            <techup>AVRO</techup>
            <bnova-techup.techhub-topic.v1-value>AVRO</bnova-techup.techhub-topic.v1-value>
        </schemaTypes>
        <references>
            <bnova-techup.techhub-topic.v1-value>
                <reference>
                    <name>com.bnova.Decodify</name>
                    <subject>decodify</subject>
                </reference>
                <reference>
                    <name>com.bnova.Techup</name>
                    <subject>techup</subject>
                </reference>
            </bnova-techup.techhub-topic.v1-value>
        </references>
        <compatibilityLevels/>
        <messagePath/>
        <outputPath/>
        <previousSchemaPaths/>
        <schemas/>
    </configuration>
    <goals>
        <goal>register</goal>
        <goal>validate</goal>
    </goals>
</plugin>

To ensure that the required dependencies are available, the Confluent repositories must be added to the pom.xml. This allows Maven to find and load the specific Confluent packages:

 1
 2
 3
 4
 5
 6
 7
 8
 9
10
11
12
13
14
15
16
	<repositories>
		<!-- io.confluent:kafka-json-schema-serializer is only available from this repository: -->
		<repository>
			<id>confluent</id>
			<url>https://packages.confluent.io/maven/</url>
			<snapshots>
				<enabled>false</enabled>
			</snapshots>
		</repository>
	</repositories>
	<pluginRepositories>
		<pluginRepository>
			<id>confluent</id>
			<url>https://packages.confluent.io/maven/</url>
		</pluginRepository>
	</pluginRepositories>

With this configuration, we can efficiently register the Avro schemas and ensure they are correctly validated and compatible with the requirements of the Kafka applications.

Implementation of the Consumer

Now we focus on implementing a Kafka Consumer. The consumer is represented by a Java class that we simply call Consumer. To listen to a specific Kafka topic, we use the @Incoming annotation from MicroProfile Reactive Messaging. This indicates that this method should receive messages from the “techhub” topic.

For flexibility in handling different schemas, we use the SpecificRecord as a parameter of the process method. SpecificRecord is an interface from the Apache Avro Framework that allows handling generated Avro objects, each representing a specific schema.

Currently, the functionality of the consumer is limited to logging information about the received Avro record. The class is configured to output the name of the Java class object representing the Avro record in the log. In our scenario, we expect the names com.bnova.Techup and com.bnova.Decodify to appear in the log, depending on which schema is used in the incoming messages.

 1
 2
 3
 4
 5
 6
 7
 8
 9
10
11
12
13
14
15
16
17
18
19
20
21
22
23
24
25
26
27
28
29
30
31
32
33
34
35
package com.bnova.consumer;

import lombok.extern.jbosslog.JBossLog;

import org.apache.avro.specific.SpecificRecord;
import org.eclipse.microprofile.reactive.messaging.Incoming;
import com.bnova.Decodify;
import com.bnova.Techup;

@JBossLog
public class Consumer
{
	@Incoming("techhub")
	public void process(SpecificRecord record)
	{
		log.info(record.getClass().getName());

		if (record instanceof Techup techup)
		{
			log.info(techup.getTitle());
			log.info(techup.getSlug());
			log.info(techup.getAuthor());
			log.info(techup.getContent());
			log.info(techup.getDescription());
		}
		else if (record instanceof Decodify decodify)
		{
			log.info(decodify.getEpisode());
			log.info(decodify.getSeason());
			log.info(decodify.getTopic());
			log.info(decodify.getAttendees());
			log.info(decodify.getDescription());
		}
	}
}

Interactive Testing of the Topics

To enable writing messages to the Kafka topic “Techhub” for testing purposes, I’ve implemented a REST endpoint that allows manually creating and sending entries for two different object types – Techup and Decodify. The endpoint offers two specific paths: /test/techup/{title} for a Techup object and /test/decodify/{title} for a Decodify object.

For sending these objects to the Kafka topic, the Emitter mechanism of MicroProfile Reactive Messaging is used. This emitter is connected to the name of the topic to be written to using the @Channel annotation. This makes it possible to send messages directly from the application to the specified topic.

In the Java code, it looks like this:

 1
 2
 3
 4
 5
 6
 7
 8
 9
10
11
12
13
14
15
16
17
18
19
20
21
22
23
24
25
26
27
28
29
30
31
32
33
34
35
36
37
38
39
40
41
42
43
44
45
46
47
48
49
50
51
52
53
package com.bnova.endpoint;

import jakarta.inject.Inject;
import jakarta.ws.rs.GET;
import jakarta.ws.rs.Path;
import jakarta.ws.rs.PathParam;

import java.util.List;
import org.apache.avro.specific.SpecificRecord;
import org.eclipse.microprofile.reactive.messaging.Channel;
import org.eclipse.microprofile.reactive.messaging.Emitter;
import com.bnova.Decodify;
import com.bnova.Techup;

@Path(value = "test")
public class ExampleGenerator
{
	@Inject
	@Channel("techhub-topic")
	Emitter<SpecificRecord> commandTopicEmitter;

	@Path("techup/{title}")
	@GET
	public void createExampleTechup(@PathParam("title") String title)
	{
		var techup = Techup
				.newBuilder()
				.setTitle(title)
				.setSlug(title + "-slug")
				.setAuthor("Ricky")
				.setContent("example content for " + title)
				.setDescription("example desciption for " + title)
				.build();

		commandTopicEmitter.send(techup);
	}

	@Path("decodify/{episode}")
	@GET
	public void createExamplePodcast(@PathParam("episode") int eNr)
	{
		var episode = Decodify
				.newBuilder()
				.setEpisode(eNr)
				.setSeason(1)
				.setTopic("Multiple Eventtypes in the same topic")
				.setAttendees(List.of("Ricky", "Stefan", "Tom", "Wasili"))
				.setDescription("This is a decodify episode to talk about multiple diffrent event types in the same Kafka topic")
				.build();

		commandTopicEmitter.send(episode);
	}
}

By implementing these endpoints, the user can create and send example Techup and Decodify objects to the Kafka topic through simple HTTP GET requests. This method is excellent for debugging and testing integration and processing logic in the Kafka environment.

Commissioning

To test the required infrastructure for our Kafka and Quarkus application, we first start the services via Docker Compose. The command docker compose up in the directory containing our docker-compose.yaml file downloads all necessary images and starts the containers. We can then check the correct execution and status of the containers using the command docker ps. The result should look something like this:

1
2
3
4
CONTAINER ID   IMAGE                                   COMMAND                  CREATED              STATUS              PORTS                                            NAMES
ddf93697afd8   confluentinc/cp-schema-registry:7.6.0   "/etc/confluent/dock…"   About a minute ago   Up About a minute   0.0.0.0:8081->8081/tcp                           schema-registry
e28aa00fb7fe   provectuslabs/kafka-ui:latest           "/bin/sh -c 'java --…"   About a minute ago   Up About a minute   0.0.0.0:8082->8080/tcp                           kafka-ui
3bce38d889ed   confluentinc/cp-kafka:7.6.0             "/etc/confluent/dock…"   About a minute ago   Up About a minute   0.0.0.0:9092->9092/tcp, 0.0.0.0:9101->9101/tcp   broker

Next, we check if the Schema Registry has started successfully and is accessible, although no schemas should be registered at this point.
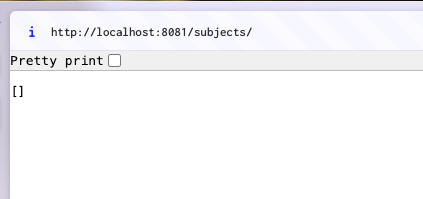
Once the services are running, we start our Quarkus application in development mode with mvn quarkus:dev. If this process is successful, we should see the newly created topic bnova-techup.techhub-topic.v1 in the Kafka UI.

Now it’s time to register the schemas for our events that we previously configured in our Maven project. We achieve this by executing the command mvn schema-registry:register, which registers the schemas in the Schema Registry:

 1
 2
 3
 4
 5
 6
 7
 8
 9
10
11
12
13
14
15
16
17
~/Development/techhub/quarkus-kafka/producer ❯ mvn schema-registry:register                                                                                                                                                                                                                          16:02:59
[INFO] Scanning for projects...
[INFO] 
[INFO] -------------------------< com.bnova:producer >-------------------------
[INFO] Building producer 1.0.0-SNAPSHOT
[INFO] --------------------------------[ jar ]---------------------------------
[INFO] 
[INFO] --- kafka-schema-registry-maven-plugin:7.6.0:register (default-cli) @ producer ---
[INFO] Registered subject(decodify) with id 1 version 1
[INFO] Registered subject(techup) with id 2 version 1
[INFO] Registered subject(bnova-techup.techhub-topic.v1-value) with id 3 version 1
[INFO] ------------------------------------------------------------------------
[INFO] BUILD SUCCESS
[INFO] ------------------------------------------------------------------------
[INFO] Total time:  1.564 s
[INFO] Finished at: 2024-04-10T16:03:03+02:00
[INFO] ------------------------------------------------------------------------

The successful registration can also be verified directly in the Registry.

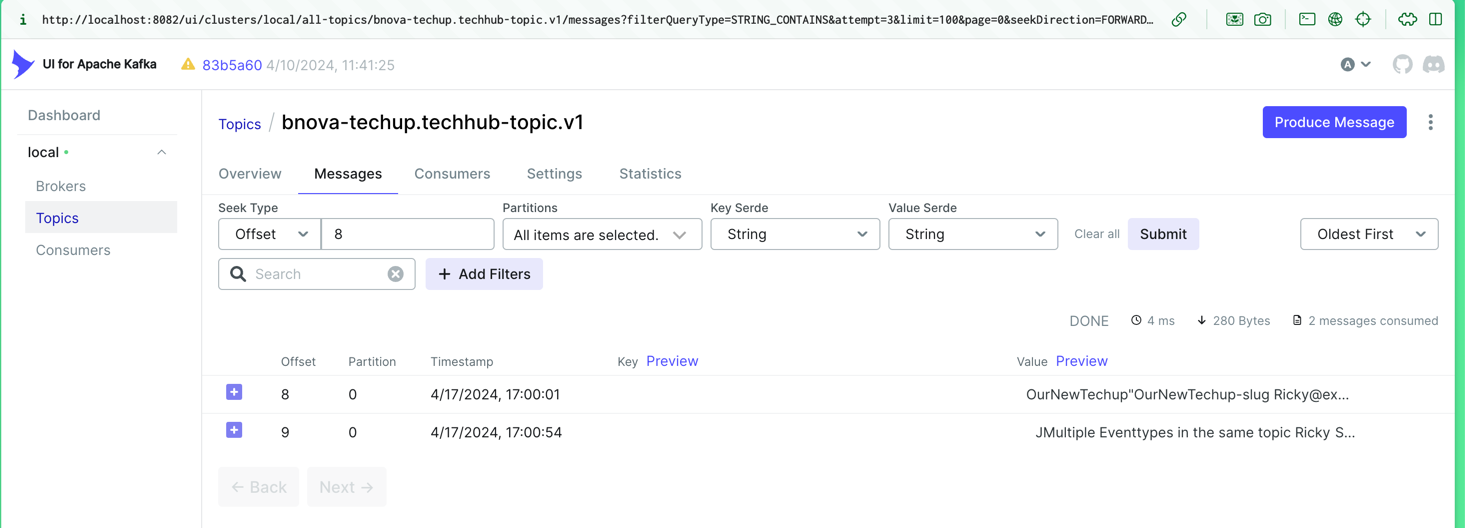
The actual test is performed by sending two different event types via our REST endpoint. We use Curl commands to send one Decodify and one Techup event to the topic.

As you can see on the right side, one decofiy event and one Techup event were sent. On the left, you can see the output, which outputs the correct classes as desired.

We can see the results of these actions not only in the console but also in the Kafka UI, where the received messages are displayed.
[!TIP]

The entire code can also be viewed via the Techhub Repository

Conclusion

Implementing this approach presents both challenges and significant advantages. Technically, simplifying with a single topic initially increases complexity, especially during the initial configuration. A specific type is not read directly from the topic but is processed as a SpecificRecord that needs to be checked before further processing. The use of Avro schemas also limits the use of generic classes or inheritance structures.

On the positive side, there is a significant reduction in administrative effort and costs, as fewer topics need to be maintained, and costs are often calculated per topic. Additionally, the structure allows for flexible expansion with new types without much effort: It only requires creating a new schema, registering it, and possibly adjusting the business logic. This approach offers an efficient solution for dynamic and scalable data architectures in modern applications.

This techup has been translated automatically by Gemini

Ricky Elfner

Ricky Elfner – Denker, Überlebenskünstler, Gadget-Sammler. Dabei ist er immer auf der Suche nach neuen Innovationen, sowie Tech News, um immer über aktuelle Themen schreiben zu können.