We already looked at Telepresence in the TechUp for Ambassador and now want to deepen it and try it out hands-on.
Here again as a little reminder:
What is telepresence?
Telepresence allows parts of a complex Kubernetes application to run locally.
Cloud native applications can quickly become too large and complex to handle with all moving parts and Start dependencies locally. With Telepresence, a smart proxy is used to track the traffic of a specific forward services (Microservice) to the local development environment. This is how your own computer or laptop becomes, so to speak integrated into the Kubernetes cluster.
The entire application is then called via the normal url or a certain preview url, which routes the traffic of the target services to the local machine. From a technical point of view, a header is added to the request. On the basis of this header, the Telepresence proxy then decides whether the traffic is sent to the real service or to be routed to the locally running service.
Telepresence was recently released in version 2.0, which is no longer written in Python, but in Golang. In addition, version 2 was specially developed for use in corporate networks, for example in combination with VPNs.
Specifically, there are two modes that decide how the traffic is forwarded. In the default mode all traffic is routed directly to the local machine, the running application is completely influenced. The collaboration mode allows only certain users, via a preview url, to access the local running instance of a managed microservices. The application itself remains unaffected and can continue to be used normally.
The big advantage of this concept is the time saving. In the case of short tests in the cluster, the complete CI / CD process can be skipped, but it is possible to guide only certain users to the local instance. So you get a much faster feedback, and you can exchange ideas much more easily with pair programming. In one heterogeneous systems, it is often difficult to reproduce a bug locally. Here, too, Telepresence can remedy the situation by simply debugging the local instance and then carry out the necessary fix directly in the cluster.
The following picture describes the architecture of Telepresence. The so-called Traffic Manager controls where certain traffic is directed. As a sidecar proxy container, the traffic agent ensures that all containers can be addressed.
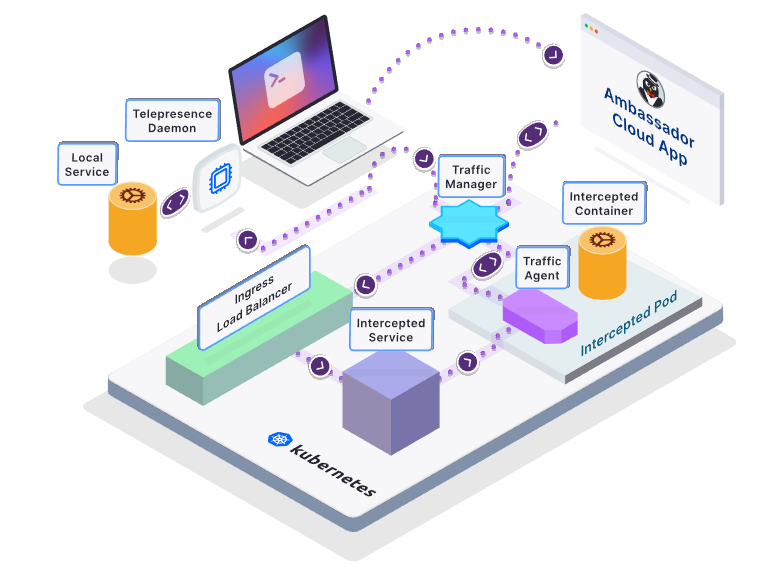
Figure: Source: 31.08.2021: https://www.getambassador.io/docs/telepresence/latest/reference/architecture/
Telepresence must be installed and configured locally and in the cluster. Forwarding can then be carried out by the local
computer which should have with a valid kubeconfig.
Hands on
In order to be able to test telepresence quickly and easily, we use the demo Kubernetes cluster from Ambassador, more precisely described here. Of course, you can use telepresence with a normal or even self-hosted K8s cluster.
It is important here that kubectl is configured accordingly in order to use the new kubeconfig.yaml. This can
can be done, for example, via an environment variable:
|
|
Now we want to install Telepresence on our MacBook, we use
the Quickstart Guide for reference.
After we installed Telepresence with brew, we can verify our installation with telepresence status.
This command gives us useful information about the current status of the daemons.
Then we want to connect our telepresence client to the Telepresence traffic manager in the cluster. Simply, with this command we hang our client in the Kubernetes cluster as if they were in the same cluster and network.
|
|
To be able to verify that we are effectively in the cluster, we can use the Kubernetes API Server, for example requests. Here we expect a ‘401 Unauthorized’ error.
|
|
Here we can now see that all network traffic including DNS resolving etc. is routed into the cluster and we have a connection to the API server in our Kubernetes cluster.
This setup allows us, among other things:
- to access and use all cluster services
- to develop only one dedicated microservice locally and to use all real moving parts in the cluster
- to be able to debug, analyze and solve occurring errors directly without laborious, local readjustment
This also means that we do not have to access resources in the cluster via external urls or the like when developing. We can, like the application or the microservices, use the internal DNS or service names. Cool, or? 🚀
Next we want to deploy a simple demo project (we are using the already known demo project from Edgey Corp) with the following command:
|
|
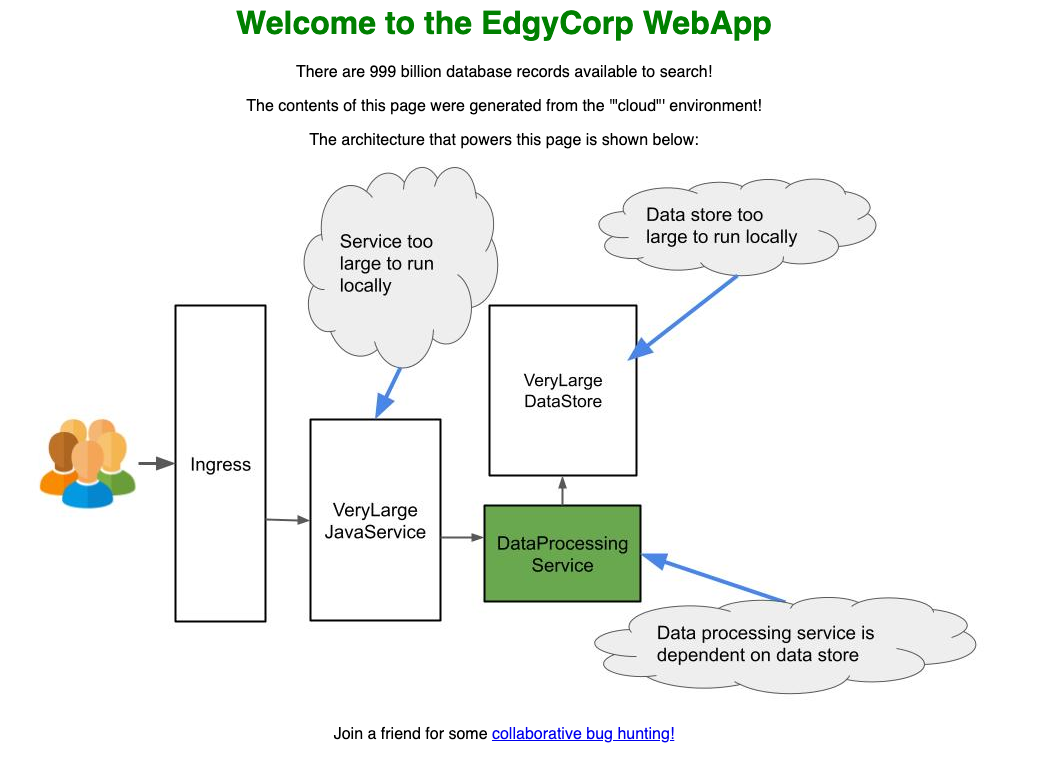
In detail, this demo project consists of three different services, the VeryLargeJavaService asks
the DataProcessingService for some data and renders the page. The VeryLargeJavaService receives the
color, which is then used for the image and the heading during rendering. The DataProcessingService consists of
different endpoints, one endpoint queries a database, the VeryLargeDataStore, in the background.
After a short time we see via kubectl get pods that all pods are running and the demo is ready for use.
Via (http://verylargejavaservice.default:8080) [http://verylargejavaservice.default:8080] we can start the demo project
call.
This call would not work without a previous telepresence connect, since the dns name is otherwise unknown. Bacause
our local machine is part of the cluster, we can call this url directly.
A green title and a green pod can now be seen in the demo app.
The first change
Now the time has come, we want to make a change to the demo project and then mount the change on our local machine into the cluster.
We want to change the color of the heading, which is queried via the DataProcessingService.
For this we first check out the repository, install and start the DataProcessingService.
|
|
Once everything is started we can check the local version of the DataProcessingService by
we call localhost:3000/color. Here we see that the color ‘blue’ is coming back.
Now we want to hang our locally running application in the cluster, we can do this with the following command. It is important here that the correct name and port of the Kubernetes service to be intercepted is specified. In our example this would be:
|
|
However, this command only works if the telepresence connect has been executed correctly beforehand and still is active.
If we now load our page again, we see that the heading is blue, the new value from our local microservice.
From a technical point of view, this command directs all data traffic that occurs in the cluster on dataprocessingservice:3000
to arrive at localhost:3000 on our local client. Is our application not running locally or on another
port it cannot establish a connection. We could recognize this from the null values in the example and generally the color ‘gray’in the picture.
Now we can also go there and change the color to ‘purple’, for example. To do this we adopt the
constant DEFAULT_COLOR in the file edgey-corp-nodejs/DataProcessingService/app.js. The NodeJS server detects
the change automatically and compiles and restarts itself. After a short waiting period, the change is directly via the
normal cluster url visible.
Finally, we can end the current interception with telepresence leave dataprocessingservice.
Here you enter the name of the Kubernetes service again.
Of course, several interceptions can be set up at the same time, these can be viewed with telepresence list.
Own preview url
In the previous example, we have now intercepted all the network traffic that is going to the service in the cluster.
Often, however, you only have the use-case, to initially show changes to a dedicated person or group.
Telepresence offers a so-called preview url for this. To do this, you have to be registered with Ambassador,
this is done with the command telepresence login.
Then we start a new intercept like before, because we are logged in we are asked for further configurations.
We use verylargejavaservice.default, 8080 and n as parameters. We can use the default value for the fourth param.
We then get a preview url in the output of the command. The complete input and output should then be something like this:
|
|
Here we can now view the locally running version via our preview url without affacting the
cluster url http://verylargejavaservice.default:8080/. Technically, it works through a
header, which is set when the preview url is called. The Iigress- & traffic controller recognizes this
header and decides to which service the request should be directed.
Of course, we can also appenden the header manually, so we don’t have to change the url.
Error handling
When we tried it out, we sometimes had crashes or performance problems. Apparently we occured
longer waiting times or inactivity due to timeouts or disconnections. A possible solution could be
to end the current session completely with telepresence quit and then reconnect again with telepresence connect.
Conclusion
Telepresence is a great idea for solving recurring problems or use cases quickly and easily. Unfortunately, there were performance or stability problems during the evaluation, there is certainly still room for improvement here.
Nevertheless, the use of telepresence is recommended as soon as lengthy or complex CI / CD processes are part of the project. Basically, however, you have to ask yourself whether you want to use the real resources in the cluster for developing. With a large development team, conflicts or broken, wrong states can quickly arise. Here you could think about the use of local mocks servers or the like.
Stay tuned! 🚀
This text was automatically translated with our golang markdown translator.