If you have already made your first steps with Go, you know that it is not always easy to find the ideal library if you don’t always want to reinvent the wheel. In its relatively short lifespan (Golang exists since 2009), Go has had enough success that a global community and a corresponding library ecosystem has formed. For example, there is a well-kept list of all Go-relevant projects and libraries under https://github.com/avelino/awesome-go. As a result, many problems were solved several times and made available as a repository (the dependency management with Go still relies on Git repositories).
At b-nova, we always strive to have the best breeds in action. Lately we have been developing more Go projects and for this reason we would like to present our Bread & -Butter Go-Library: namely the CLI duo Cobra and Viper.
Who is spf13?
Before we look at Cobra and Viper any further, I would like to say a few words about Steve Francia, also known by his abbreviation spf13. Steve is well known in the Go community and is the acting Product Lead of the Go programming language at Google. He is also the inventor and main developer of Hugo, the static site generator (lern more about SSGs with Hugo in our TechUp about JAMstack), and Cobra and Viper.
Cobra - The library for the CLI
Cobra is a widely used library to quickly write CLI-capable software in Go. For example, in addition to Hugo, the well-known Kubernetes CLI or the GitHub CLI also use the Cobra library. Cobra provides the option of using POSIX-compliant flags, nested command structures, global and local parameters, customized help outputs or auto-completions for the well-known shells such as Bash, Zsh or even Powershell.
Cobra uses a cleverly conceived strategy pattern to map all possible command structures. Let’s take a quick look at what this is all about.
Command line and CLI structures and Unix philosophy
We’ve all probably used a CLI tool before. There are very simple commands such as ls, cd or cat that are used to navigate and / or read files.
But there are also CLI tools that can do a little more and are often used these days.
A good and well-known example would be the CLI for Kubernetes: kubectl.
This allows you to connect to a Kubernetes cluster and operate the cluster completely via command line.
If you’ve never thought about it before, pretty much all CLI tools follow a certain convention so that you can use these tools intuitively, even if you don’t know the specific implementation of a new CLI tool exactly.
This convention is also known as the Unix philosophy. In a nutshell, and I quote Peter H. Salus from 1994, every tool is subject to the following properties:
- Write programs that do one thing and do it well
- Write programs to work together
- Write programs to handle text streams, because that is a universal interface
We will keep this in mind as much as possible when designing our CLI. We shall see why this is so important. Next we would like to take a look at what a usage of a CLI looks like. This is also subject to conventions that can be derived from the principles of the Unix philosophy.
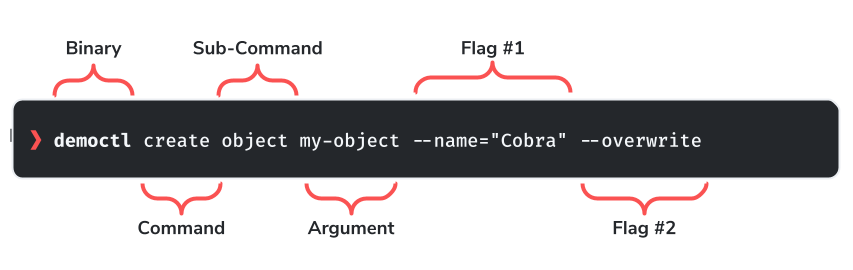
Using the example of kubectl, I will briefly explain the structure.
First the top-level command. This is the binary that is called. In the example above this is democtl and kubectl simply kubectl.
Then comes the actual command (often describes as the verb) and can describe what needs to be done.
|
|
The terms are often called differently and can alternatively correspond to the format below. This is primarily a matter of taste, but certainly good to know if you know the two spellings.
|
|
In order to use Cobra, the command structure must be mapped in the go files. For a classic CLI application, this can look like this:
|
|
The commands.go represents the lowest level, the rootCmd, of the CLI application. This then implements its sub-commands. Here is a template how the implementation of these Cobra commands can look like:
|
|
Viper - The library for the configs
Viper is just like Cobra a go-library which takes over the whole configuration of the application. Just like Cobra, Viper is also used in many Go projects and is now the gold standard for application configurations.
Supported formats and config data sources:
- JSON
- TOML
- YAML
- HCL
- envfile
- Java properties config files
- Environment variables
- Remote Config-Systems like etcd or Consul (plus Live-Watching)
- Buffer reading
Important properties to consider at Viper:
- Viper acts like a singleton: Nevertheless, Viper can also be instantiated several times.
- Viper can be used completely independently: Viper can be used entirely without a Cobra.
- Config-Keys are case-insensitive: Since different sources are used for the configuration, it is impractical to guarantee case-sensitivity
The top calls at Viper in a nutshell are the following:
|
|
On your own
Since we have recently reported in detail about the JAMStack, we are now building a simple CLI tool together which should provide the following functionalities:
- clone any Content Git repository
- Convert Markdown files to HTML within the repo
- display the converted content
With this CLI we can convert Markdown from a Git repository locally using a terminal. This functionality is the basic structure of a full-fledged static page generator such as Hugo or Gatsby.
jamctl - our CLI with Cobra and Golang
In this project we focus on three possible commands, also called commands:
- add / create
- get
- list
- update
- help
Install the libraries
In our Go project we first install the two libraries as follows:
|
|
For this exercise I have uploaded a Git repository on GitHub, https://github.com/b-nova-techhub/jamctl, which you are welcome to use for this. This contains all the Go Source files, as well as a Makefile with which you can build the project through.
|
|
project structure
The project structure is based on the example above and implements the four commands defined above under cmd/.
|
|
add-Command
The add \ command adds a new content repository. A check is made whether the repository already exists in the target directory. If not, it will be cloned into the directory there.
|
|
This is the cmd/add.go that we need to add to the cmd \ project directory:
|
|
get-Command
The get \ command reads out the desired content repository and converts all the Markdown files in it to HTML and outputs them in StdOut.
|
|
This is the cmd/get.go that we need to add to the cmd \ project directory:
|
|
list command
The list \ command checks whether and which repositories are already available in the target directory and displays its project name (folder name) as a list.
|
|
This is the cmd/list.go that we need to add to the cmd \ project directory:
|
|
update command
The update \ command checks whether a repository already exists. If so, it deletes the corresponding directory and clones the repository again in the same place.
|
|
This is the cmd/update.go that we need to add to the cmd \ project directory:
|
|
help command
The help \ command shows all possible commands and also shows which flags are allowed for which command.
The help command is generated automatically by Cobra and reads the declared metadata from the corresponding cobra.Command \ definitions.
This help output is also output when the ctl is simply called. This behavior could be adapted, but in our implementation it is solved that way.
|
|
completion command
The completion \ command is also a command generated automatically by Cobra. This issues a shell-specific autocompletion declaration which can be generated for your shell of choice (bash, fish, powershell or zsh). I think this is very useful.
|
|
It should be noted that Cobra can also automatically generate documentation in different formats. Since we can now deal with this separately, I recommend taking a look at the official documentation: https://github.com/spf13/cobra/blob/master/doc/README.md
using the jamctl
Before we can use the jamctl we first have to build the binary.
There is a Makefile in the Git repository which automates the compilation process.
There is the option of having the binary built according to bin/ using make build or using make install directly according to the specified $GOROOT, by default under $GOPATH/bin or if set $GOBIN, whereby the jamctl can be called without direct reference.
For the sake of simplicity, we opt for the latter case:
|
|
From now on we can call jamctl in the terminal and test our project.
If you do not have a content repository with the associated markdown files at hand, you can also use one of our test repos: https://github.com/b-nova-openhub/jams-vanilla-content.
There are sample Markdown files with a corresponding metadata header under content/de/.
For this we use our add \ command as follows:
|
|
Now we can check whether the repository has been created and check that it is best to use the list \ command:
|
|
If you have not specified the --targetPath by flag, the repo should be created under /tmp/jamctl and cloned as a Git repository.
|
|
Very good, seems to fit. Now we need to be reminded that the header is marked by an HTML tag.
Next we want to get the content output as HTML. For this we have the get \ command which converts the repository to Markdown files parst and these.
|
|
The header looks like this:
|
|
It is important to know that the current implementation of jamctl listens to the delimiter and uses it to read the front matter (meta data).
This is by default <content-header>, e.g. we have to tell our CLI via flag that the delimiter is different in this case, namely ---.
Next we want to get the content output as HTML. For this we have the get \ command which parses the repository for Markdown files and converts them.
|
|
Global config file
The configurations that are entered at runtime via the arguments and the flags can also be saved in a config file. The idea is that the config file is in a home directory and the application can be configured using it, or at least alternatively that the config file can be specified using a flag parameter when calling jamctl.
The config file will therefore be located in the home directory ~/ and should contain the following entries. These are all configuration entries that we use during runtime:
|
|
Conclusion
So now we have written a CLI together with Cobra in Go. It should be said in advance that there is a lot more to mention when it comes to the implementation of Cobra and Viper, because the devil is, as is well known, in the details. But I think we have already laid the basic knowledge here to encourage further familiarization with the Go ecosystem.
If we have piqued your interest, please do not hesitate to ask us for the necessary specialist knowledge for your next Go project.
Next week Ricky will teach us unit testing in Go and present the most common implementations of a test framework.
Stay tuned!
Additional links and resources
Quelle der Gopher-Illustration im Artikel ist Takuya Ueda
https://github.com/spf13/cobra
https://github.com/spf13/viper
https://medium.com/@skdomino/writing-better-clis-one-snake-at-a-time-d22e50e60056
https://www.educative.io/edpresso/how-to-use-cobra-in-golang
https://www.linode.com/docs/guides/using-cobra/
https://blog.knoldus.com/create-kubectl-like-cli-with-go-and-cobra/
https://levelup.gitconnected.com/exploring-go-packages-cobra-fce6c4e331d6
This text was automatically translated with our golang markdown translator.