Argo is an Open Source project in active development that provides several Kubernetes-native applications. Argo is in the Cloud Native Computing Foundation listed as an Incubating project and has therefore already established itself in the cloud. Argo applications take care of workflows, events and CI / CD in a Kubernetes cluster. One of these applications is called Argo CD.
Argo CD is a tool for declarative Continuous Delivery for Kubernetes that uses the GitOps pattern. As already described in one of our older blog post , GitOps is considered a _ ‘single through Git repos source of truth’ _ to describe a cluster declaratively using ‘Infrastructure-as-Code’. A new change is made to the infrastructure by means of a merge request and as soon as the change is accepted, a CD pipeline is triggered that brings the infrastructure to the target state. Argo CD takes on exactly this function in a Kubernetes cluster. Thus, Argo CD is a possible implementation of GitOps in a cluster environment. Argo CD uses Kubernetes-native features such as controllers and <a href=“https://kubernetes.io/docs/concepts/extend-kubernetes/api-extension/custom-resources/ “target =”_ blank”>CRDs.
The end-to-end CI / CD architecture
Specifically, Argo CD provides a GitOps-driven CI / CD pipeline (s). This CI / CD pipeline performs the following steps in a classic implementation:
- The developer commits a Git repo (e.g. GitHub, BitBucket, GitLab, etc.).
- A CI workflow is initiated. (Linting, Testing, etc.)
- A Docker container is created and uploaded to a container registry (e.g. DockerHub, GCR, Amazon ECR, etc.).
- Kubernetes manifest (s) are generated and commited into a separate repo managed by Argo CD.
- Argo CD detects a change in the target state and deploys a new infrastructure or application in the preconfigured Kubernetes cluster.
Exactly this process can be seen quite nicely on the official architecture diagram (source: Argo CD) from Argo CD as shown below:
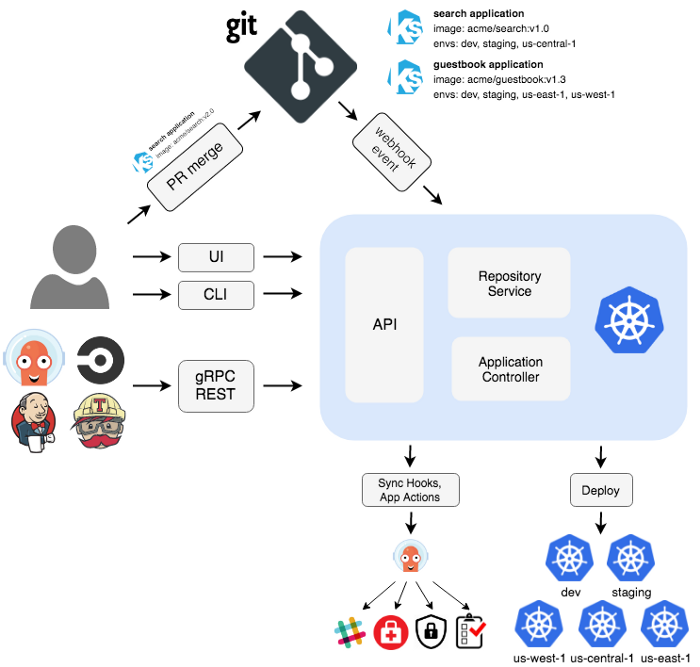
The various features of Argo CD are immediately apparent in the diagram. The user accesses Argo CD via CLI or web UI or can address Argo CD programmatically via gRPC or REST interface. Argo CD can also deploy. This is also done via gRPC or the REST interface.
Webhooks integration for various actions for external consumers, such as sending a notification of successful or unsuccessful deployments in a relevant Slack channel, is possible with Argo CD. There are also more complex rollouts with additional actions for PreSync, Sync, or PostSync states possible.
Argo CD is also completely enterprise-ready and supports common infrastructure components such as SSO, RBAC, monitoring (with Prometheus) or security protocols.
The Argo Magic
The idea with Argo CD is that a target state of an infrastructure, called the target system, is described by a manifest. Argo CD checks whether the target state during operation, called live system, is present. If not, Argo CD lifts the state and usually deployed the delta between Target and Live systems.
Since the delta between Target and Live should only ever be due to a change in the Git repo - the Git repo is considered a single source of truth - the Git process is crucial for triggering a sync process (a Deployment). The decision-makers are therefore people who also manage the Git repo and accept merge requests. Thus the control of the Ops lies with the developers, just as DevOps provides for it.
Argo CD is very flexible about the manifesto. This can optionally be written in the following formats:
- Plain YAML
- Ksonnet
- Jsonnet
- helmet
- Customize
It is precisely this flexibility that makes Argo CD a Swiss knife for CI / CD pipelines in the Kubernetes environment.
In a later step, we will run an application in an ‘Argo CD’ pipeline in a local Kubernetes cluster.
The application also uses a manifest to describe its Target target state. Such a manifest can look like this in plain YAML, for example:
|
|
The above yaml file corresponds to the guestbook-ui-deployment.yaml and the guestbook-ui-svc.yaml of the argocd-example-apps-repo, which we will use again in a moment.
Setting up the Argo CD
The official Argo CD website describes how to set up a Hello World example project here. For our example we take the same Git repo with the same manifestos and adjust them slightly.
requirements
The following prerequisites must already be present in advance in order to be able to set up the Argo CD:
- The guide is designed for local setup on macOS
- kubectl installed
- a
kubeconfigfile should be available (default directory is~/.kube/config)
Local installation from Argo CD
Argo CD is installed with a CustomResourceDefinition on a Kubernetes namespace. To do this, first create a new namespace with the name argocd as follows:
|
|
Then install the Argo CD with the official manifest (CustomResourceDefinition) on the newly created namespace:
|
|
You should now have a namespace argocd with Argo CD running in your local Kubernetes cluster.
Now we install the Argo CD CLI. This can optionally be installed manually or with homebrew.
We use homebrew for phlegmatic reasons. If you have Homebrew installed, simply run the following command with brew:
|
|
Login to Argo CD
Before we can use Argo CD, we have to expose the Argo CD API server IP-technically. For this we can use a classic port forwarding and bind the cluster-internal port 443 to the external port 8080. To do this, execute the following command:
|
|
The initial password for the login is generated automatically and always corresponds to the pod name of the Argo CD API server. The pod name can be found out as follows:
|
|
First log in with the admin user. Use the IP as the target cluster <ARGOCD_SERVER> and the password determined above for the admin user.
|
|
The password can be changed as follows:
|
|
Create an app from a Git repo
Argo CD provides exemplary applications that we can use in the local sample infrastructure.
The repo can be viewed at https://github.com/argoproj/argocd-example-apps. We are going to create an application called guestbook that will use the repo.
The application can be created either via CLI or via web UI. We will describe both options here.
Create the app with the CLI
To create the application via CLI, use the argocd CLI as follows:
|
|
The repo is given as a parameter with the flag --repo. The project to be used is specified with the flag --path.
Creating the app with the web interface
Pick up your browser of choice and go to https://localhost:8080/.
You will see a login window. Use the admin user with the password that we were able to determine in the above step.
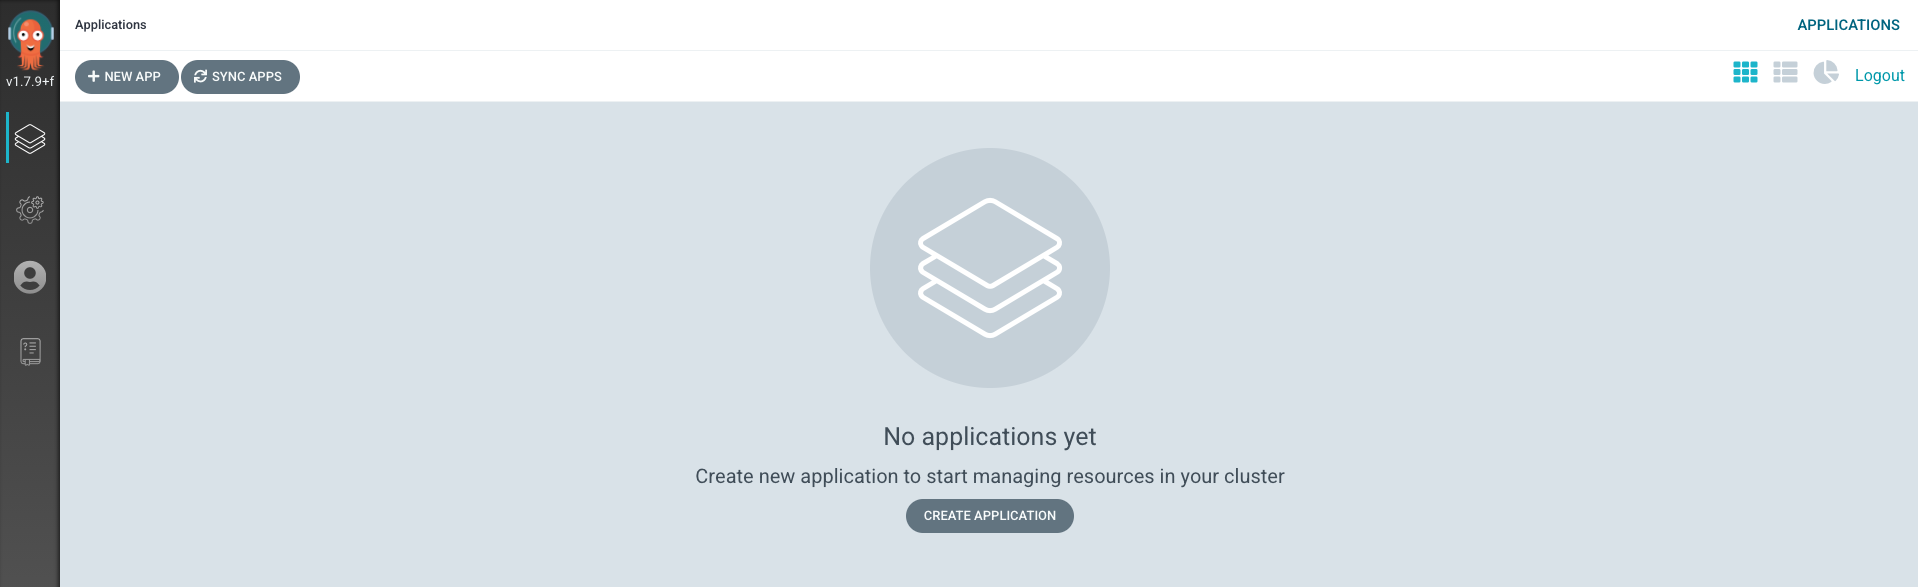
After successfully logging in, you should see the following web interface. No application is available yet.
To create the application, click on + NEW APP. In the following modal, use guestbook as Application Name, default for Project and Manual for the Sync Policy.
Further down in the same modal, use https://github.com/argoproj/argocd-example-apps.git for the Repository URL, HEAD for Revision and guestbook for Path.
In the Destination tab, use https://kubernetes.default.svc for Cluster and default for the Namespace. All of these options correspond to the parameters used for the single line CLI expression above.
Confirm the creation of the application with the CREATE button (up above in the modal).
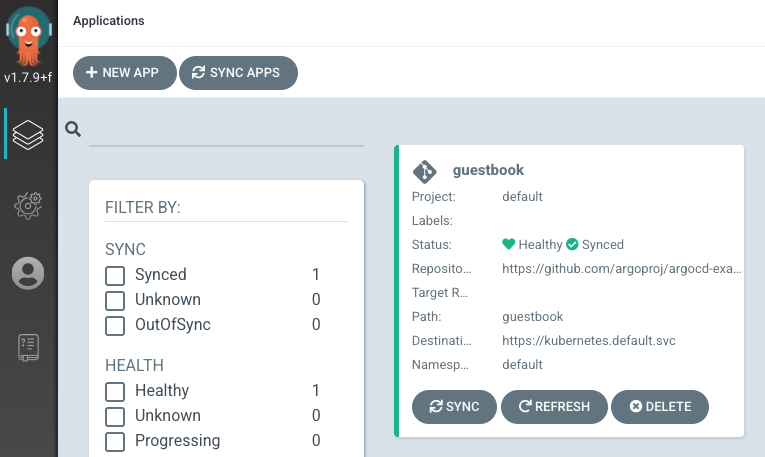
The application guestbook can be seen in the dashboard of the web interface.
Sync the application
The sync corresponds to the coordination between the current state (live state) and the desired target state (target system). Our application was loaded from the Argo CD, but it does not yet correspond to the target state because the application is not yet running or has been deployed. This means that when the sync process is initiated, the application is deployed in order to be able to reach the target state.
The sync can be done just like creating an application via CLI or via web UI. We will - just like before - run through both variants.
Syncing the app with the CLI
First we check whether the guestbook application was created correctly. To do this, we use the CLI’s argocd app get command as follows:
|
|
The status is still OutOfSync. That means not yet deployed and no Kubernetes resources have been created. To start the sync process, simply execute the following command:
|
|
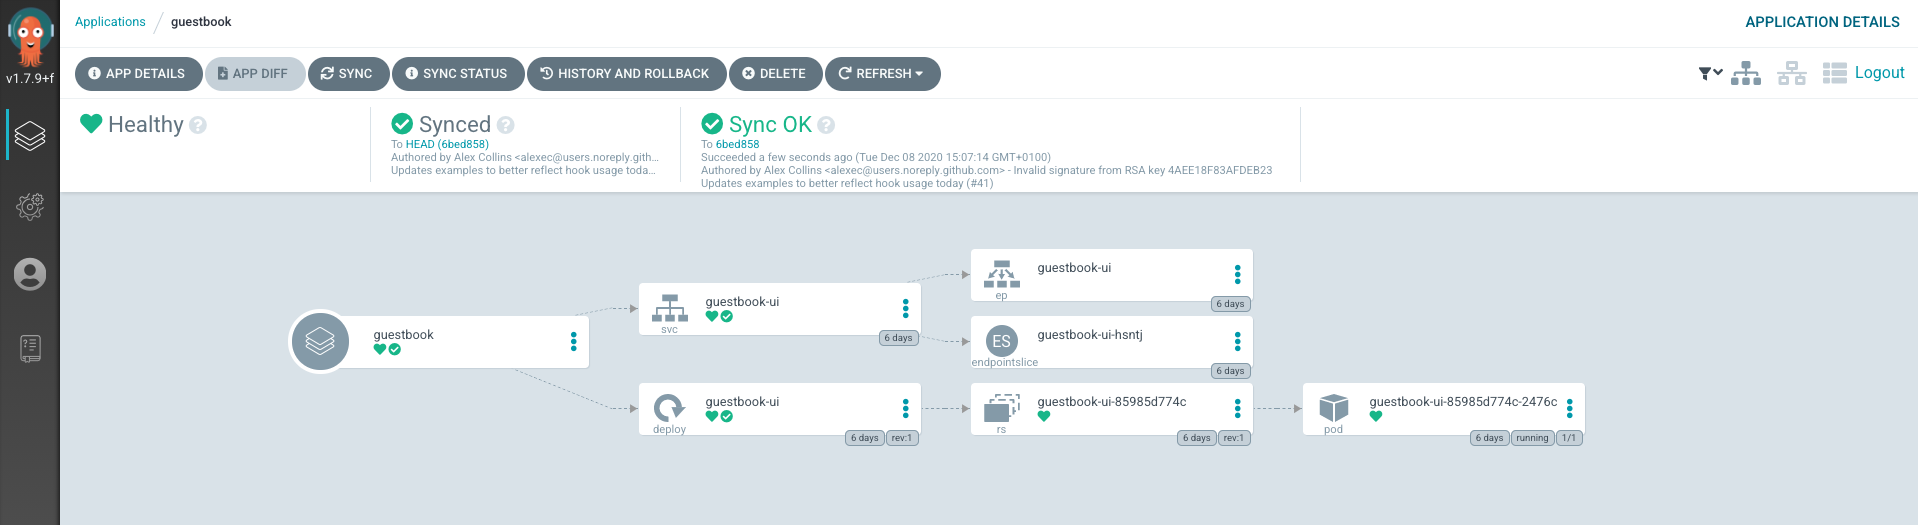
Check the status of the application again. Now the status should be Synced and the health Healthy.
Syncing the app with the web interface
The sync process can be started just as easily in the web interface.
The SYNC button on the guestbook application triggers exactly the process of the same name. Confirm in the following modal with Synchronize.
When the application is called, the status and health are displayed as below after a successful sync.
Congratulations! Now you’ve built your first GitOps-enabled CI / CD pipeline. It wasn’t as difficult as originally thought.
Finally, you can still call the actual guestbook application.
For this, the port must still be exposed accordingly. Execute the following command and then call http://localhost:8000/ in the browser:
|
|

Conclusion
The path from the local Argo CD instance listed here to your daily business requires a little more know-how about CI / CD and Argo CD. In the real world, there are other questions about how best to design and roll out a GitOps process.
Argo CD is on the right track and makes a good impression at first glance. A Kubernetes-native CI / CD solution that skilfully implements the GitOps pattern is currently looking for its equal.
We at b-nova will increasingly deal with the DevOps topic and know how to apply the best breeds for your specific use case.
This text was automatically translated with our golang markdown translator.