Basics
In today’s TechUp we are once again dealing with a topic related to Go. We had already written several TechUps about Golang and would like to refer to the previous articles.
- Practical introduction in Go
- gRPC with Go-Microservices
- How to build a elegant CLI-tool with Cobra in Go in 15 minutes?
- Testing in Go made easy, that’s how!
We at b-nova have already gained a lot of experience with Golang and today we want to introduce you to a new aspect of Go. According to the annual (2021) JetBrain’s The State of Developer Ecosystem 2021 the most widespread framework in Golang with 40% is Gin (maybe worth mentioning here certainly the fact that 43% of the participants said that they do not have a specific framework in use). For this reason we take a closer look at gin in today’s TechUp Gin. This offers an API similar to Martini, but according to its own information about 40 times as fast. They also show this performance within their Git repository with various Benchmark tests and comparisons.
Routing functions are included from the factory, including patterns and grouped URLs. In the area of rendering, Gin also offers direct options for returning the response as HTML, XML, JSON and other formats. There is also support for middleware. This includes, for example, an authentication process. These standard functions that are provided to you save a lot of boilerplate code and can therefore quickly and easily build a web application or a microservice.
Key features:
- fast performance
- Middleware support
- Crash-free →
- Error management
- JSON validation
- URL management
- rendering
- Expandable
The practice part
Now, as usual with us, let’s move on to a practical part. In order to be able to use the gin framework, you have to install it first.
|
|
The layout
Since we would like to use a UI with this application in order to be able to better display the changing of the different pages and also to show this functionality, you must first create the necessary HTML files. For this we decided to split pages into four parts. This enables you to use the header multiple times, for example, or to exchange it on certain pages.
First you create the header of the HTML page. On the last line you can see that the header also contains a menu.
|
|
The menu is structured as follows in our application:
|
|
The third part of our HTML page becomes the part that is exchanged depending on the URL. Because there should be a start page and a second page that shows more detailed information about the blog. However, we will come to these two HTML templates later.
Now the only thing missing is the footer, which completes the construct and closes the necessary and still open tags.
|
|
The router
Next we will create the gin router, as well as the various routes. To do this, create a variable router from the Gin
Engine Instance, which contains the muxer, the middleware and the configuration settings. This can be created either
with Default() or New(). Since you have already created the various HTML templates, you can use the gin
function LoadHTMLGlob. This loads the desired files using the glob pattern, which is transferred as a parameter, and
links them to an HTML renderer. This means that the templates are loaded directly at the start and do not have to be
reloaded at a later point in time. Then the method InitRoutes() is called, which you will create next. In order to be
able to provide the application now, the method Run still has to be executed.
|
|
For the beginning there should be the two routes for the start page and for the detail page. The first parameter determines the relative path and the second a handler function.
|
|
First, let’s create the homepage. There is the function initPage() for this. Two further functions are
necessary within these functions. The first function that we then have to create is a function to get all blogs that are
saved. And the second function is responsible for rendering the HTML. For this purpose, the gin context is transferred
once, a map (gin.H{}) with the corresponding content and finally the name of the template.
|
|
In our example, the attribute gin.H{} determines which data should be transferred to the HTML template. This is once
the title and once the payload, i.e. the blog articles themselves. Within the header.html file, you could already see
how the data from this map is used:
|
|
The rendering - part 1
The RenderHTML \ function is structured as follows and uses the HTML function provided by the Gin framework:
|
|
The data
In order to have data that you can display, you now have to create a file with the name staticpage.go. Within this you
first create a structured data type with the name StaticPage:
|
|
For test purposes, for the sake of simplicity, create an array with the type StaticPage, which reflects our test data.
|
|
Then you have to implement the function GetAllBlogs(), which you call within the initPage() function. This returns
the previously created StaticPage array with the test data.
|
|
The start page
The corresponding HTML markup must now be created for the start page. To do this, create the file index.html. First
the header of the page is integrated. After the heading, a section opens in which you have access to all the data from
the payload that you have transferred. And finally, the footer is included so that all tags are properly closed.
|
|
You can then build and start your application for the first time:
|
|
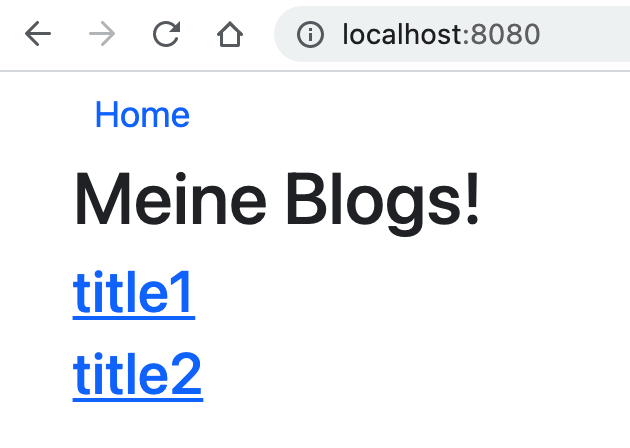
As soon as you call up the address http://localhost:8080/ in your browser, you should see the following:
The detail page
Since it should now also be possible to have a page that shows more detailed information about the blog, the application
needs to be expanded a little. For this you now have to implement the function getBlog, which you have already defined
in the function InitRoutes. To do this, we first read the parameter blog_id from the gin context and save it as a
variable. Now it should be checked whether this variable is empty or not. If so, a 404 error should be output.
|
|
Since there is currently no HTML template for this page, you have to create one now. A very simple layout is sufficient for test purposes. First, the header is included. The available attributes of the blog are then read out and used within HTML tags. And here, too, the footer has to be integrated again at the end.
|
|
If you have now saved everything, you can build and then start the application again.
|
|
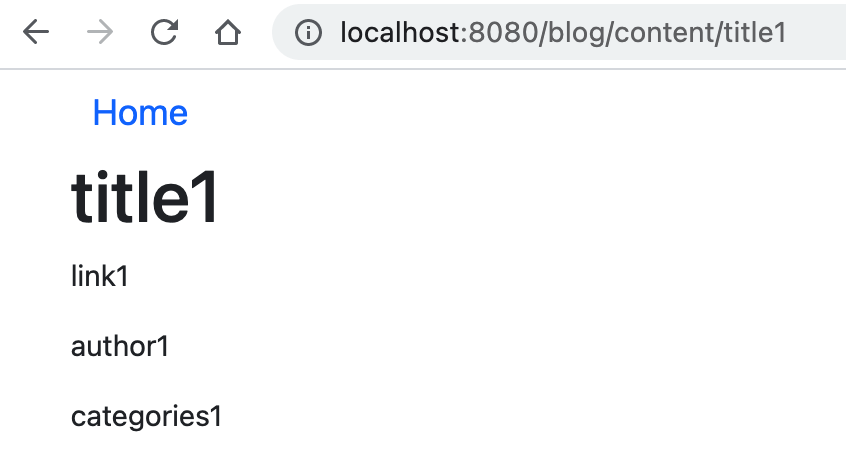
As soon as you click on the first blog on the home page, for example, you will be redirected to the corresponding detail page.
The rendering - part 2
To make the application even more universally usable, the RenderHTML can be converted into a generic variant. This allows you to decide on the basis of the request header in which format the response should be returned. Instead of just using Gin’s HTML function, the JSON, XML or HTML function is used to create the response, depending on the header.
|
|
Now you can replace every RenderHTML \ - method with this RenderByType \ - method.
You can now see two examples of this with the respective response. The first example is the XML variant and the second is the JSON variant.
|
|
|
|
testing
We recently wrote a blog article about the topic testing. Even with such an application, it makes sense to write some tests. Of course, we will also show you how you could write such a test. First, it is about the actual functions and how you could use gin within a test.
We used the package rest for our router functionality. Inside of it you will find its implementation rest.go. Now
you have to create another go-file with the name rest_test.go.
|
|
Within this test file, you can first write a function that provides you with a return value from a router on which your templates have already been loaded. If you want to test several different pages at a later point in time, you will be happy about it.
|
|
As a first example, it is a good idea to test the start page of your application. To do this, initialize your router
using the previously created function. Then define the router on your home page, as you have already done in router.go
. In order to be able to test now you have to create a get request on the start page with the path /. You also have to
determine the HTML which should be checked whether it is present within the response.
|
|
The next thing you need to do is create the testHTTPResponseByHTML \ function. You have to initialize a new
ResponseRecorder so that you can later check the content that comes back from the page. You must transfer this to the
router together with the request so that the request can be executed. Finally there is the testHTML \ function which
should be used to check whether the body contains this HTML.
|
|
Within this function, it is first checked whether the code within the response body corresponds to a http.StatusOk,
i.e. an HTML code 200. The body is then read out and transferred to the body variable. In the next step, this is used to
check whether the required HTML layout is present. These two Boolean values are again used to check whether the call was
successful.
|
|
If you now want to test another page and, for example, after a p-tag with a certain content, this is also done in next to no time.
|
|
Now you know the most widely used web framework Gin when it comes to development with go! Stay tuned!
This text was automatically translated with our golang markdown translator.