From proxy to proxy

Every developer has certainly heard the word proxy in the context of IT infrastructure. The question of what exactly a proxy is and what it does is the initial question of today’s TechUp. We look at web proxies in general and one subtype of them in particular, namely the reverse proxy. If you’ve been wondering what this is all about, this TechUp is for you. Get in on the action and learn what’s behind a proxy.
In the beginning was the proxy
The word proxy comes from the Latin “procuratorem”, related to the English procurator, which means “to take care of something”. Linguistically, a proxy can therefore be seen as an intermediary between two parties, which is very close to the IT term proxy.
In network technology, a proxy is the link between two computers. In the diagram below, you can see the proxy in its simplest form. There, a computer on the left sends a message to the destination of the computer on the right. Here, a proxy (in red in the diagram) acts as an intermediary between the two devices.

Classically, the left computer is a “client “, which requests a resource from the server via the proxy and receives it as a response. This process is so conventional and so fundamental in network technology, which nowadays includes all communication in private and public networks (such as the Internet), that this process was recorded early in the history of the Internet in a CERN guiding paper.
In this “paper” from 1994, the proxy as such is still reduced to certain characteristics, which today only represent a partial area of what a proxy solution must be able to do. However, the basic idea of the mediator element with the bidirectional communication between two physically separated computer units was goal-oriented. The paper also reduces the proxy to its ability to communicate in HTTP, an Application Layer Protocol, and FTP. This is worth noting in that proxies can interact at the network layer in addition to the application layer, where they can play a broker role.
Perhaps even more important than the distinction of the level of abstraction at which the proxy has to interact is the fact that a proxy rarely comes alone, but a given message goes through a multitude of proxies until it arrives at its destination. Thus, each stop can be simplified abstractly as a proxy. Especially if the message is to go from a client over the World Wide Web to a server, the individual jumps - so-called “hops” - are quantitatively in the higher dozens.

This is important to keep in mind, as the failure or misbehaviour of one of these stops will result in the message not arriving at all, or arriving in an undesirable state, causing further problems if not handled properly.
Is it going forward or backward?
The attentive reader may probably ask why there needs to be proxies between computers at all and what exactly they do. Before we can answer this, I need to make one more subdivision of proxies, namely a subdivision depending on the positioning of the proxy in relation to the source and target systems.
Let’s take a typical connection of a client over the internet to a server for illustration. Here, the proxy can occur at two positions in the life cycle of the message. Namely, between the client and the WWW, or between the WWW and the server. In the first case, one speaks of a Forward Proxy and in the second case of a Reverse Proxy.
Let’s first take a closer look at the first case, the forward proxy.
The forward proxy
In very simple terms, a forward proxy forwards the traffic from clients to the Internet. In doing so, the forward proxy takes on the task of deciding whether a given connection may go out to the Internet and persists equivalent messages in order to make the general traffic to the Internet perform better. In this way, the forward acts as an intermediary between clients and the Internet and thus “disguises” the internal network from the public Internet.

The classic application of a forward proxy is the anonymisation of the source address. Another important function that a forward proxy assumes is as a firewall against requests to target systems via the Internet.
Especially in large companies, the forward proxy is the last instance of a maintained component before a request goes out, and is therefore ideally suited to monitor the entire web traffic, which is what is usually done.
The Reverse Proxy
If a forward proxy forwards traffic from a client to the Internet, then the reverse process is the reverse proxy. In a reverse proxy, traffic is forwarded from the Internet to the destination and the proxy acts as an intermediary between the Internet and the servers.

The application areas of a reverse proxy are numerous and one often finds reverse proxies in a multitude of successively connected proxies, which all cover a different functional area. These include the following application areas:
- Encryption / SSL-Acceleration: Often it is not the web server which is responsible for the encryption of the “Secure Sockets Layer” (SSL), so a proxy takes over this. This can also be done with dedicated “SSL Acceleration Hardware”, which can perform SSL encryption particularly efficiently.
- TLS termination / re-encryption: The TLS termination of an HTTPS request can also be carried out via a proxy. This decrypted request can then also be re-encrypted with a company-internal client certificate.
- If the traffic has to be distributed to several target servers, a proxy enables load balancing of the incoming traffic and addresses a target server with a desired scheduling algorithm. Load balancing can take place either at the application level, the so-called layer 7 according to the OSI model, or at the network level, the layer 4.
- Caching: A reverse proxy can also optimise traffic by storing static files such as images or documents for a certain time. This is called caching and is the main component of a Content Delivery Network (CDN). Examples of a CDN are Cloudflare or AWS CloudFront.
- Compression: A reverse proxy can perform even further optimisations by compressing the content, which leads to an improvement in loading times.
- Spoon feeding: Reduces server resource consumption caused by slow clients by caching the content and returning it to the client in small “bites” - spoon feeding.
- Authentication: A reverse proxy can also authenticate against an identity provider and, for example, generate JWT tokens, which are then passed on to the server.
- Security: A reverse proxy can of course also validate “Web Access Lists” (ACLs) in order to block requests completely if necessary. In this way, the proxy takes on a security function.
- HTTP transformations: A reverse proxy can also perform certain transformations and filter functions on incoming requests and outgoing responses. Typically, header entries can be extended, removed or simply modified.
- Extranet publishing: A reverse proxy can be placed directly between the Internet and an internal firewall to provide extranet functionality. The actual target servers would be on the internal intranet, which would be behind the firewall.
Each of the above-mentioned areas of application certainly deserves its own TechUp, in which the use case would be dealt with in more detail and one could also look at how this could be technically implemented in a given proxy technology. However, that would exceed the scope of this TechUp. If you are interested in the topic, you should definitely take a look at Tom’s TechUp on AWS CloudFront - pretty exciting.
The Gateway and Tunneling Proxy
There is a third group of proxies. These are neither forward, nor reverse proxies, but lie between these two systems. On the one hand, there is the gateway proxy and the more abstract tunneling proxy. I will not go into this further in this TechUp but here are some examples where this third group of proxies is used:
- Internet Gateway
- NAT gateway
- Tunneling proxies on the WWW like Tor
- Switches, routers, PoPs or other internet hardware
There was something about HTTP
Although there are a multitude of web protocols, none is as widespread and ubiquitous as the “Hypertext Transfer Protocol”, or HTTP for short. The protocol developed by Tim Berners-Lee at CERN is still the web standard par excellence and also the abstraction level on which a Layer 7-based proxy interacts. For this reason, I would like to give just a small refresher here on what an HTTP request and its response look like, and how a proxy deals with them.
Basically, an HTTP connection, called HTTP Message, consists of a request, the HTTP Request, and a response, the HTTP Response. The whole connection runs over a TCP connection and is containerised in what is called a “session”.
A request could look like this:
|
|
A possible response would be as follows:
|
|
There would be a lot of explaining to do here, if you know HTTP more deeply, but in the context of proxies, we would like to know how a proxy can handle HTTP. So let’s define how exactly the proxy can act on a given HTTP message.
The following diagram shows the life cycle of an HTTP message. This example assumes only one proxy. In the real world, these are cascaded and the individual transformations have an effect on the subsequent receipt of the message.
![]()
The client sends a request, which is forwarded to the server via the proxy. The request possibly undergoes a transformation λreq and is in the state req' before the proxy and in the state req'' after the proxy. Exactly the same principle applies to the response that goes from the server via the proxy back to the client. This undergoes a transformation λres, where the request has the state res' before the proxy and a state res'' after the proxy.
These transformations can be the addition or removal of a header field, a compression of the body, or even a TLS encryption of the entire message. This possibility is important to keep in mind if you want to assess the behaviour of an overall architecture with several proxies, perhaps to identify and isolate a faulty transformation by debugging.
Proxy in practice
As a developer or DevOps engineer, one typically has to deal with the reverse proxy. This can be, for example, a load balancer, which splits the incoming traffic among a large number of instances of the application server. This load balancer can be provided with different technologies. Now we would like to give a brief overview of what contemporary reverse proxy solutions are available on the market and how they differ from each other.
A proxy technology is contemporary if it continues to be developed and supports the new web standards on the one hand and on the other hand the feature set includes certain cloud and containerisation approaches. This definition leads to the following technologies (as of 2022):
- F5’s NGIИX
- HAProxy
- Traefik
- Envoy
- Cloud provider solutions such as AWS Elastic Load Balancing or Google Cloud Load Balancing.
Let’s take a reverse proxy out of this list and set it up locally on the computer. Although NGINX is now widely used, HAProxy is one of the most popular and well-known solutions. Let’s therefore start with an idiomatic HAProxy.
HAProxy in action
Since we at b-nova are in the cloud world and like to deal with applications in a containerised form, let’s say in advance that HAProxy offers official images on the Docker Registry.
As of the writing of this article, version 2.5 is available there as an image. The description on the official Docker Registry page of HAProxy describes how to configure it and bring it into an image. This looks like this:
|
|
It also shows how to build the image and how to validate the configuration using a container instance of the built image. Finally, the execution of the container is described. This looks like this in the command line:
|
|
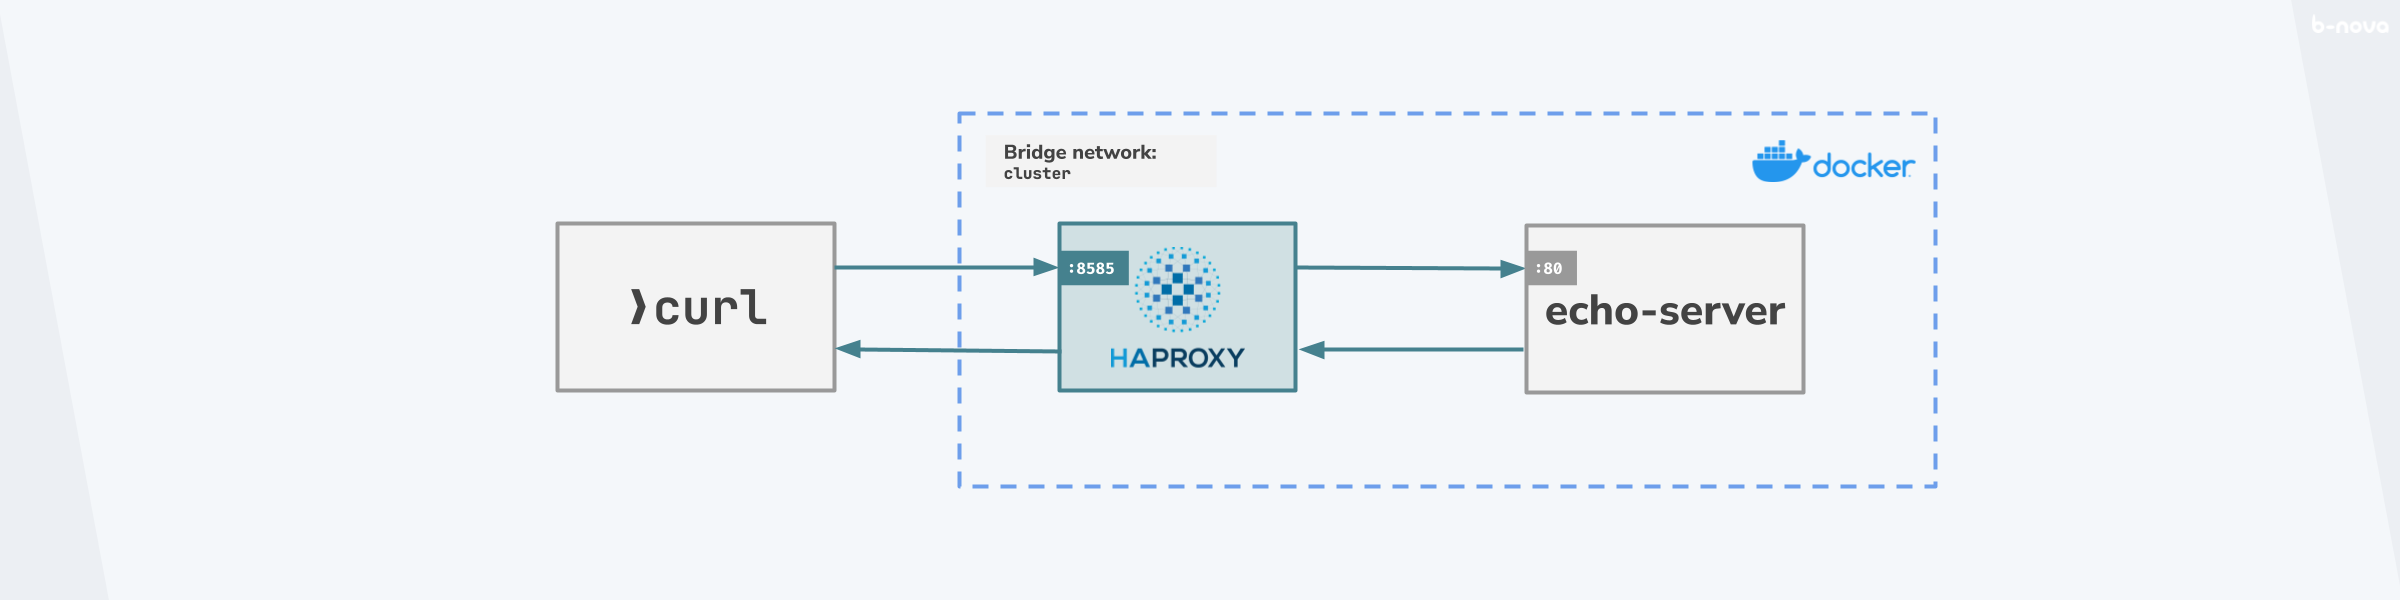
So far, so good. But with this we would like to simulate and reproduce the whole route from the call of an HTTP message via the HAProxy to a target server. The target system, the Origin server, will be an instance of ealenn/echo-server in our case. The proxy will forward the HTTP request to this echo-server and send the HTTP response back to the sender. The call for this simulation does not come from the Internet, but classically via the curl command. Roughly, this constellation can be sketched as follows:
The idea is given, now we can start and assemble the components. First of all, we need a valid haproxy.cfg configuration file for the HAProxy.
I. The configuration
The haproxy.cfg configuration file is the heart of our simulation, because pretty much all variables are mapped there. The format of such a haproxy.cfg is HAProxy-specific and is described in detail in the documentation.
|
|
The haproxy.cfg configuration file has 4 sections, or “stanzas”. These are very well described in an official article on The Four Essential Sections of an HAProxy Configuration. Here is just a brief outline of them:
-
global: Under theglobalstanza, cross-process, low-level configurations suitable for security or performance tuning are grouped together. In this example we have only onelogentry, which logs outinfo-LogLevel into thestandard output. -
defaults: Under thedefaultsstanza, default values are defined which can then be overridden by more specific sections. This is useful for larger configuration files that have many backend or frontend instances. In the example we usemode http, which means that everything should run on the application level or OSI level 7 as default. The alternative value would bemode tcp. Otherwise there are certaintimeoutvalues for the corresponding operations. -
frontend: Besides theglobalanddefaultsstanzas, there are two important sections that are mandatory. Thefrontendstanza defines how the HAProxy listens to incoming requests. In the example, port8585is bound for incoming traffic. This is forwarded to a default backend serverbe_srvr. -
backend: Thebackendstanza defines the target system(s) where incoming traffic must be forwarded to. In our example, there is no load balancing, as this would require us to specify at least two backend servers. However, there is one serversrvr0with the address127.0.0.1:80.
The configuration file natively supports feeding environment variables. This is very useful if you want to keep containerisation flexible. In our case, it is advantageous to handle the source and target variables dynamically and to pass them along at runtime of the containerised HAProxy. For this reason we make a slight adjustment to the above haproxy.cfg configuration file and replace the bind port in the frontend stanza, as well as the server address (there the IP and the corresponding port) in the backend stanza.
The two stanzas in the haproxy.cfg then look like this:
|
|
If you have already installed haproxy as a dependency somewhere, you can use haproxy -c -f /path/to/haproxy.cfg to validate the configuration. If not, this can also be done with the container we are about to set up.
II. The containerisation
The Dockerfile is already given and we can actually leave this as it was already shown as a template. The default path of the haproxy.cfg configuration file is /usr/local/etc/haproxy/haproxy.cfg. It is important that the configuration file created above is in the same directory as the dockerfile now created.
|
|
III. The simulation
Since we are reluctant to cascade a multitude of shell commands, I suggest we include all the necessary steps in a bash script. This will make the whole process more transparent, traceable and easily customisable.
The idea here is to use Docker and the Dockerfile to build an image b-nova-techup/haproxy:0.0.0, which then validates the haproxy.cfg configuration file and subsequently starts a Docker network in which the HAProxy runs once and the echo-server once. Afterwards, an HTTP request is fired ten times against the HAProxy via curl with detailed output, which ideally forwards the requests to the echo-server without any significant transformations. Finally, the containers are stopped and the network is dismantled.
And this is how it can look in a bash script. The script is best called run.sh. It is worth mentioning that the port HAProxy listens on is 8585. The rest of the script - I think - is relatively self-explanatory.
|
|
Yes, now we are ready to start the simulation by running the bash script through ./run.sh.
|
|
In stdout curl will output the corresponding HTTP requests and responses. Thus we have successfully implemented the basic functionality of the HAProxy, namely the switching of an HTTP message between a source and target system. Of course, HAProxy can do much more, and it is precisely at this point that it would be interesting to carry out transformations on the request or response, an authentication flow against an identity provider or even traffic shadowing. All this is possible with HAProxy (or another proxy solution like NGINX).
But I would like to discuss these ideas in a second, more detailed TechUp. I hope you now know a little better what a proxy is, especially a reverse proxy, and how to set up such a proxy with HAProxy.
I placed the practical example above in a Git repository on GitHub, you can easily use it accordingly.
Further links and resources
Proxy servers and tunneling | MDN Web Docs