We at b-nova have committed ourselves to the GitOps pattern. This article is another part of a multi-part series on the GitOps topic. If you are new to the GitOps pattern, maybe first take a look at the first part GitOps as Devops or the second part about Argo CD. In a nutshell, the idea of GitOps Git is to be used as a Single-Source-of-Truth for the application, but also infrastructure code (Infrastructure-as-Code).
With Argo CD, for example, you can use infrastructure repos to integrate automated pipelines into your Kubernetes cluster. It is checked whether the target state, described in the corresponding Git repo, already exists on the cluster. If not, Argo CD would initiate the process to establish this target state on the cluster.
The idea of GitOps implemented with werf - the so-called ‘Consistent Delivery Tool’ by Flant - is to be even more consistently than with Argo CD. Instead of just using the infrastructure codebase as a single source of truth, the application codebase is also taken into account with Werf. The whole process is therefore deterministic and idempotent from a GitOps point of view: The whole process, from the Git repo to the running pod in the Kubernetes cluster, becomes even more transparent for all DevOps stakeholders.
In this post we will look at the basic functionality that werf offers. Then we will build a Git repo with werf in a short handson.
The blueprint with werf
werf is written in Go and is basically a simple CLI tool. It is intended precisely for a GitOps case; namely in combination with Git repositories for application and infrastructure, a Docker repository and Kubernetes as a platform.
The following diagram shows the structure of a GitOps pattern with werf:
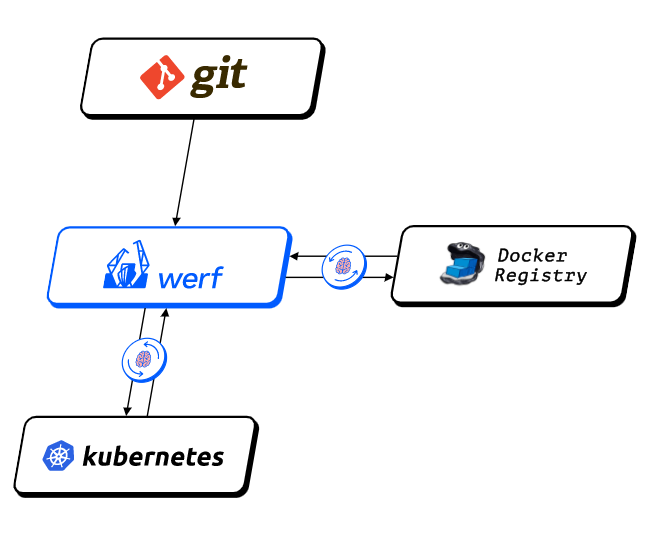
werf plays the link between the Git repositories (above), the Docker repositories (right) and the Kubernetes cluster (below).
With werf converge, the main command of werf, werf offers the possibility of synchronizing the status on the Git repo with the status of the Docker repository with the current status on the Kubernetes cluster.
In other words, werf converge triggers the process, whereby werf checks whether there are already corresponding Docker images in the Docker repository for the existing code state in the Git repo, if so, werf checks whether these Docker images are in of this form are already running on the Kubernetes cluster.
If not, werf initiates the construction, the push into the Docker repository, and the roll-out of the new Docker images.
This process is described in more detail on the official Introduction page.
Thus werf takes care of:
- building Docker images
- the rollout of the application in the Kubernetes cluster
- Ensuring that the application is executable and healthy is running on the cluster
- If necessary, rebuilding Docker images if the code has changed
- if necessary, the renewed roll-out of the application on the cluster
- The cleaning up of obsolete or irrelevant Docker images in the Docker registry
The core functions that werf uses and makes available to the user are:
werf build: Build Docker imageswerf publish: Tag Docker images and upload them to the Docker repositorywerf publish-and-publish: Firstbuild, thenpublishwerf deploy: Synchronize the state of Docker images with the state of Kuberneteswerf converge: Firstbuild, thenpublish, lastlydeploywerf run: Unit testing of the built Docker imagewerf dismiss: Terminate the application in the Kubernetes clusterwerf clean: Delete unused Docker images from the repository
As described earlier, the most important function is werf converge.
You can have werf done by hand every time or werf somewhere automated.
To illustrate this, we’ll try out werf together in the next step.
Throw in action
In order to better understand the core functionality and the feel of werf, we will now set up werf and run through an example GitOps pattern with a personalized Git repository. We are based on the official quickstart from werf.
The idea is that Docker images for multiple applications that are available and defined in a Git repo can be built using werf and then use them to record the local Kubernetes cluster. After the application has been rolled out, we make a change to the code base of an application and see whether and how werf then handles the GitOps pattern.
Requirements
In order for you to be able to participate, you should meet the following requirements in advance:
- Docker installed and running
- Docker Hub Account (or similar Docker repository) available
- Local minikube installed and running (see Minikube Installation)
Fork Git repo
At github.com/b-nova/quickstart-application there is a Quickstart-Application- repo. The best thing to do is fork this Git repo into your personal repo. Then clone the forked repo on your computer (here as an example with the b-nova repo):
|
|
Architecture of the application in the Git repo
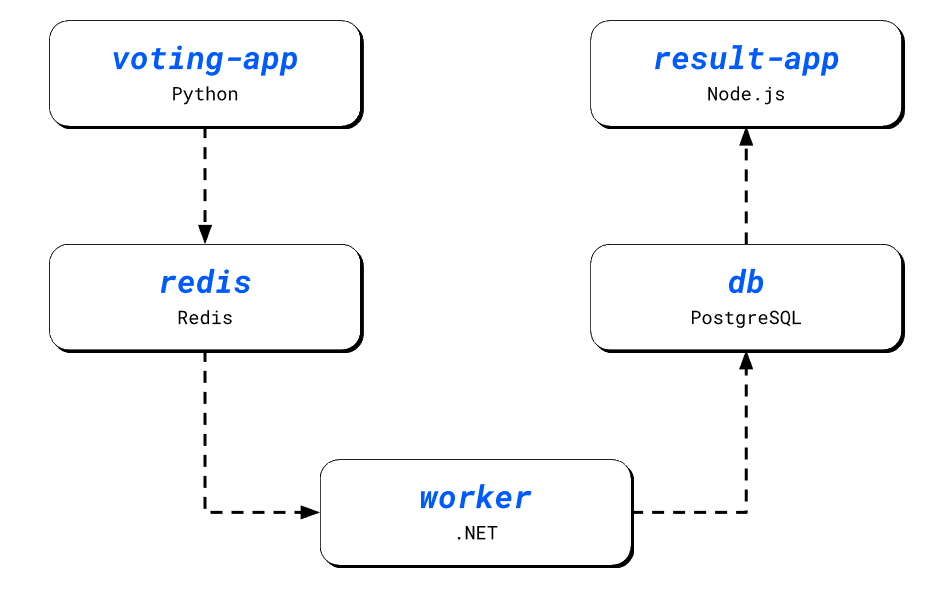
The above Git repository contains 5 components, 3 of which are applications (vothing-app, result-app and worker) and two persistence units (redis and db). Votes can be made with the overall application, with voting-app serving as the input UI for the individual votes and result-app as the display UI for the voting results. The following scheme shows this:
For us, the folder structure is more interesting.
Under the respective sub-folders result/.., vote/.. and worker/.. there is a Docker file that describes the corresponding application as a container.
Under .helm/.. there are Helm charts that describe the cluster configuration of Kubernetes.
The central werf.yaml, which sends the GitOps-relevant information to werf, is still on the root level.
Here the werf.yaml from our Quickstart-Application Git repository:
|
|
Werf.yaml is kept very simple and completely self-explanatory. Now let’s install werf.
werf install
werf has a flexible installation tool that allows you to select the correct werf binary for your target system. That means multiwerf, and this is how it works:
|
|
Just run it and you can use werf version to check whether you can call up the last version.
If everything worked, we are ready to throw on our applications.
Throw converge
Before we go any further, make sure Minikube is running locally and ready to use. If not, try the following. It is important to specify docker as the driver.
|
|
Now switch to the repository.
|
|
And now run werf converge. With the --repo flag, we enter our Docker repository (I use my own), with which werf should synchronize the Docker images to be built.
And with the --repo-docker-hub-token flag we give a security token that the Docker registry knows who we are.
|
|
The output of werf converge looks something like this:
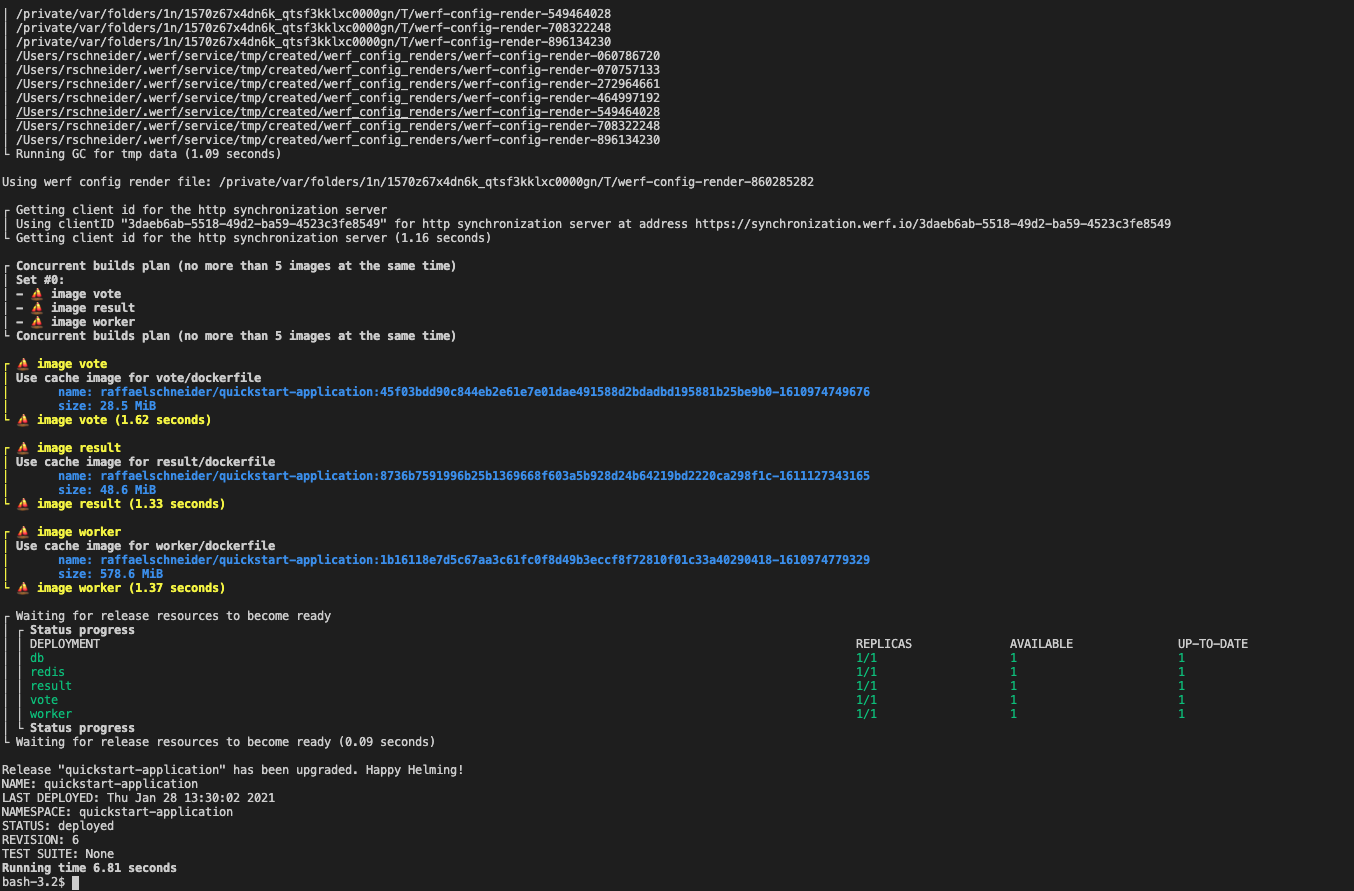
You can see that the roll-out of the Docker images on the cluster is running successfully with one replicas each.
The two front ends, voting-app and results-app, can be found under the following endpoints
Call up http://127.0.0.1:51226/ and http://127.0.0.1:51329/. If the ports are different, the corresponding endpoints can be found using minikube service:
|
|
|
|
The UIs should look like this. Left the Result-App, right the Vote-App.
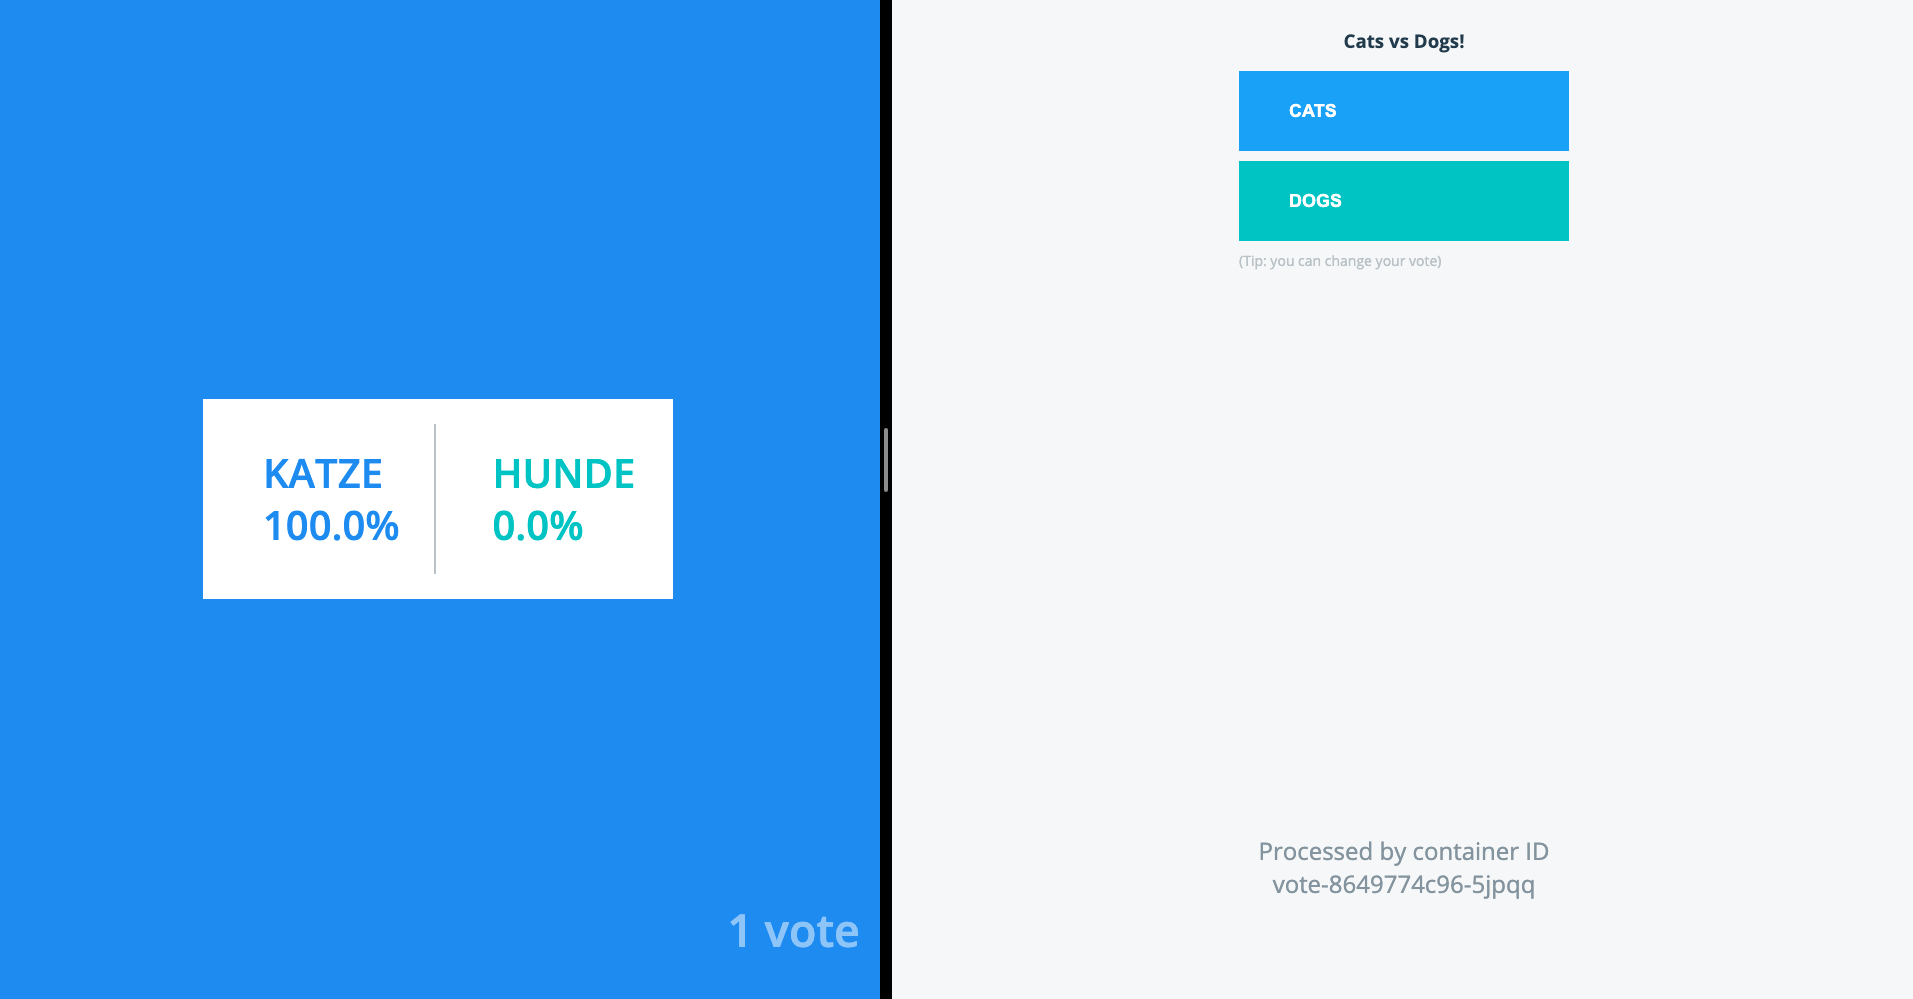
Now it is interesting to know how werf behaves when you adjust something in the repository and execute werf converge again.
For example, you can use the title ‘Cats vs Dogs!’ Exchange the Result-App in the result/views/index.html:
|
|
Then push the change into the repo and run werf converge again.
You will see that the Docker images are rebuilt, uploaded to the Docker registry with a new tag, and the frontend actually outputs the new title as soon as it has been rolled out to the Minikube cluster.
Conclusion
werf is a small but fine CLI tool to quickly and easily introduce a GitOps pattern in your Kubernetes cluster. Not only the infrastructure code but also the application code is taken into account. This enables a holistic GitOps pattern that allows the paradigm from the cradle to the sink.
If you liked the article on werf, let us know! Don’t muss Dmitry Stolyarov, developer of werf and CEO of Flant, personally in his CNCF webinar at Delivering cloud-native apps to Kubernetes using werf.
We at b-nova are enthusiastic about GitOps and would like to support you in making your GitOps pattern a success with werf, for example.
This text was automatically translated with our golang markdown translator.