SvelteKit?
After we got to
know Svelte als Frontend-Compiler bereits im Juni
we want to take a closer look at SvelteKit.
SvelteKit is a full-fledged web framework and an extension that builds on top of Svelte
which uses the Svelte compiler to provide the basis for building modern web applications. The kit itself is very new and
has been available in a public beta since March 2021 and is currently on the Road to 1.0.0. The predecessor Sapper
itself is no longer really developed and users should switch over to SvelteKit.
Difference from Svelte
As stated earlier, SvelteKit builds on top of Svelte. Svelte alone is just a frontend compiler. To be more precise, Svelte provides its own JavaScript/TypeScript compiler from which the client-side JavaScript is being generated at build time. This compiled JavaScript is specialized to adapt the DOM in such a way that as little data as possible has to be exchanged between the server and the client. This has numerous benefits for the user experience. You can find more details on this in the aforementioned first article on Svelte.
The kit, on the other hand, functions as a full-fledged app framework. This allows us to implement all modern best practices like server-side rendering (short SSR), routing etc.
Setup
Similar to our Svelte based ToDo-List, SvelteKit also offers us a command for creating new projects. Now we want to get to know SvelteKit and use a skeleton app with TypeScript, ESLint and Prettier.
|
|
Now that we have successfully started the SvelteKit app, we want to open it via code . (given that you
have VS Code already installed) and examine it more closely.
Hot code replacement
A clear highlight of SvelteKit is the HotCode or HotModule replacement. This allows us to change code, markup and CSS at runtime without having to reload the page. The updates are made incredibly quickly and without the page losing the state, the values of the variables, etc. I think it’s very cool! 🚀
Routing
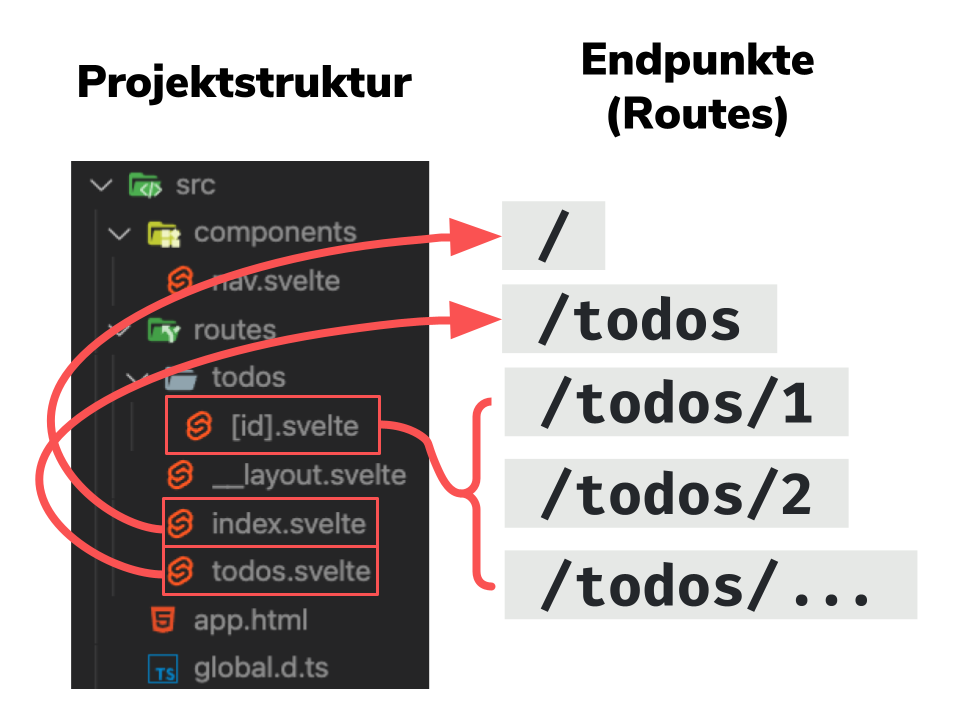
SvelteKit uses a so-called file system-based routing to define and implement pages and urls for the user. This means
that the file structure mirrors the structure of the actual web pages. In contrast to Svelte, the folder structure
under src is slightly different, with the kit there is the folder routes. There are different Svelte Pages, the
file name here symbolizes the url that can be called up.
If you want to define a sub URL, you can create a folder under Routes and create further Svelte Pages there.
First custom route
Now we want to create a new page where our to-do list will be placed later. For this we create a file with the
name todos.svelte under /src/routes.
|
|
After saving, our new page can be reached directly at http://localhost:3000/todos.
Routes with parameters
It often happens that urls contain certain parameters, SvelteKit also offers the possibility to define such
placeholders. We want a ToDo.Item with an ID directly via a URL such as can call /todos/abc.
For this we first have to create a todos/ folder under routes/, in which we can then create our page:
|
|
The square brackets symbolize a parameter that can be received again later in a so-called load() function. Here it is
also possible to set several parameters such as to receive [id]-[number].svelte in a route.
Our URL and routes structure now looks like this:
Navbar
Now we still need a navigation, we want to create this as a decentralized component. For this we create a components/
folder and create a Svelte component:
|
|
We could now integrate this component individually in each page, but SvelteKit offers us a more elegant solution here.
Layout
The structure of a webpage is mostly the same, regardless of the framework or the technology used, there is a header, a body and a footer. Our pages (oder auch Routes genannt) should always only contain the body, the component header & footer should always be included automatically.
For this we create a __layout.svelte file under /src/routes/. With the <slot /> placeholder we can define a place
for the actual content of the pages.
|
|
In addition, the kit also offers the possibility of nesting such layouts.
Customizing
Now we want to adapt header information, for example, the title or certain SEO data, the kit also offers us an elegant
solution for this. We can use the svelte:head directive to overwrite/adapt certain metadata in the header:
|
|
|
|
Here you can see that the meta information of the page can be adjusted without a real page refresh. This is how our SvelteKit application becomes SEO-friendly.
Loading data
In a normal frontend application, the loading of dynamic data is usually deeply integrated into the components. With
the load() function, SvelteKit takes a similar approach to Angular with the OnLoad guard. This function can be
implemented in any Page component and is performed by rendering the component.
With an exemplary Rest API we want to query and
display data via ToDos. For this we implement the load() function in the module -context in our ToDos-Page:
|
|
Here it is nice to see that we can receive the result from the load() function as a parameter in the actual component
and then use it there.
We now want to do the same in our parameterized route for each to-do item individually.
|
|
The big advantage of this structure is that the load() function can be executed on both the client and the server
side.
Rendering & adapters
SvelteKit supports server-side rendering. At first glance it sounds logical, but we want to look behind the facade and highlight the differences to client-side rendering and other types.
First, let’s take a closer look at the well-known client-side rendering (short CSR). The browser receives an almost empty HTML page from the server, has to download and execute the complete JavaScript and can then reload the data asynchronously and display the page. The moment when something is displayed to the customer is the same when the page is fully usable and the customer can interact. This method has the great advantage that the computing power is transferred to the client and no server is required. If the customer has a slow internet connection or insufficient computing power, this can quickly lead to problems.
The server-side rendering (kurz SSR) on the other hand delivers a fully rendered, displayable HTML to the browser. All requests for dynamic data etc. are made on the server. The browser can directly display the page to the customer and then load the JavaScript framework to make the page interactive. This process is called Hydration.
There are differences here depending on the implementation, but most of the rest of the rendering is then taken over by
the front end, since the framework is loaded. The name Universal Rendering is often used for this. This has the great
advantage that it takes less time to display the page. Of course it is a disadvantage that you need a server for
rendering. SvelteKit activated SSR by default.
SvelteKit supports two other types of rendering: Pre-Rendering and Static Rendering. With Static Rendering the entire application is rendered during the build process and delivered as a static artifact. In the ** pre-rendering**, however, only individual pages are statically built and delivered in this way. The Youtuber Franck Abgrall has animated, short videos on his channel that clearly illustrate these processes.
Prefetching
SvelteKit supports what is known as prefetching, which turns out to be very helpful in practice. You can annotate anchor
tags with sveltekit:prefetch, so the load function of the target url is called when hovering or directly when clicking
on mobile. Of course, this only works with internal links to other Svelte Pages, but ensures an even faster and smoother
UX for the customer.
For example, our To Do Detail link would look like this:
|
|
Adapters
In SvelteKit a so-called adapter is used to control the build & deployment behavior of the SvelteKit app. With
the @sveltejs/adapter-static the complete page is built as static HTML files during the build process. For this you
have to adapt the svelte.config.js file accordingly:
|
|
All pages are called up one after the other and further links including querying the Rest API etc. are called up and built. With pre-rendering, on the other hand, only individual pages of the application are rendered at build time; this can be configured for each page.
There are also other adapters that are compatible with cloud providers or the like, e.g. B. the Netlify adapter. The node adapter, which builds and delivers an independent node server, is ideal for normal deployment.
You can of course also find this TechUp at GitHub .
Conclusion
Svelte + SvelteKit = Big Love ❤️ build awesome webapps for app sizes!
After the TechUp for Svelte itself has already met with great approval and interest, SvelteKit goes a step further. SvelteKit closes the gaps that Svelte cannot or does not want to close due to its size. By expanding with the kit, the Svelte app becomes ready for every challenge. k You need a future-proof web application with Svelte including a backend, for example in Go? Make sure to contact us!
This text was automatically translated with our golang markdown translator.