Angular
Angular is a very popular, client-side JavaScript framework for creating so-called Single-Page-Applications (SPA). When speaking of a single-page application, a certain pattern or the structure of a website is meant. Simply put, there is only one HTML document, the dynamic data is changed on the client side or accessed from a backend using a REST API. This creates a very slim and high-performance webpage with a very small bundle size. Another big advantage of Angular is that the application is completely responsive, and it can be used on a mobile device or on the desktop.
The Angular code base is the TypeScript language, which, in contrast to “normal” JavaScript, is typed (typesafe). Angular itself not only offers a framework for SPAs, but a whole platform for developers with, for example, generators, architecture concepts, ready-made solutions and numerous useful tools.
Angular vs. AngularJS
Again and again you hear Angular but also AngularJS, what exactly is the difference and what do the two JavaScript libraries have in common? In short, Angular is the successor to AngularJS, whereby the core has been completely redeveloped and TypeScript is new. Nowadays, there is an LTS version of AngularJS, but the open source project itself links to the “new Angular version” - the normal Angular.
Getting Started - b-nova ToDo List
In this short tutorial we get to know Angular Hands On and create a simple to-do list. All you need is a terminal, an IDE and a browser. We are using Microsoft Visual Studio Code and Google Chrome on an OSX system.
1. preparation
To run Angular we needed NodeJS, download the last LTS version from NodeJS and install it.
Professional tip: If you use OSX, NVM makes it easier for you to work with NodeJS and NPM.
Angular offers its own CLI with many useful commands. Execute the following line in your terminal.
|
|
2. Create a new Angular app
With the following command we use the Angular CLI to create a new Angular project.
Since Angular 10 there is a so-called strict mode, which ensures stricter type checking and generally a smaller compiler.
In general, this option (with the parameter --strict) should be activated in order to identify potential errors and bad practices at an early stage.
Execute the following command:
|
|
Then you would have to choose your stylesheet for the project, for the sake of simplicity we use CSS.
After a short wait, our Angular project is finished and we switch to the new folder b-nova-todo-list.
With the command code . we open the current folder as Visual Studio Code Workspace.
3. Get to know the folder structure of an Angular project
The following screenshot briefly describes the most important components of an Angular project.
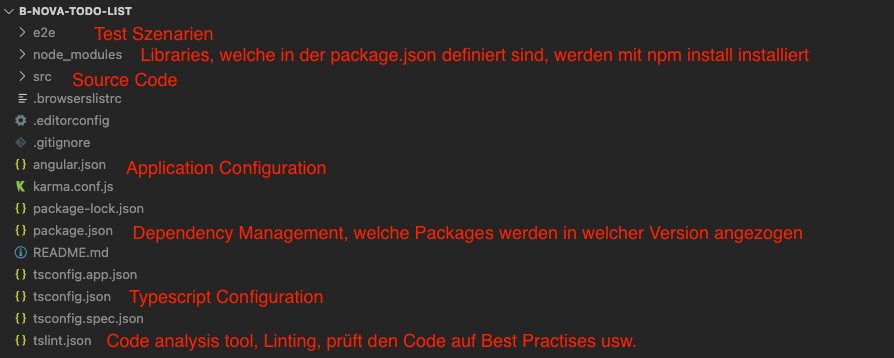
But where is the entry point?
Below the src folder you will find an index.html file, this is the file that is loaded by the browser. Angular itself uses the so-called app-root directive in the index.html as an entry point.
4. The first start of our application
Now it gets exciting, we let our boat into the water for the first time with the following command:
|
|
--open ensures that the application is opened directly in the browser.
You should then see your first Angular app with a demo page under http://localhost:4200/.
5. The first changes to our application
As a first simple change we want to change the HTML element title, for this we open the src/index.html, it should look like this:
|
|
You will see the title BNovaTodoList in the tab at the top of your browser, we now want to change this to “b-nova ToDo List”.
Do you already see the change in your browser? Very well, this happens without any further commands, because Angular recognizes changes in the sources and automatically compiles them again (ahead of time compilation) and reloads the page in the browser (Hot Code Replacement).
Then we want to remove the demo HTML and replace it with our own small basic structure. Replace the content from src/app/app.component.html with the following HTML:
|
|
Now you should only see the heading “b-nova ToDo List” in your browser.
6. The first Angular component
Basically, an Angular component consists of four parts or four files.
name.component.html
The template with the HTML markup of the component.
name.component.css
The component’s CSS styles.
name.component.ts
The TypeScript file of the component, it contains the declaration and the logic of the component.
name.component.spec.ts
This file is also a TypeScript file and contains instructions for testing the component.
But now we want to create our first Angular component, fortunately the Angular CLI provides us with a command:
|
|
Professional tip: As with many commands, there is a shorthand syntax ng g c components/ToDos.
You should now see the following structure below src/app:
|
|
We can delete the to-dos.component.spec.ts file because we do not need it.
If we now look at the template of our new ToDos component, we will see that the text to-dos works should be output. Unfortunately we cannot see it in the browser yet because we have not yet integrated the component.
A component is integrated into the HTML using a directive, the name of the directive must correspond to the property “selector” in the component declaration in the to-dos.components.ts file. In our case the selector is as “app-to-dos”, we now use this in the src/app/app.component.html file to integrate the components:
|
|
Now we see “to-dos works!” In the browser, so we have successfully created and integrated our first component!
7. The ToDo array
Now we would like to be able to define and display an array of ToDos. But before we define the actual items, we have to conceptualize and create a data model. For this we create a folder named “models” under src/app and in it a file “ToDo.ts”.
A classic to-do item consists of a text and a flag indicating whether it has already been processed.
|
|
Now we import the ToDo model into our ToDos Component (TypeScript File) and define a new array with some ToDo items.
|
|
Now we have written three ToDo items in the toDos array, we did this in the so-called ngOnInit method.
In Angular there are so-called Component Lifecycle Hooks which allow us to execute certain logic in a certain phase of a component.
For example, the ngOnInit hook is called while Angular is initializing this component. This is a good place to provide and load data or the like for the component.
But how do the ToDo items get into our template and become HTML? Angular uses double curly brackets as so-called Template String, so variables from the TypeScript class of the component can be output in HTML.
In our to-dos.component.html file we want to loop over all toDos and output them including numbering.
We achieve this with the *ngFor directive, each time we assign the current item from toDos to the variable toDo and the current index to the variable i.
|
|
Then we add some CSS. You can find the CSS code at the end of this blog post.
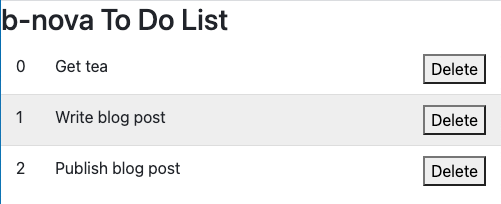
Now we have successfully defined our first component and data from the TypeScript file are output in the HTML template. Our to-do list should look like this:
8. Checking off ToDo items
Before we actually check it off, let’s implement visual feedback. Since the ToDo model already has the field completed, we can use this in Templates Strings in the HTML template, in combination with the Ternary Operator.
Our “.todo” div now looks like this, we can use the toDo variable of the *ngFor loop directly on the same level.
Thus we can output the class done with completed = true items.
|
|
But now we want to set existing ToDos simply by clicking on completed, for this we need a method in our TypeScript component.
|
|
The method toggleCompleted is called with an indexToUpdate and toggles the field completed with the ToDo element at this index.
Now we still have to react to the “Click” event in the HTML, but this is not done in Angular with the “onClick” function known from JavaScript. In Angular there are so-called Event Bindings, you can react to certain events (in our case click) with normal brackets.
|
|
Our .content div calls the method toggleCompleted with the index i with a click and we can check off ToDos!
9. Delete ToDos
Finally, we come to the most pleasant part of a ToDo list, the deletion of ToDo entries.
For this we needed a method, as in the above step, which receives an indexToDelete and deletes it.
|
|
In addition, as in the previous step, we needed a click event on the delete button, which calls our deleteToDo function.
|
|
As you can see when you delete an item, Angular renders the adapted array by itself without any further changes.
Now we have the possibility to look at, tick off and delete ToDo items!
10. Add Entry - Two Way Data Binding
Last but not least, we naturally want to create the possibility of being able to record ToDos.
For this we first need an HTML form with a text field and a submit button.
|
|
Then we want to implement the logic in our ToDos TypeScript component. For this we need a new variable and a method.
|
|
So we now have a variable inputToDoText of type String, which should contain the value of the input field and a method for adding the ToDo item. In the addToDo method, we add a new ToDo element to the toDos array using push and then reset the inputToDoText variable again.
But how does the value of the text field get into the variable? Angular also offers a practical functionality for this, called Two Way Data Binding. With the so-called ngModel directive, an input field is linked to a variable, changes are always updated directly in both directions. This means that the value of the variable is always in the input field, and every change in the value in the input field is automatically updated in the variable.
In order to be able to use this feature we first have to import the FormsModule into our application, we do this in the src/app/app.module.ts file.
|
|
First we import the FormsModule and then add it to the imports array, so we can now use it in our application. As you have seen, our ToDos component is also referenced in this file, this is also necessary (in our case this was done by the Angular CLI).
The Two Way Data Binding is done with normal and square brackets in the HTML file, our text field now looks like this:
|
|
Last but not least, we still have to link our button with the addToDo method, we do this via an event binding to the submit event of the form:
|
|
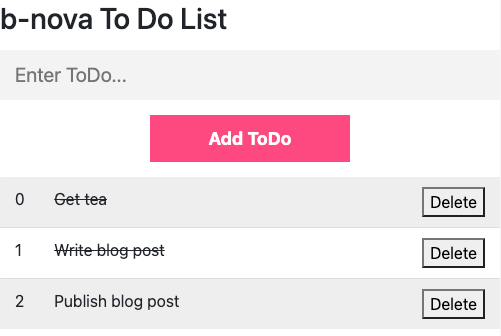
Congratulations, you have successfully created a b-nova To Do List. You can now view, check off, delete and add new to-do items.
The end result should look like this:
Do you need a competent and reliable partner for your Angular project? Contact us!
CSS Code to-dos.component.css
|
|
This text was automatically translated with our golang markdown translator.